Space most path lights 6 to 8 feet apart for a standard walkway, tightening to 4 to 6 feet on narrow garden paths and widening to 8 to 12 feet along driveways. Stairs and risers need a fixture every 2 to 4 feet. That range works as a starting point only. Beam spread, fixture height, and decision points like turns and steps will always pull the real number in one direction or another, so walk the path at night with your lights staked in place before you commit to a final layout.
TL;DR:
- Path light spacing should adapt to path width, beam spread, fixture height, and ambient lighting, with tighter spacing for dark surfaces and broader beams.
- Measure the actual walking line, mark decision points, and test fixture placement at night before fixing fixtures to avoid dark gaps and glare issues.
- For standard walkways, 6 to 8 feet spacing is common; tighten to 4 to 6 feet for garden paths and widen to 8 to 12 feet for driveways.
- Adjust fixture positions to prevent glare and dark spots, especially at curves, steps, or narrow sections, rather than relying solely on even spacing charts.
- Professionals often hone layout by visual testing, particularly on slopes or complex paths, to ensure even illumination and avoid common mistakes.
Table of Contents
- What Is the Right Path Light Spacing for Different Walkways?
- Why Does Path Light Spacing Change From Project to Project?
- How Do You Measure a Path and Calculate the Number of Fixtures?
- Where Exactly Should Each Fixture Sit?
- How Do You Fix Dark Gaps and Glare Once Lights Are Installed?
- What Do Real Path Lighting Projects Actually Look Like?
- A Contributor’s Take on Getting Path Lighting Right
- Ready to Get Your Path Lighting Installed Right?
- Where to Check Further Technical Guidance
- Sources
- FAQ
What Is the Right Path Light Spacing for Different Walkways?
Every path has its own personality, and the spacing should match it. Here’s how we break it down when we’re laying out a project for a homeowner:
- Garden paths (narrow, meandering): 4 to 6 feet apart. Tighter spacing suits the intimate scale and slower walking pace.
- Standard walkways (front entry, side yard): 6 to 8 feet apart. This is the range that most guides settle on for typical residential fixtures.
- Driveways: 8 to 12 feet apart, since these fixtures usually sit farther from the travel surface and often carry brighter, wider beams.
- Stairs and risers: 2 to 4 feet, essentially one fixture per step or every other step, because footing errors here carry the highest consequence.
Tighten spacing when you’re working with dark pavers, dim or low-lumen fixtures, or when elderly family members use the path regularly. Widen it when fixtures throw a broad beam, the surface is light-colored concrete, or a porch light already fills in some ambient glow.
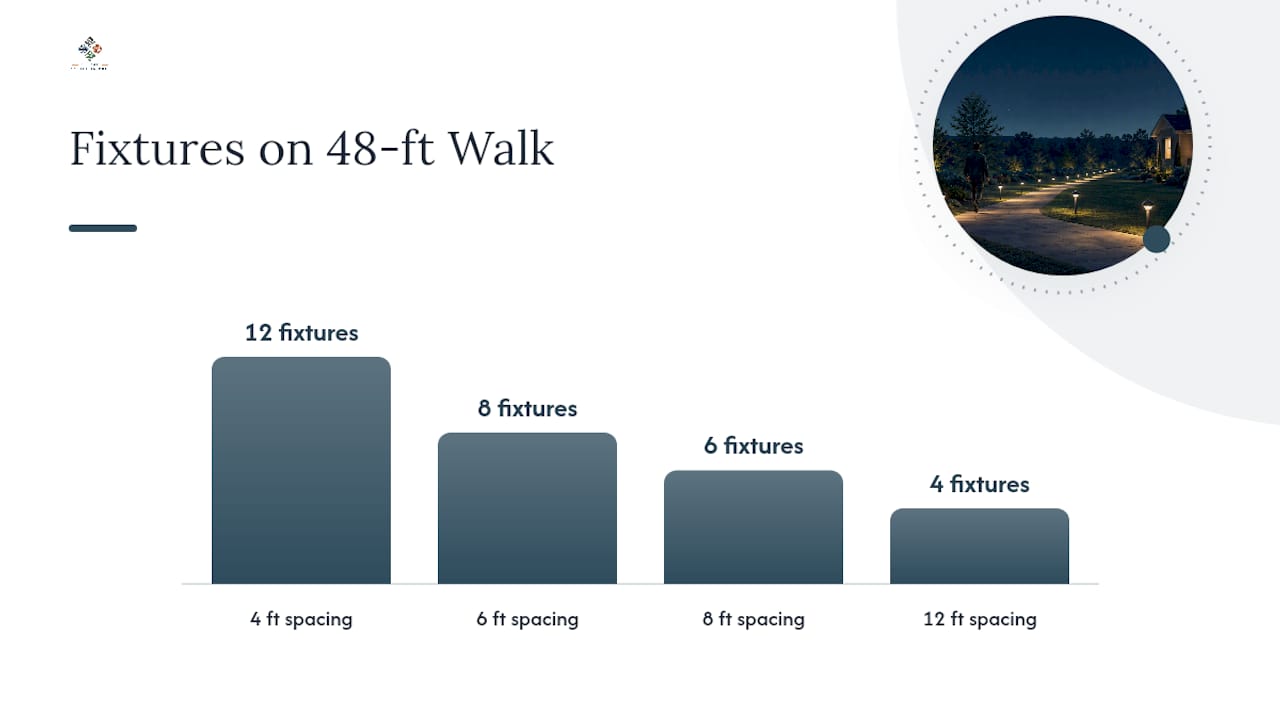
Here’s the math in practice: a 48-foot front walkway divided by an 8-foot spacing target calls for 6 fixtures. Round up rather than down. A gap that’s slightly tighter than planned looks intentional; one that’s too wide leaves a dark stretch that undermines the whole design.
Why Does Path Light Spacing Change From Project to Project?
Spacing isn’t a fixed number because no two paths carry light the same way. Several variables push it wider or tighter, and understanding them keeps you from copying a spacing figure that doesn’t fit your yard.
- Beam spread: A fixture with a 90 degree beam angle throws light much farther sideways than one with a tight 25 degree beam, so wide-beam fixtures can sit farther apart without leaving gaps.
- Fixture height: Low stake lights (12 to 18 inches) illuminate a smaller footprint than 24 to 36 inch bollards, which changes how much overlap you need between fixtures.
- Lumen output: A 100 lumen fixture and a 300 lumen fixture behave completely differently at the same spacing. Brighter fixtures tolerate wider gaps.
- Surface and path width: Light concrete bounces light back up and fills shadows; dark pavers or mulch borders absorb it, which means tighter spacing is often the fix.
- Ambient light: A porch light, street lamp, or nearby security fixture reduces how much work your path lights need to do.
Overlap matters more than most homeowners assume. Where one fixture’s beam edge meets the next fixture’s beam edge, you get an even wash of light underfoot rather than a bright spot followed by a dim patch. The IES RP-43 2025 recommended practice for outdoor pedestrian lighting builds glare metrics and lighting zones into its design guidance for exactly this reason: even light reduces both tripping hazards and glare complaints from neighbors.
Pro Tip: If you’re mixing fixture types along one path, walk it after dark and note where your eyes catch a hot spot or a shadow. That’s usually where beam spread and height are mismatched, not where spacing itself is wrong.
How Do You Measure a Path and Calculate the Number of Fixtures?
Getting the fixture count right starts with a tape measure, not a shopping cart. Follow this sequence before you buy anything:
- Measure along the actual walking line, not the property line. Curves add distance that a straight-line measurement misses.
- Mark every turn, step, and landing on a rough sketch. These are decision points, and they need their own fixture regardless of the math.
- Pick your spacing band based on path type (garden, walkway, driveway, stairs) and the site factors covered above.
- Divide path length by spacing, then round up. A 65-foot walkway at 8-foot spacing needs roughly 9 fixtures, not 8.1.
- Redistribute the leftover distance evenly rather than leaving one cramped gap at the end. A 65-foot run split into 8 segments of about 8.1 feet each looks far more intentional than 8 even segments plus one 1-foot afterthought.
Before you dig a single hole, stake or tape your fixtures at the planned spots and walk the path after dark. Adjust individual fixtures 12 to 18 inches in either direction until the dark gaps disappear. This single step, confirmed by testing guides across dozens of installs, catches more layout mistakes than any formula.
Where Exactly Should Each Fixture Sit?
Spacing only works if placement backs it up. A perfectly spaced row of lights aimed the wrong direction still produces glare and shadow.
- Set fixtures 12 to 18 inches back from the walking line as a default, adjusting inward on narrow paths and outward on wider ones so no one clips a fixture with their foot.
- Stake lights typically sit 12 to 18 inches tall; low bollards run 24 to 36 inches. Aim the beam down and shield the source, following the Energy for outdoor fixtures.
- Treat curves, steps, and entry points as decision points that need their own fixture, even if that means breaking your even spacing pattern slightly.
- For low-voltage systems, check your transformer’s total wattage load against your fixture count before finalizing placement, and bring in a licensed electrician for anything touching a home’s main electrical panel.
- Anchor every stake or post securely. A fixture that tilts even a few degrees throws its beam off the overlap zone and recreates the dark gap you just fixed.
Installer guidelines from the American Outdoor Lighting Professionals recommend leaving 3 to 5 feet of extra cable buried at each fixture location. That slack lets you shift a fixture later without digging up the whole run, which matters once you’ve lived with the lighting for a season and want to fine-tune it.
How Do You Fix Dark Gaps and Glare Once Lights Are Installed?
Most spacing complaints fall into one of two camps: dark gaps or a glaring “runway” effect where every fixture reads as a bright dot rather than a smooth wash of light.
- Dark gaps usually mean two fixtures are too far apart or a decision point (a turn or step) has no dedicated light at all.
- Glare and runway effect often means fixtures are too close together, too bright, or aimed outward instead of down.
- Dim fixtures at the far end of a run point to voltage drop or a transformer overloaded past its rated capacity, not a spacing problem at all.
Start with the cheapest fix first: move the affected fixture 12 to 18 inches before assuming you need to buy another one. Staggering fixtures on opposite sides of a wide path, rather than lining them up directly across from each other, also smooths out the light pattern without adding hardware.
| Symptom | Likely Cause | First Fix to Try |
|---|---|---|
| Dark patch mid-path | Spacing too wide for beam spread | Add or shift a fixture 12–18 in |
| Bright glare, uneven dots | Spacing too tight or fixtures aimed outward | Widen spacing or re-aim downward |
| Fixtures dim at the far end | Voltage drop or overloaded transformer | Check transformer load, not spacing |
| Steps feel unsafe at night | Missing dedicated fixture at decision point | Add fixture regardless of even spacing |
What Do Real Path Lighting Projects Actually Look Like?
Across more than 1,750 projects, one pattern shows up again and again: homeowners who nail decision points first, then fill in the straight runs, end up happier than those who space everything evenly and hope it works.
- On a narrow, sloped garden path, we typically drop spacing to about 5 feet and add an extra fixture at the grade change, since footing missteps happen most where the ground pitches.
- On a driveway approach mixing bollards and stake lights, we usually widen spacing toward 10 feet for the brighter bollards near the street and tighten it slightly where stake lights meet the walkway, blending the two fixture types without a visible seam.
- Our installers follow the same checklist every time: measure the true walking line, pick a spacing band, stake a temporary test layout, prioritize steps and turns over even math, then secure every fixture before backfilling.
A Contributor’s Take on Getting Path Lighting Right
The biggest mistake I see homeowners make isn’t choosing the wrong number. It’s trusting a number at all before walking the path in the dark. Spacing charts are a starting point, not a verdict, and the yards that end up looking professionally lit are the ones where someone adjusted a stake 15 inches to the left after standing on the path at 9 p.m. and squinting. Here’s the checklist worth taping to your garage wall: measure the walking line, pick your spacing band, stake a temporary test, prioritize decision points over even math, adjust for glare, then secure and inspect every fixture before you call it finished.
— Ty
Ready to Get Your Path Lighting Installed Right?
If your project involves a slope, a low-voltage transformer, code-sensitive wiring, or a path that curves through several decision points, that’s exactly where a DIY layout starts to strain against what a tape measure and a night walk can catch. Experienced lighting layout crews already know where dark gaps and glare tend to hide before they show up. We handle the layout math, the fixture selection, and the wiring checks in one visit instead of several weekends of trial and error.

If you’d rather hand off the measuring, staking, and transformer math to someone who’s done it thousands of times, schedule a landscaping consultation and we’ll walk your property with you before anything gets installed. For a look at how we run a project from first visit to final walkthrough, our working process page lays out what to expect.
Where to Check Further Technical Guidance
- IES RP-43 2025 sets pedestrian lighting zones and glare metrics.
- NFPA’s National Electrical Code governs wiring safety for outdoor circuits.
- AOLP landscape lighting guidelines detail installer-level cable and fixture practices.
Sources
- 7 Solar Path Light Placement Safety Rules for Walkways
- How to Fix Pathway Lighting Spacing Problems – lightissues
FAQ
How Far Should Path Lights Be Spaced Apart?
Most residential walkways look best with fixtures spaced 6 to 8 feet apart, narrowing to 4 to 6 feet for garden paths and widening to 8 to 12 feet for driveways.
What Is the Rule of Thumb for Outdoor Path Lighting?
Pick a spacing band based on path type, then walk the path at night with fixtures temporarily staked and adjust by 12 to 18 inches until dark gaps disappear.
How Far Apart Should LED Path Lights Be Placed?
LED fixtures often allow slightly wider spacing than older incandescent stakes because their aimed, overlapping beams cover more ground per fixture, but the 6 to 8 foot standard walkway range still applies as a starting point.
Should Path Lights Line Up on Both Sides of a Walkway?
Not always. Staggering fixtures on opposite sides of a wider path often produces a smoother light wash than lining every fixture up directly across from its neighbor.
When Should I Hire a Professional Instead of Doing It Myself?
Bring in a professional when the path involves slopes, transformer load calculations, code-sensitive wiring, or multiple decision points where DIY spacing math tends to fall apart.