

Sinking pavers are almost never a problem with the pavers themselves. They sink because something underneath moved: the soil, the compacted aggregate base, the bedding sand, or the edge that holds everything in place. A few low stones can often be lifted, re-leveled and reset in an afternoon. A dip that holds water, a wide uneven area or a repair that keeps failing means the base needs to be rebuilt. Either way, the repair only lasts if you find the cause first.
This guide walks through why pavers settle, how to read the signs, how a correct lift-and-reset repair goes, and when to stop patching and rebuild.
TL;DR
- Pavers sink because of base, soil, drainage or edge failure. Fixing only the surface brings the problem back.
- A handful of low pavers usually calls for a lift, base correction, fresh bedding sand and a reset. A puddle or wide dip points to drainage or base trouble.
- Never use bedding sand to fill a hollow in the base. Correct the base first, then screed fresh sand over it.
- Work a margin of at least one paver beyond the visible dip, because settlement often reaches farther than it looks.
- If the same spot sinks twice, the base needs rebuilding and the water source needs fixing.
Table of Contents
- Why pavers sink in the first place
- How to read what your patio is telling you
- How a proper lift-and-reset repair goes
- When lift-and-reset is not enough
- Fix the water, or the repair will not last
- What drives the total on a paver repair
- Keeping pavers from sinking again
- Our perspective on sinking pavers
- Get your patio assessed and repaired
- FAQ
- Sources
Why pavers sink in the first place
A paver patio is a system: pavers on a thin bedding layer, over a compacted aggregate base, over native soil, held in by edge restraints, locked together with joint material. Sinking points to a failure somewhere in that stack. According to a contractor-focused breakdown of paver settlement, the usual suspects are movement in the soil, the base, the bedding, drainage or the edges.
Here is what we see most often on the ground.
Water moving under the surface
Water is the biggest troublemaker. It softens the soil below, erodes the aggregate base and carries bedding sand and joint material out of the system. A downspout that dumps beside the patio, a slope that sends runoff across the surface, or a leaking underground line can all do this. If you suspect a hidden leak is feeding the problem, the warning signs of sewer line repair are worth knowing, because a failing line can wash out the ground beneath hardscape the same way a bad downspout does.
Roof water matters just as much. Learning how gutters and roofing work together to move water away from a house helps you see why a patio next to the foundation is so sensitive to a clogged gutter or a short downspout. We cover practical fixes in our guide to downspout drainage ideas a landscaper trusts.
A base that was never fully compacted
A base that looks finished and a base that is compacted to carry load are two different things. The difference stays hidden until traffic and time reveal soft spots. Rushed compaction, too little aggregate, or aggregate placed in one thick pass can all leave a base that slowly consolidates under foot traffic, furniture and vehicles.
Soft or unstable soil underneath
Some soils compress, swell or shift more than others. If the subgrade is soft or holds water, even a well-compacted base can settle unevenly over the seasons. The fix there is not more sand on top. It is a better-prepared subgrade and a base designed for the ground it sits on.
Failed edges
Edge restraints keep the field of pavers from spreading outward. When an edge shifts, the pavers next to it loosen, joints open and the surface starts to drop. A sunken strip along a border is a classic edge sign.
Loads the patio was not built for
A patio built for chairs and a grill will not forgive a delivery truck or a trailer parked on it. Loads above what the system was designed for push the base down in wheel paths and corners.
How to read what your patio is telling you
Before touching a single paver, look at the pattern of the sinking. It narrows down the cause quickly.
| What you see | Likely cause | What it usually calls for |
|---|---|---|
| One to a few low pavers, joints otherwise tight | Localized settlement or a small void | Lift, correct the base, re-bed, reset |
| A dip that collects water after rain | Settlement plus a drainage problem | Fix the water path, then rebuild that section |
| A low strip along the border, pavers leaning outward | Edge restraint failure | Reset the edge, then the pavers beside it |
| Wide, wavy area across the patio | Base or subgrade trouble | Larger section rebuild |
| Same spot sunk again after a past repair | Base never corrected, or water still arriving | Full base rebuild and drainage correction |
After a hard rain, walk the patio and watch where water goes. Look at where your downspouts discharge, whether the ground slopes toward the house, and whether soil or sand is washing into the joints. If water pools anywhere near the patio, our guide on why water pools and how to stop it is a good next read.
How a proper lift-and-reset repair goes
This is the process our crews follow for a contained settled area. It is also the answer to how to lift pavers without wrecking them.
1. Mark the area and add a margin
Outline the visibly sunken zone, then extend it by at least one full paver in every direction. Settlement can extend beyond what you can see, and a repair that stops exactly at the visible edge tends to leave a new dip right beside it.
2. Lift the pavers without damage
The first paver is the hardest because it is locked in tight. This Old House describes gently separating the target paver from its neighbors on all sides with a pry bar or flat shovel. Then you set wire paver pullers into the sand beside the loosened stone, twist the handles 90 degrees so the fingers turn under the block, and pull up firmly and evenly on both handles.
A few habits protect the stones:
- Work slowly and avoid excessive force.
- Put a thin layer of cardboard, rubber or cloth between a steel tool and the paver face.
- Lift straight up rather than twisting, which can stress and crack the stone.
- Stack the pavers in the order they came out, face up, away from the work zone.
Once the first paver is out, the rest come up easily.
3. Dig into the cause, not just the dip
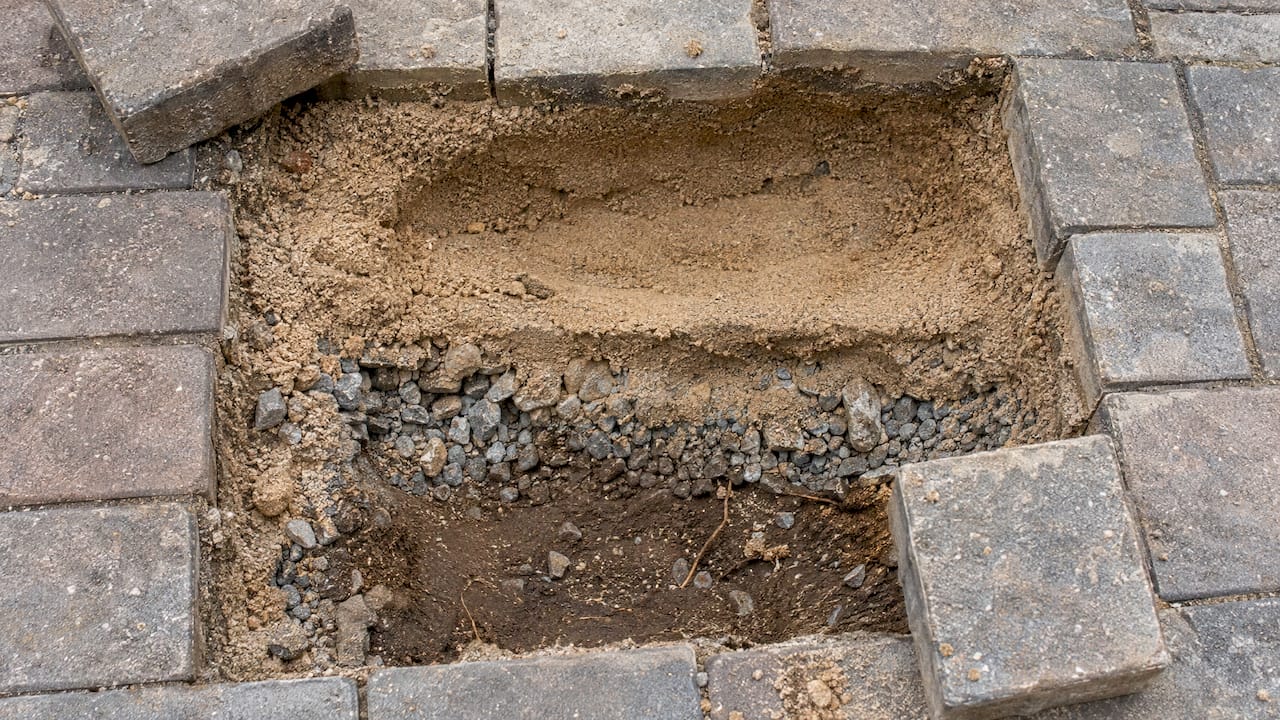
Remove the bedding sand and look at the aggregate base. Is it washed out, soft, uneven or contaminated with soil? Is there a void? Is the ground wet? What you find decides the rest of the job. If the base is sound and only the sand layer slumped, you can re-bed. If the base itself has hollows, it has to be rebuilt.
For how thick that base should be, our breakdown of paver base depth and exact specs goes into detail.
4. Correct the base before any sand goes down
This is the step shortcuts skip, and it is why many repairs fail. Industry guidance is clear that bedding sand should not be used to make up for depressions in the aggregate base. Sand is a thin leveling layer. Thick sand compresses unevenly under load and the dip returns.
Instead, add aggregate in thin layers and compact each one before adding the next. Check the grade with a string line or straightedge, and confirm the slope still sheds water away from the house.
5. Screed fresh bedding sand
Use fresh, coarse concrete sand for the bedding layer, not the old sand you pulled out, which may be contaminated and uneven. Family Handyman’s repair guide lists a level, rubber mallet, trowel, screed board and straight pipe among the basic tools and materials for leveling a sunken patio section. Rest the screed board on the pipes, pull it across to strike the sand flat, then remove the pipes and fill the grooves lightly.
6. Reset the pavers
Place each paver straight down onto the sand rather than sliding it, which pushes sand into ridges. Tap it into place with a rubber mallet and check level against the surrounding pavers as you go. Keep the original pattern and joint spacing so the repair blends in.
7. Fill and lock the joints
Sweep joint material into the gaps, compact the surface lightly and sweep again. Polymeric sand holds joints tight and resists washout, but it has to be installed and cured correctly. Our field notes on polymeric sand problems and the 24 hour dry rule explain what goes wrong and how to avoid it.
When lift-and-reset is not enough
A spot repair is the right call when the cause is local and understood. It is the wrong call when any of the following is true:
- Settlement is widespread rather than confined to one spot.
- Water keeps collecting in the same area.
- Edges have migrated or restraints have failed.
- An earlier spot repair has already failed.
These conditions call for a larger repair or a base rebuild. That means lifting a bigger section, excavating to firm ground, installing a properly compacted aggregate base in lifts, rebuilding the edge, and correcting the slope or drainage before the pavers go back.
Soft or clay soils may also call for fabric between the subgrade and the aggregate, and a slope that moves water away from structures. A rebuild is more work now, but it is the only repair that ends the cycle of re-leveling the same spot every spring.
Fix the water, or the repair will not last
It is tempting to treat sinking pavers as a masonry problem. In our experience it is just as often a water problem that shows up in masonry. If a downspout, a low spot in the yard or a leaking line is sending water under the patio, new pavers on a new base will eventually settle again.
That is why we look at the whole site, not only the sunken stones:
- Where does roof water go?
- Does the grade tilt toward the patio?
- Is there a channel, drain or swale that could carry runoff elsewhere?
- Are the joints open and letting water straight into the base?
Our page on landscape water drainage solutions explains the options we use to move water out of problem areas, and our Landscape & Irrigation service covers that work on the property side.
What drives the total on a paver repair
We do not publish figures in articles because every patio is different, but we can tell you what moves the total up or down:
- Size of the affected area, including the margin beyond the visible dip.
- Depth of the problem. Re-bedding sand is a much smaller job than excavating and rebuilding a base.
- Drainage work. Redirecting a downspout or adding drainage adds scope, and it is often what makes the repair last.
- Access. Tight gates and long carries slow material handling.
- Edge condition. Failed restraints need to be rebuilt along with the field.
- Pattern and paver type. Complex patterns and discontinued pavers take more time to match.
A site visit is the only way to turn those factors into a firm quote.
Keeping pavers from sinking again
Prevention is mostly about water and maintenance:
- Keep gutters clean and downspouts discharging well away from the patio.
- Keep drainage paths clear of leaves, mulch and soil.
- Watch the patio and the ground around it after heavy rain.
- Refill joints as needed, following the joint product’s maintenance guidance, as recommended for preventing repeat settlement.
- Keep heavy vehicles off patio areas not built for them.
If you want a second set of eyes on the property every season, our annual maintenance plans are built around that kind of routine attention.
Our perspective on sinking pavers
We have worked on well more than 2,000 projects since 2020, and the sinking patios we are called to fix have a pattern. The pavers are rarely the issue. The cause is usually hidden: a base that was rushed, a downspout that was left to dump beside the patio, or an edge that was never anchored properly.
That is why we do not like quick top-up repairs. Adding sand to a dip feels productive on the day, but it hides the cause and the dip is back after the next few storms. We would rather lift the section, read what the base is telling us, correct it with compacted aggregate and put the water somewhere else.
Our approach combines design with function. We want a patio that looks like it belongs to the property and keeps its shape because the structure underneath is right. Skilled craftsmanship and quality materials matter most in the parts nobody sees once the pavers are back in place.
If your patio has a dip, a puddle or a wavy edge, treat it as information. It tells us where to look. Our crews would rather solve the cause once than return to the same spot.
Ty
Get your patio assessed and repaired
If you have sunken pavers in Central Arkansas, we can inspect the area, find out why it settled and repair it properly, whether that is a contained lift-and-reset or a full base rebuild with drainage correction. Our Hardscape & Stone Masonry team handles paver repair and installation for homeowners, property managers and businesses.

If you are also planning changes to your outdoor space, see our Decks & Patios service or browse paver patio ideas for design and material guidance. To start a conversation, reach us through villageprecisionpros.com.
FAQ
Can I just add sand to a sunken paver and be done?
Only if the problem is a thin layer of slumped bedding sand and the base below is sound. Adding sand to cover a dip in the aggregate base does not last, because thick sand compresses under load. Correct the base first, then screed a fresh, even layer of sand.
How many pavers around the dip should I lift?
Lift the visibly sunken pavers plus at least one paver beyond them in every direction. Settlement often reaches past what you can see. If the area keeps growing, or the dip holds water, a larger section may need to be rebuilt.
Why do my pavers sink in the same spot over and over?
A repeat failure usually means the cause was never fixed. The base may not be compacted, water may still be running under the patio, or an edge may be moving. Spot repairs on a bad base fail again, so the section needs to be excavated and rebuilt, with the water source corrected.
How do I lift pavers without cracking them?
Loosen the first paver on all sides with a pry bar or flat shovel, then use paver pullers and lift straight up with even pressure. Cushion steel tools with cardboard or cloth and do not twist the stone. Once one paver is out, its neighbors lift easily.
Sources
- How to Fix Sunken Patio Pavers, Family Handyman
- A Step by Step Guide to Easily Remove Patio Pavers, This Old House
- Paver Repair: How To Fix Sunken And Uneven Pavers, Turf Magazine
- Why Are My Pavers Sinking? Causes and What to Check
- How to Fix Sunken or Uneven Patio Pavers
- Warning Signs You Need Sewer Line Repair
- How Gutters and Roofing Work Together to Save Your Foundation