
For most homeowners, the single best starting decision is a mid-tier concrete paver in a running-bond or simple herringbone pattern, sized to match your primary use. That one choice locks in your budget range, sets your labor complexity, and gives you a finish that holds up through freeze-thaw cycles, heavy foot traffic, and years of outdoor entertaining.
Here is where to start, based on your goal:
- Low-cost DIY: Concrete pavers in a running-bond pattern, 12×12 or 16×16 inch units, on a compacted gravel base. Straightforward to cut, easy to source, and forgiving for first-time installers.
- High-style entertaining: Mixed-size modular pavers or large-format porcelain in a stacked or offset pattern, paired with a seating wall and integrated lighting.
- Low-maintenance longevity: Tumbled concrete or natural stone with a penetrating sealer, simple rectangular layout, and polymeric sand joints that resist weeds and ant intrusion.
Your immediate next step: measure your yard, pick a material family from the guide below, and decide whether you are doing this yourself or calling a crew. Everything else follows from those three decisions.
Key Takeaways
A properly compacted gravel base, correct drainage slope, and pinned edge restraints determine whether a paver patio lasts 25 years or starts shifting within two.
| Point | Details |
|---|---|
| Start with material and pattern | Choose concrete pavers in a running-bond pattern for the best balance of cost, durability, and DIY accessibility. |
| Base and drainage come first | A compacted gravel base with a 1 to 2% slope away from structures prevents the most common long-term failures. |
| Pattern complexity drives labor cost | Simple patterns take less labor than herringbone or circular insets on the same footprint. |
| Know your cost range | A 20×20 paver patio depends on materials, labor rates, pattern complexity, and site conditions. |
| Villageprecisionpros | Central Arkansas homeowners can get a site-specific design, drainage plan, and full installation from one crew. |
Table of Contents
- What paver patio ideas work best for your yard?
- Which paver material fits your budget and climate?
- How paver patterns change the look and the labor cost
- How to plan patio size, drainage, and material quantities
- Step-by-step installation: what the process actually looks like
- Common installation mistakes and how to avoid them
- How long does a paver patio last, and what does it need?
- How much does a paver patio cost, and is a poured slab cheaper?
- Where to start shopping: brands and materials to look for
- Contractor checklist: what every professional bid should include
- When to DIY and when to call a professional
- Ready for a patio that holds up for decades?
- Sources
- FAQ
What paver patio ideas work best for your yard?
The most useful way to think about paver patio designs is by function first, then aesthetics. A patio built around a fire pit needs different dimensions, clearances, and traffic flow than one anchored by an outdoor kitchen. Getting the function right before you pick a pattern or color saves you from a beautiful patio that nobody actually uses.
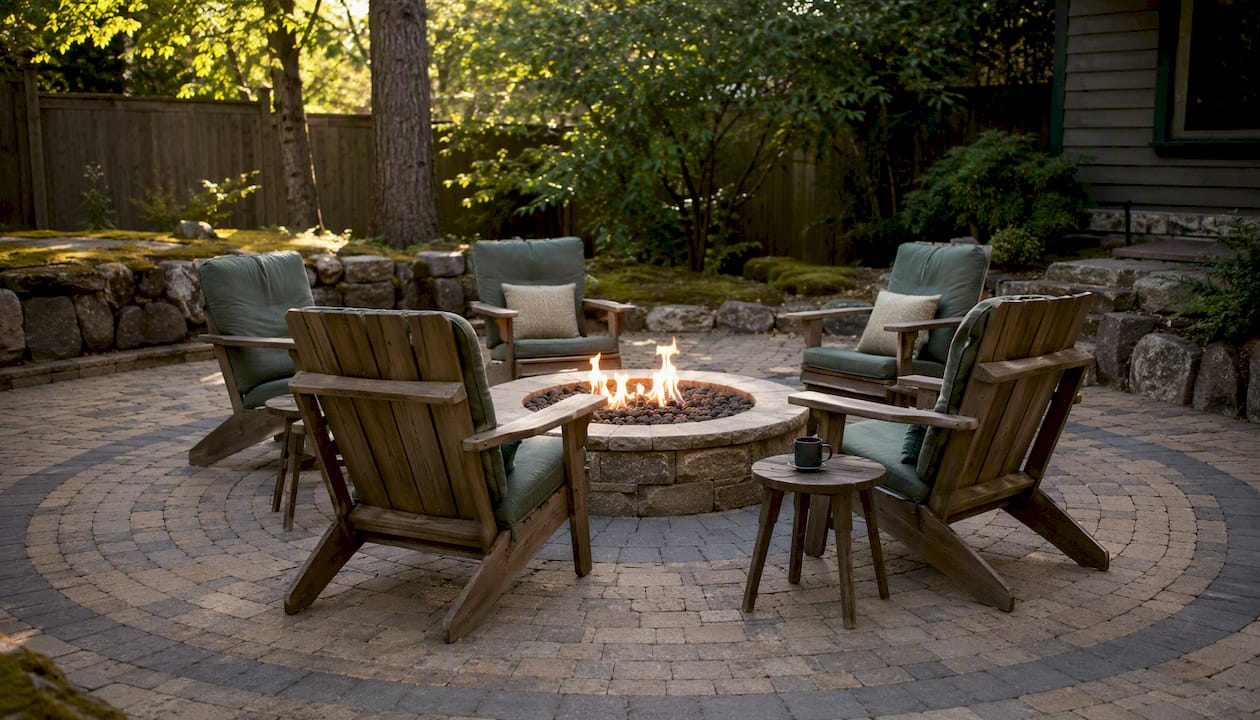
Fire pit patio
A fire pit setup works best on a roughly 16×16 ft footprint, which gives you comfortable seating for six to eight people with enough clearance between chairs and the fire. Circular or fan-shaped paver layouts reinforce the gathering feel and draw the eye inward. Avoid wood-tone pavers near an open flame; charcoal gray or buff concrete holds up visually and practically. Keep a non-combustible paver border at least 2 ft around the pit perimeter.
Dining and outdoor kitchen patio
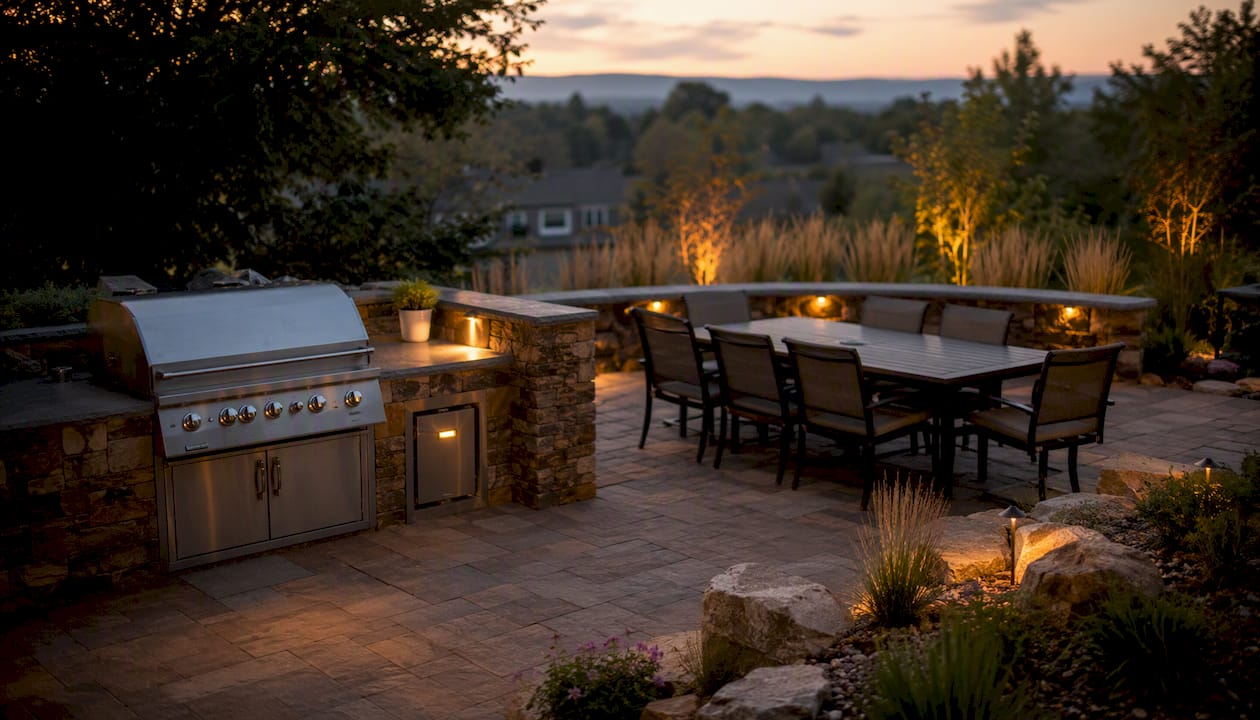
A dining area for six needs at least a 12×14 ft clear zone, and if you are adding a grill station or outdoor kitchen, budget another 4 to 6 ft of depth behind the table. L-shaped layouts work well here because they separate the cooking zone from the seating zone without requiring a wall. Large-format pavers (18×18 or 24×24 inch) read as more formal and are easier to keep clean around food prep areas. HGTV’s design gallery shows this pairing consistently across high-performing outdoor kitchen builds.
Lounge and pergola patio
A lounge patio under a pergola typically runs 14×16 ft to accommodate a sectional, coffee table, and side chairs without feeling cramped. The pergola posts need to land on solid paver or concrete footings, so plan post locations before you lay a single stone. Warm-toned pavers in tan, terracotta, or blended earth tones complement wood pergola structures naturally. Add low-voltage path lighting along the patio edge to extend usability into the evening.
Poolside patio
Poolside pavers need a textured or brushed finish to reduce slip risk when wet. Travertine, tumbled concrete, and brushed porcelain are the go-to choices here. A 4 to 6 ft wide paver border around the pool perimeter is the practical minimum; most designers push to 8 ft on the primary lounging side. Light-colored pavers stay cooler underfoot in direct sun, which matters more than most homeowners realize until their first barefoot July afternoon.
Seating walls and steps
Seating walls double as retaining elements on sloped lots, which makes them one of the most functional additions to a paver patio. A standard seating wall runs 18 inches tall and 16 to 18 inches deep. Steps connecting grade changes should match the paver field material for a cohesive look, with a riser height of 6 to 7 inches and a tread depth of at least 12 inches. Both features add significant material and labor cost, but they solve real problems on uneven ground.
Which paver material fits your budget and climate?
Material choice is where budget, durability, and aesthetics converge. Each material family has a distinct look, a different tolerance for freeze-thaw stress, and a different skill threshold for installation. The table below covers the key decision points.
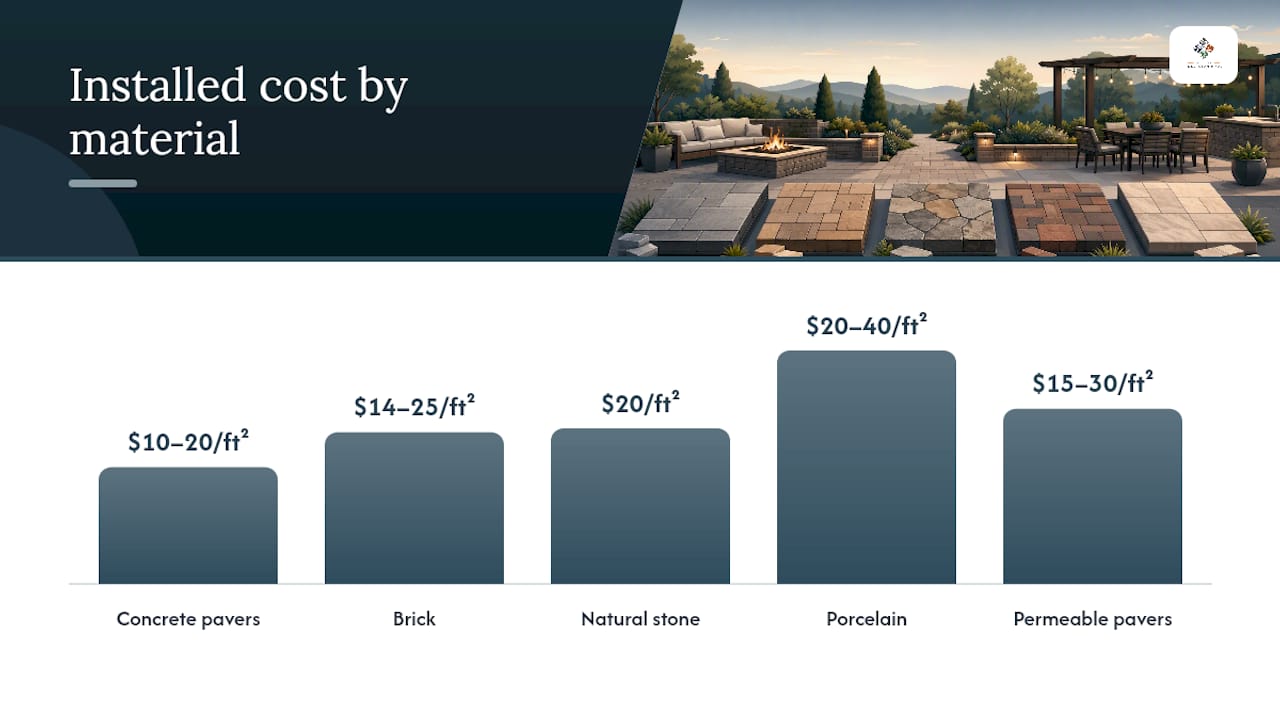
| Material | Best For | Freeze-Thaw Performance | Installation Difficulty | Maintenance |
|---|---|---|---|---|
| Concrete pavers | Most uses; widest color range | Good (manufactured for it) | Low to moderate | Seal every 2 to 3 years; reapply joint sand as needed |
| Brick | Traditional, cottage, historic styles | Good in quality units; varies | Moderate | Occasional repointing; seal optional |
| Natural stone (flagstone, bluestone) | Formal or rustic; irregular or cut | Variable by stone type | Moderate to high | Seal annually; reset sunken pieces |
| Porcelain | Modern, pool surrounds, low-maintenance | Excellent (non-porous) | High (wet saw required) | Low; clean with mild detergent |
| Permeable pavers | Drainage-sensitive yards, eco-conscious builds | Good | Moderate | Clear joints annually; top up aggregate |
A few practical notes on color and finish decisions:
- Light colors (cream, buff, light gray) reflect heat and stay cooler underfoot, which is important for pool decks and sun-exposed patios in warmer climates.
- Dark colors (charcoal, slate, deep brown) absorb heat and can become uncomfortable in full sun but read as more contemporary and hide surface staining better.
- Textured or tumbled finishes add slip resistance and a more natural, aged look. Smooth finishes are more formal but require more care around wet areas.
- House style matters. Warm red brick tones suit traditional homes; large-format gray concrete or porcelain suits modern architecture. Mixing materials (a stone border with a concrete field) can bridge the two.
For durable paver stone selection in climates with temperature swings, concrete pavers manufactured to ASTM C936 standards offer consistent compressive strength and freeze-thaw resistance. Natural stone varies by quarry and cut, so ask your supplier for freeze-thaw test data before committing.
How paver patterns change the look and the labor cost
Pattern choice is one of the most underestimated decisions in a paver project. It changes the visual scale of the space, the number of cuts required, and the time a crew spends on the job. Those three things are directly connected to your final invoice.
- Running bond: Offset rows, like standard brick. The easiest pattern to lay, with the fewest cuts. Works on rectangular patios of any size and reads as clean and contemporary. Best choice for DIY first-timers.
- Herringbone (45° or 90°): Interlocking V-pattern. Stronger under vehicle or heavy load traffic because the interlocking geometry distributes weight. Looks polished and traditional. The 45° version requires diagonal cuts along every edge, which adds time and waste. Complex patterns like herringbone increase labor costs materially because of the extra cutting and fitting involved.
- Basketweave: Pairs of pavers alternating direction in a grid. A classic look that suits cottage and traditional styles. Moderate cut count; works best with square pavers.
- Circular or fan insets: A focal point pattern, often used around a fire pit or at a patio entrance. Requires custom-cut wedge pieces or specialty fan-shaped units. Labor-intensive and best left to experienced installers.
- Random or ashlar: Irregular-sized units laid in a planned random pattern. Mimics natural flagstone. Requires careful planning to avoid awkward joints; moderate to high cut count.
Pro Tip: If you love the look of herringbone but want to manage cost, use a simple running-bond field and reserve the herringbone for a 2 to 3 ft border band. You get the visual interest where it counts without paying for diagonal cuts across the entire patio.
For small patios under 200 sq ft, large-format pavers (18×18 or 24×24 inch) in a simple grid or running bond make the space feel bigger. For pool edges, a soldier-course border (pavers laid end-to-end perpendicular to the edge) creates a clean, finished look without complex cuts.
How to plan patio size, drainage, and material quantities
Get the slope right before anything else. Pavers need a 1: 2% grade away from your house or any structure, which works out to roughly 1/8 inch of drop per foot of run. That slope is what keeps water from pooling against your foundation. Plan it on paper before you excavate, not after.
Sizing rules of thumb
- Dining for 4 to 6: Minimum 12×14 ft clear paver surface (not counting furniture overhang).
- Lounge seating area: 14×16 ft for a sectional plus coffee table.
- Fire pit circle: 16×16 ft minimum; 20×20 ft if you want generous seating clearance.
- Grill station add-on: Add 4 to 6 ft of depth to any dining or lounge zone.
- Combined entertaining patio: 20×20 ft (400 sq ft) is the most common project size and a useful planning benchmark.
Quantity calculation: worked example
Say you are building a 20×20 ft patio (400 sq ft) in a running-bond pattern with standard rectangular pavers.
- Calculate base area: 20 × 20 = 400 sq ft.
- Add waste allowance: 5% for a simple rectangular layout, 10% or more for lots of cuts or curves. At 5%: 400 × 1.05 = 420 sq ft of pavers to order.
- Calculate base material: A 6-inch compacted gravel base plus 1-inch sand bedding is a common industry guideline for residential patios. For 400 sq ft at 6 inches deep, you need roughly 7.5 cubic yards of gravel.
- Edge restraint: Measure the perimeter (80 linear ft for a 20×20) and add 10% for corners and overlaps.
- Polymeric sand: Typically covers 30 to 80 sq ft per bag depending on joint width; check the product spec.
Pro Tip: Order your pavers from a single production run when possible. Color and texture can vary between batches, and a mismatched pallet delivered mid-project is a headache that costs time and money to resolve.
Drainage planning goes hand in hand with quantity calculation. If your yard has a natural low point or clay-heavy soil, factor in a French drain or channel drain at the patio perimeter before you finalize the layout. Addressing drainage after the patio is built costs far more than planning for it upfront.
Step-by-step installation: what the process actually looks like
The core sequence is: excavate, compact the base, set edge restraints, screed sand, lay pavers, fill joints, compact again, and seal. Every step depends on the one before it. Skipping or rushing the base work is the single most common cause of a patio that shifts, sinks, or heaves within a few years.
Full installation checklist
- Mark and excavate. Stake the patio perimeter, mark utilities, and excavate to the required depth (typically 8 to 10 inches for a 4-inch paver on a 4 to 6 inch base plus 1-inch sand).
- Grade and compact the subgrade. Remove all organic material. Compact the native soil with a plate compactor before adding base material.
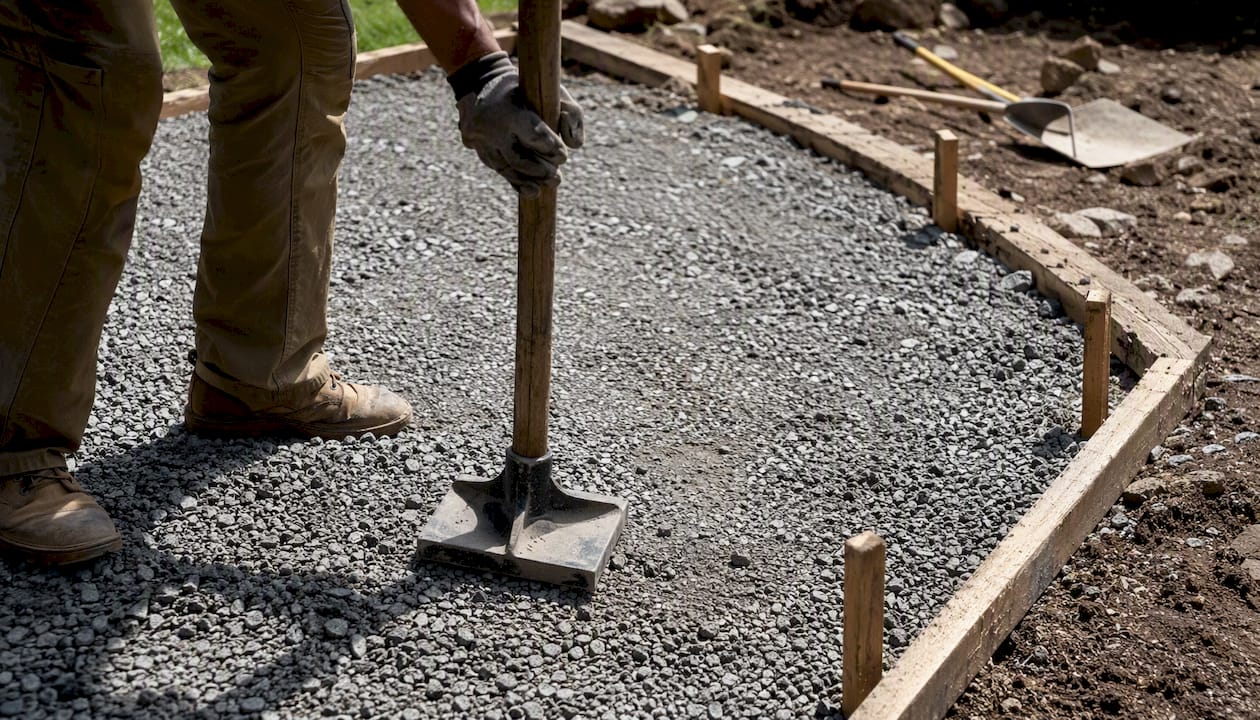
- Install base material in lifts. Add compacted gravel in roughly 2-inch lifts, compacting each lift before adding the next. This is where most DIY projects cut corners.
- Set edge restraints. Plastic or aluminum edge restraint, pinned with 10-inch spikes, goes in before the sand. It holds the field pavers from migrating outward over time.
- Screed a 1-inch sand bedding layer. Use screed rails to pull a flat, consistent sand surface. Do not walk on the screeded sand before laying pavers.
- Lay pavers. Work from a fixed corner outward. Use a string line to keep rows straight. Maintain consistent joint spacing (typically 1/8 to 3/16 inch).
- Cut border and edge pieces. A wet saw or angle grinder with a diamond blade handles most cuts. A plate compactor, wet saw, and 4-foot level are the three tools that separate a professional result from a rough one.
- Fill joints with polymeric sand. Sweep in two passes, blow off excess, and mist lightly to activate the binder.
- Final compaction. Run the plate compactor (with a rubber pad to protect paver faces) over the entire field to seat the pavers into the sand.
- Apply sealer. Allow joint sand to cure per manufacturer instructions before sealing. A penetrating sealer protects without changing the surface texture significantly.
Tools you need
- Plate compactor (rent or hire out)
- Wet saw or angle grinder with diamond blade
- 4-foot level and string lines
- Screed rails and a straight board
- Rubber mallet
- Tape measure and chalk line
- Safety glasses, hearing protection, and knee pads
Timeline
A professional crew typically completes a 400 sq ft patio in 1 to 3 days, depending on site access, base conditions, and pattern complexity. A capable DIYer working weekends should budget 2 to 3 weekends for the same project, not counting material delivery and curing time. Excavation and final compaction are the two tasks most worth hiring out if you are otherwise doing the work yourself.
Common installation mistakes and how to avoid them
Most paver patio failures trace back to three root causes: inadequate base compaction, poor drainage planning, and missing or improperly pinned edge restraints. Everything else is secondary.
- Skipping compaction lifts. Adding all the base gravel at once and compacting once produces an unstable base. Compact in 2-inch lifts, every time.
- No slope or wrong slope direction. Water must drain away from the house. A flat patio or one that pitches toward the foundation will cause water intrusion and accelerated paver movement.
- Missing edge restraints. Without pinned edge restraint, the paver field migrates outward over time, opening joints and creating trip hazards. This is a non-negotiable installation element.
- Laying pavers on dirt. Placing pavers directly on unprepared soil leads to heaving, discoloration, moss growth, and persistent weed problems. A compacted gravel base is not optional.
- Wrong joint sand. Regular mason’s sand washes out and invites weeds. Polymeric sand, activated with water, locks the joints and resists both.
- Overcomplicated pattern for the site. A herringbone or circular inset on a small, irregular lot creates excessive cuts, wasted material, and a longer timeline. Match pattern complexity to your budget and skill level.
- No drainage plan for clay soil. Clay does not drain freely. If your subgrade is clay-heavy, a French drain or perforated pipe at the patio perimeter prevents water from building up under the base.
Pro Tip: Cuts are the hidden labor multiplier. Every diagonal cut in a herringbone pattern, every curved edge piece, and every inset border adds time. If you are hiring a crew, ask them to estimate cut count as part of the bid: it tells you immediately whether they have actually thought through your layout.
How long does a paver patio last, and what does it need?
A well-built paver patio lasts 25 to 50 years with routine maintenance. The base is what determines longevity. A properly compacted gravel base with correct drainage can outlast the pavers themselves. The surface is almost always the easier fix.
Maintenance schedule
- Weekly/monthly: Sweep debris off the surface. Blow out joint sand accumulation in low spots.
- Annually: Inspect joints for sand loss, weed growth, or ant activity. Reapply polymeric sand to depleted joints. Check edge restraint pins and reset any that have worked loose.
- Every 2 to 3 years: Apply a penetrating or film-forming sealer after cleaning the surface. Clean with a paver-specific cleaner or diluted muriatic acid for efflorescence (the white mineral deposits that appear on concrete pavers).
- As needed: Reset sunken or shifted pavers by lifting the affected units, adding or removing sand beneath, and re-laying. This is one of the clearest advantages pavers hold over poured concrete: individual unit replacement is straightforward and nearly invisible when done with matching material.
Common repairs
- Sunken paver: Lift with two flathead screwdrivers or a paver puller, adjust the sand bed, reset, and tamp.
- Weed growth: Pull weeds, treat with a paver-safe herbicide, and refresh polymeric sand.
- Efflorescence: Scrub with a diluted acid wash, rinse thoroughly, and seal once dry.
Premature failure almost always traces to one of two causes: base failure from inadequate compaction or drainage, or edge restraint failure that allows the field to spread. Neither is a surface problem, which is why the base work matters so much upfront.
How much does a paver patio cost, and is a poured slab cheaper?
Poured concrete costs less upfront. On a patio of this size, that price difference can amount to a significant sum. But the comparison does not end at installation day.
A 20×20 paver patio (400 sq ft) depends on materials, labor rates, pattern complexity, and site conditions.
Our Arkansas-specific guide shows how regional labor and material rates shift a project from national averages.
Cost tiers at a glance
- Economy (concrete pavers, simple pattern, flat site): lowest per sq ft installed.
- Mid-tier (concrete or brick, herringbone or mixed-size, minor grading): higher per sq ft installed.
- Premium (natural stone, porcelain, complex pattern, seating walls, drainage work): highest per sq ft installed.
Pavers vs. poured concrete: the real trade-off
Concrete slabs crack. In freeze-thaw climates, that is a matter of when, not if. Repairing a cracked slab means grinding, patching, or full replacement, and the repair almost always shows. Pavers offer superior long-term repairability because individual units lift out and reset cleanly. If a tree root shifts three pavers five years from now, you fix three pavers, not a 400 sq ft slab.
Hidden cost drivers
- Site access: Tight side yards or fenced lots require hand-carrying materials, which adds labor hours.
- Soil type: Clay or expansive soil needs deeper excavation and sometimes geotextile fabric under the base.
- Drainage work: A French drain or channel drain adds to the job depending on length and complexity.
- Pattern cuts: Complex patterns increase labor by 20 to 40% compared to a simple running bond on the same footprint.
Where to start shopping: brands and materials to look for
Two manufacturers worth knowing by name are Belgard and Unilock. Belgard offers a wide range of concrete paver styles from basic utility units to premium architectural series, with strong availability through regional distributors. Unilock is known for its design-forward product lines, including permeable paver systems and large-format units, and publishes detailed DIY installation guidance. Both brands sell through landscape supply yards and some big-box retailers, and both offer online visualizer tools that let you preview patterns and colors on a photo of your home.
Shopping checklist
- Pavers: Confirm all units come from the same production lot (same dye batch). Check for chips, color inconsistency, and dimensional tolerance before accepting delivery.
- Base gravel: Crushed stone (3/4-inch clean or crusher run) compacts better than round river gravel. Confirm it is angular, not smooth.
- Bedding sand: Coarse concrete sand, not mason’s sand or play sand. Fine sand does not drain or compact correctly under pavers.
- Edge restraint: Flexible plastic or aluminum, not wood. Confirm spike length (10-inch minimum for most residential installs).
- Polymeric sand: Match joint width to product spec. Wide joints need a coarser product.
- Sealer: Penetrating sealers preserve the natural look; film-forming sealers add sheen. Both protect; choose based on the finish you want.
Saving on materials
Buying “seconds” (pavers with minor cosmetic variation) works well for large field areas where slight color variation reads as natural. Reserve first-quality units for the border and any highly visible sections.
Contractor checklist: what every professional bid should include
Before you sign anything, a credible contractor bid should answer every item on this list. If it does not, ask. If the contractor cannot answer, that is your signal.
- Base depth and material specified. The bid should state the gravel type, depth, and number of compaction lifts, not just “base preparation.”
- Slope and drainage plan. The bid should name the slope direction, the drainage destination, and any supplemental drainage work included or excluded.
- Edge restraint type and spike spacing. Plastic or aluminum, pinned at what interval? This should be explicit.
- Joint sand type. Polymeric sand should be specified by name, not just “sand.”
- Sealer included or excluded. If excluded, get a separate line-item price so you can compare apples to apples.
- Warranty terms. What does the contractor warrant, for how long, and what voids it?
- Permit responsibility. Who pulls any required permits, and who pays the fee?
Red flags in contractor quotes
- No base depth listed, or a vague reference to “proper base.”
- No compaction method or lift count specified.
- No drainage plan on a sloped or clay-soil lot.
- A price that is 30 to 40% below other bids with no explanation.
- No references or photos of similar completed projects.
Always ask for photo evidence of at least two comparable past projects. A contractor who has built a dozen paver patios will have photos on their phone within 30 seconds. One who hesitates or offers only generic stock images is worth a second look before you commit. Our hardscape project portfolio shows the kind of finished work you should expect from any crew you hire.
When to DIY and when to call a professional
The honest answer is that most homeowners can handle a simple paver patio on a flat, accessible lot with a rectangular layout and a running-bond pattern. The physical work is manageable. The discipline required is not about strength; it is about following the base compaction sequence without cutting corners when you are tired on day two of a weekend project.
Hire a professional when any of these apply:
- The lot slopes more than 2 to 3%. Grading, retaining, and drainage on a sloped site require equipment and experience that most DIYers do not have.
- You want a complex pattern. Herringbone, circular insets, or mixed-size modular layouts require precise cuts and layout planning that add significant time for an inexperienced installer.
- Drainage is already a problem. If water pools in your yard after rain, a paver patio without a proper drainage solution will make it worse. Diagnosing and solving drainage issues before laying a single paver is a job for someone who has done it before.
- You cannot rent or borrow a plate compactor. Hand-tamping a base is not a substitute. If you cannot get the right equipment, hire the crew that brings it.
- Your timeline is tight. A professional crew completes in days what takes a DIYer two or three weekends. If you need the patio ready for a specific date, factor that in.
DIY makes sense when you have a flat, accessible site, a simple rectangular layout, a free weekend (or two), and the patience to follow the compaction steps correctly. The savings are real. But those savings evaporate quickly if the base fails and you are resetting pavers two years later.
Ready for a patio that holds up for decades?
Villageprecisionpros brings more than 2,000 completed projects to every new patio job in Central Arkansas, with crews that handle design, base excavation, drainage, installation, and sealing as a single coordinated process. Where most homeowners run into trouble, drainage planning, compaction discipline, and complex pattern cuts, our crews have solved those problems dozens of times on similar lots.

If you are weighing DIY against hiring out, the clearest advantage we offer is certainty: a properly compacted base, a written drainage plan, and a finished surface that matches what you envisioned. No guesswork on base depth, no skipped compaction lifts, and no surprise callbacks because the edge restraint was under-pinned.
Schedule a consultation to get a site-specific plan and a detailed bid for your patio project. You can also explore our patio design and installation services to see the full range of what we build.
Sources
- 10-Step Guide to Installing Pavers
- How much does a patio cost to build and install?
- Concrete Patio vs Pavers: Which Wins in 2026?
- How to Lay Patio Pavers on Dirt
FAQ
How much does a 20×20 paver patio cost?
A 20×20 paver patio (400 sq ft) depends on materials, labor rates, pattern complexity, and site conditions.
Is it cheaper to pour a concrete slab than to use pavers?
Yes, upfront. Pavers need smaller repairs over time because a crew can lift and reset individual units.
Can I lay pavers directly on dirt?
No. Installing pavers directly on unprepared soil leads to several long-term issues such as shifting, staining, moss growth, and weed invasion; therefore, a compacted gravel base is essential,. A compacted gravel base is required for any paver installation that is meant to last.
What are the most common mistakes when laying pavers?
The three most costly mistakes are skipping compaction lifts in the base, omitting or improperly pinning edge restraints, and failing to plan drainage slope before excavation. A fourth mistake that surprises many DIYers is choosing a complex pattern (herringbone, circular insets) without accounting for the extra cuts, waste, and labor time it requires.