
The right pergola footing is usually a poured concrete pier, a precast pad, a screw-in helical pile, an adjustable post base on an existing slab, a compacted gravel pad, or a stepped footing on a slope. Three site conditions decide between them: soil, frost, and slope. Below we explain when each option fits and what installation involves, and when to check local code or call a pro.
TL;DR:
- Use precast pads only for compact, lightweight pergolas on firm, well drained soil; larger, taller, windy, or uncertain sites favor poured piers.
- Helical piles suit wet ground, tight access, or protected landscaping, but their lateral and uplift capacity must be designed, and installers should record site resistance.
- On slopes, use stepped footings or terraces; in freezing climates, drainage and clean gravel backfill reduce frost lift, which deeper holes alone cannot prevent.
- Footing dimensions depend on soil strength, post spacing, and roof load; get a professional design for large, attached, sloped, or uncertain sites.
- Permit exemptions for small, freestanding pergolas depend on local code adoption; confirm requirements with the building official before digging or buying footings.
Table of Contents
- Which pergola footing options fit your yard?
- What are the no-dig and screw-in alternatives, and where do they fall short?
- How do soil, frost, slope, and drainage change the right footing?
- How big and deep should pergola footings be?
- What does installation involve, step by step?
- When do you need a permit, and when should you hire a pro?
- Our view: drainage and durable materials beat extra depth
- How we can help with your pergola footings
- FAQ
- Sources
Which pergola footing options fit your yard?
Every pergola footing has the same job: carry the weight of the posts, roof, and wind loads into soil that can hold it, and keep the post base dry. The options differ in how they do that and in what site they suit.
Poured concrete piers are the workhorse. You dig a hole, form it (often with a round cardboard tube), and fill it with concrete, with a metal post base set into the top. The pier spreads load into the soil below and resists sideways movement because it is buried. We reach for piers on larger spans, taller posts, and sites where soil is soft or uncertain, since you can widen the base of the hole or add steel to match the load.
Precast pads are factory-cast concrete blocks set on a leveled, compacted bed. They install fast and suit smaller, lighter pergolas on firm, well-drained soil. The tradeoff is limited resistance to uplift and sideways push, so they belong where wind exposure is modest and the structure is compact.
Screw-in helical piles are steel shafts with helical plates that you twist into the ground. There is no excavation and no cure time. They work well on wet sites, tight access, and yards where you want minimal disturbance. We cover them in more detail in the next section.
Adjustable post bases and anchored brackets attach posts to an existing slab, deck pad, or patio. They lift the post off the concrete so water drains away, and some allow small height corrections. They only work when the slab underneath is thick and sound enough to carry the load, and when the slab itself sits on stable ground.
Compacted gravel pads and full concrete slabs give you a continuous base instead of isolated points. A gravel pad drains well and is a good bearing layer under other footings. A full slab is the better choice when you want a finished floor under the pergola anyway, because the posts and the patio share one foundation. If that is your plan, our Hardscape & Stone Masonry work often combines the slab and the pergola base in one pour.
Stepped footings handle sloped yards. Instead of setting posts at irregular depths down a grade, you build level terraces or step each footing so that every post bears on solid ground at a consistent relationship to the structure. This is safer than letting depths wander, because uneven depths invite uneven settling.
Here is a quick way to match option to situation:
- Poured piers: larger pergolas, soft or unknown soil, windy exposure.
- Precast pads: small, light structures on firm, well-drained ground.
- Helical piles: wet ground, tight access, limited site disturbance.
- Adjustable post bases: pergolas mounted on an existing, sound slab.
- Gravel pad or slab: when you want a continuous base or a finished floor.
- Stepped footings: sloped yards where terraces keep every post bearing evenly.
Post spacing matters here too. A wider, heavier pergola puts more load on each footing, so it pays to settle the size first. Our pergola size guide walks through sizing around furniture, which in turn sets post spacing and footing load.
One practical note on materials: footings themselves are commonly concrete, pressure-treated wood, ABS pads, or other listed materials, according to the federal footing rule we reference later in this article. For a pergola you plan to enjoy for decades, concrete is the material we trust most, with the post lifted off it so the wood never sits in wet soil.
What are the no-dig and screw-in alternatives, and where do they fall short?
If digging is a problem, because of roots, buried lines, a high water table, or a lawn you want to protect, a no-dig system may fit. These systems transfer load differently from a buried concrete pier, so it helps to understand how.
Helical piles and screw anchors transfer load through the steel plates on the shaft, which bear on soil below the disturbed surface layer. The installer drives them in with a machine or a high-torque drive until the soil resistance reaches the target. That resistance is a useful on-site indicator of how well the soil is holding. Afterward, a bracket on top accepts the post. Because the pile goes straight in, there is no hole to backfill and no waiting for concrete to cure.
Surface-mounted anchors and post brackets on existing concrete are the other no-dig route. They bolt to a patio or slab and hold the post above the surface. They are quick, clean, and reversible, but they depend entirely on what sits underneath.
No-dig makes sense when:
- You want minimal disturbance to a landscaped or finished yard.
- The water table is high and an open hole would flood.
- Access is tight and you cannot bring in digging equipment.
- You need to build soon and cannot wait on concrete.
The limits are real, though, and you should weigh them before committing:
- Lateral stability: a slender pile with a tall post above it can flex sideways in wind unless the connection and bracing are designed for it.
- Uplift resistance: a lightweight roof catching wind wants to pull posts up. Piles must be sized and embedded to resist that, not just to carry downward weight.
- Code acceptance: some jurisdictions and inspectors expect engineered products or documented capacities, so confirm with your local building official before you buy.
- Slab dependency: surface anchors are only as good as the slab and the ground beneath it.
Pro Tip: Ask any installer of screw piles for the installation torque or resistance they reached on your site, and keep that note with your permit records. It is the closest thing to a field test of your soil.
How do soil, frost, slope, and drainage change the right footing?
These four factors do more to decide your footing than any product choice. Walk through them before you pick an option.
Soil-bearing capacity is how much load the ground can carry before it settles. Generalized figures are unreliable, because real soil depends on water table, clay content, and moisture. A single number you read online may not describe your yard at all. In expansive clay, even correctly built footings can move at different rates, tilting or shifting a pergola. When the structure is large, the soil is clay or fill, or you see standing water, a professional soil check is the dependable way to know the footings will not settle. Record what you see as you dig: color, how wet it is, how easily it crumbles, and whether you hit rock or roots.
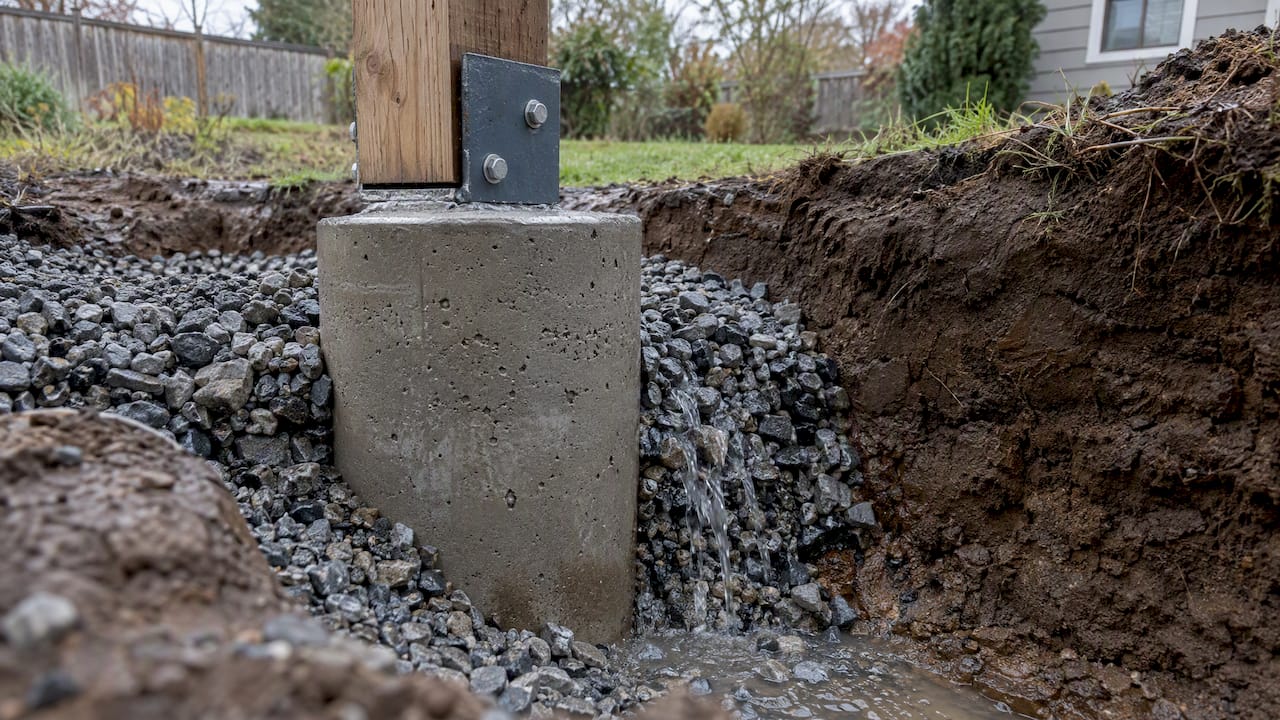
Frost matters in cold climates, where freezing soil can lift footings. Many people assume going below the frost line solves it. It reduces the risk but does not eliminate it, because of adfreezing, where frozen soil grips the side of a pier and can pull it upward. Clean, well-drained gravel backfill and good drainage reduce that grip. Some jurisdictions treat small freestanding accessory structures differently from houses, which we cover in the permits section.
Slope adds two problems: uneven bearing and erosion. Soil on a grade creeps and washes, and a footing near the edge of a slope can lose support over time. On a meaningful slope, stepped footings, terracing, or a small retaining solution give every post stable ground. If you are unsure, ask a professional before you set a single post.
Drainage is the factor homeowners underrate most. Water softens soil, feeds frost action, and rots wood. Keep water moving away from the base:
- Grade the soil so surface water runs away from the posts.
- Backfill around piers with clean, free-draining gravel rather than the fine soil you dug out.
- Lift post bottoms off the concrete with a metal base so water cannot wick up.
- Direct downspouts and irrigation spray away from the footing area.
The federal footing rule makes the same point about site-specific design. It ties minimum footing sizes to the soil’s capacity and says a registered professional must prepare the design when loads exceed what the tables show, as set out in 24 CFR § 3285.312.
If you notice cracks, sticking doors, or sloping floors in your home, take that as a sign your soil is moving. Our guide to foundation settling signs explains what to look for, and it is worth reading before you add a structure near the house.
How big and deep should pergola footings be?
Footing size comes from a simple relationship: the weaker the soil, the wider the pad has to be to spread the same load. The federal footing rule in 24 CFR § 3285.312 sets this out in tables that link soil bearing capacity to minimum pad sizes and thicknesses. It is written for manufactured home foundations, not pergolas, so we use it as a code-based reference for how sizing logic works rather than as a pergola specification.
The pattern in those tables is what matters to you. For expert help with porch construction in Midlands, SC, professionals offer comprehensive exterior contracting services including foundations and footings.
| Soil condition | What happens to the footing |
|---|---|
| Stronger soil | A smaller pad can carry the same load |
| Weaker soil | A larger pad is needed to spread the load |
| Heavier load on one footing | Larger or thicker pad, or reinforcement |
| Loads above the table values | A registered professional prepares the design |
The rule lists examples of minimum cast-in-place concrete thickness, with a 6-inch minimum for many pad sizes and greater thickness where loads are higher or soil is weaker. Treat those examples as an illustration of the method, and not as a promise that a given pad will work under your pergola.
Some points that help when you talk with a building official or contractor:
- Reinforcement and larger pads come into play when a footing carries more than the table values, such as under a heavy timber roof or a tall, wide structure.
- Depth alone does not stop frost heave. A deeper hole helps, but drainage and clean gravel backfill do much of the protecting. Your local frost depth, available from your building department, tells you the depth inspectors expect where it applies.
- Spacing and span change the load. Fewer posts mean more load per footing, so a larger pergola usually needs larger footings.
- Soil is the variable you cannot see. If you do not know your soil, size conservatively and verify with a professional.
When the pergola is large, attached to the house, built on a slope, or sits on questionable soil, bring in a professional for an engineered footing recommendation. It is a small step compared with lifting and resetting a settled structure later.
What does installation involve, step by step?
Whether you hire out the work or do some of it yourself, knowing the sequence helps you spot shortcuts. Here is how we approach a poured-pier pergola, with notes for other footing types.
- Lay out and locate utilities. Mark post locations with stakes and string, check that the layout is square by measuring diagonals, and call your utility locate service before any digging. Clear the site of sod, roots, and debris.
- Excavate to the planned depth and width. Dig each hole to the depth your plan and local code call for, with a firm, undisturbed bottom. Remove loose soil rather than tamping it back.
- Place a gravel layer. Spread and compact clean, free-draining gravel at the bottom of each hole. This gives water a path out and reduces the frost-susceptible fines around the footing.
- Form and reinforce. Set a form tube if you are using one, add any reinforcement the design calls for, and keep everything plumb.
- Pour and set the post base. Fill with concrete, preferably in one continuous pour per footing, and set the metal post base or anchor bolt at the exact location while it is workable.
- Let it cure, then set posts. Allow the concrete to reach strength before loading it. Attach each post to its base with the correct hardware, with the post bottom held off the concrete.
- Backfill and grade. Backfill around the footing with gravel where the design calls for it and grade the surface so water runs away.
Protecting the wood is part of the footing job. Posts that touch soil soak up moisture and rot from the bottom. We work to avoid exactly that, as explained in our piece on why cedar pergola posts never touch the soil.
For a compacted gravel pad, the base prep follows the same logic as paver work: a well-compacted aggregate layer on stable subgrade. Our paver base depth guide covers compacted-base specifics you can apply to a gravel pad.
Inspection checkpoints worth requesting or doing yourself:
- Hole bottoms are firm, undisturbed, and free of standing water before concrete goes in.
- Footing locations match the plan and the diagonals are square.
- Anchors and post bases are set at the correct position and height.
- Gravel and drainage are in place before backfill.
Common mistakes that lead to settling include setting footings on loose fill, skipping the gravel layer, burying wood posts directly in concrete or soil, and ignoring where roof and yard water drain.
Pro Tip: Photograph each hole before the pour, with a tape measure in the frame. Those photos double as proof of depth if an inspector or a future buyer ever asks.
When do you need a permit, and when should you hire a pro?
Permit rules for pergolas vary by town and county, so the first call is to your local building official. Some jurisdictions allow exceptions for small, freestanding accessory structures. The model residential code addresses this in its frost-protection provisions for accessory structures, where light-framed, limited-footprint structures not attached to the home may be exempt from the strict frost-depth requirements. The area limits and conditions depend on how your jurisdiction adopted the code, which is why asking locally matters.
Features that commonly trigger a permit or an engineered footing:
- A large footprint or tall posts.
- Attachment to the house, which ties the pergola to the home’s structure.
- Poor, expansive, or unverified soils.
- A sloped site or a location near a slope edge.
- Electrical work or a solid roof added later.
A competent contractor should handle the site evaluation, submit the permit, and bring in an engineered footing recommendation when the site calls for it. That includes keeping the paperwork organized so the inspection goes smoothly. If you are weighing DIY, be honest about the soil and the structure: a small pergola on firm, level ground is a reasonable weekend project, while a big or attached structure on uncertain ground rewards professional help.
Our view: drainage and durable materials beat extra depth
In our experience, the footing that lasts is the one that stays dry. Water is what drives settling, frost lift, and rot, so we put drainage and a correct gravel backfill ahead of adding a few more inches of depth. A footing that is a little shallower but sits in clean gravel with water routed away will usually outperform a deeper one sitting in soggy fines. Pair that with durable materials, concrete below and wood held off it, and you have removed most of the common failure modes before the first post goes up.
Hard sites deserve honest respect. Expansive clay, slopes, and high water tables are where we slow down, test, and plan, because a mistake there costs far more than the planning would have. Write down what you find in the soil as you dig, and keep your permit documents and inspection photos in one folder. They help with maintenance, with insurance, and with resale.
Ty
How we can help with your pergola footings
Pergola footings are part of the work our crews do. Through our Decks & Patios and Hardscape & Stone Masonry services, we handle site evaluation, drainage, and installation, along with foundation leveling where a site calls for it.
If you want a pergola that stays level and dry for years, start with a site evaluation. We look at your soil, slope, and water paths, recommend the footing type that fits, and give you a clear scope and quote. Local to Central Arkansas, we know the clay and drainage issues that show up here.

Contact Village Precision Pros today for a local assessment and project quote on your pergola.
FAQ
How deep should a pergola footing be?
Depth depends on your local frost depth and soil, so check with your building department. Some jurisdictions exempt small freestanding accessory structures from strict frost-depth rules under the model residential code. Even then, good drainage and gravel backfill matter as much as depth.
Are 4×4 posts strong enough for a pergola?
For a small, low pergola, 4×4 posts can work, but larger spans and taller structures usually call for larger posts. Thicker posts resist bending and wind better, and they bear more load on each footing. If you are unsure, ask a contractor to size the posts for your span.
How do you do footings for a pergola?
Lay out and locate utilities, dig to firm ground, add compacted gravel, then pour concrete with a post base set on top. Let the concrete cure before attaching posts, and keep the wood off the concrete. For larger or attached structures, have a professional confirm the design.
What can you use instead of concrete footings?
Screw-in helical piles, precast pads, and adjustable post bases on an existing slab are common alternatives. Helical piles need no digging and suit wet or tight sites. Confirm that your local building official accepts the product before you buy.
Sources
- Codes
- 24 CFR § 3285.312 – Footings. | Electronic Code of Federal Regulations (e-CFR) | US Law | LII / Legal Information Institute