For pedestrian walkways and patios, compact your paver base to about 4 inches; residential driveways usually require around 6 inches, and heavier vehicular areas need a thicker base, varying with load and soil conditions. But depth alone won’t save you. The single rule that matters more than any number on this chart is compaction quality: a 4-inch base compacted to 98% density outperforms an 8-inch base that was dumped and skimmed. Add a bedding sand layer about 1 inch thick after screeding, adjusting upward for soil, drainage, or frost conditions as necessary.
TL;DR:
- Proper compaction density (around 98%) is more critical than depth for ensuring long-lasting paver installations, especially on unstable soil.
- Soil type, drainage, frost exposure, and load influence whether you should increase base depth beyond standard recommendations, sometimes requiring professional assessment.
- Using ASTM No. 57 crushed stone for the base, a 1-inch layer of bedding sand, and installing edge restraints properly enhances stability and prevents future settling.
- Installing in lifts, verifying compaction, and ensuring a flat, well-drained base are essential steps that DIYers often overlook, leading to common sinking issues.
- Always order 1.25 times the compacted volume in loose material to account for settling, and consider professional guidance for sites with clay soil, poor drainage, or vehicle loads.
Table of Contents
- Recommended Paver Base Depth by Application
- How Do You Know If Your Site Needs a Deeper Base?
- What Materials Go Into Each Layer of a Paver Base?
- How Do You Install and Compact a Paver Base Correctly?
- How Much Base Material Do You Actually Need to Order?
- What Are the Most Common Paver Base Mistakes?
- What Should a Contractor Check Before Signing Off on a Job?
- What DIYers Get Wrong About Paver Base Depth
- How a Professional Consultation Can Help With Base and Drainage Decisions
- Sources
- FAQ
Recommended Paver Base Depth by Application
The chart below reflects compacted thickness, not the loose material you’ll be ordering. That distinction trips up more DIYers than any other part of this project, so keep it in mind as you plan.
| Application | Compacted base depth | Notes |
|---|---|---|
| Pedestrian walkway | about 4 in | Minimum for light foot traffic on stable soil |
| Patio | about 4 to 6 in | 6 in for larger patios, poor drainage, or clay-heavy soil |
| Residential driveway | about 6 in | Commonly pushed to deeper bases for daily car traffic |
| Vehicular / parking area | a thicker base typically between moderate and heavy depths | Delivery trucks, RVs, or commercial-grade loads |
These figures line up with the Concrete Masonry & Hardscapes Association baseline for pedestrian, residential, and light commercial applications. CMHA’s guide specification also sets the bedding sand depth at a nominal 1 inch after screeding, a number worth memorizing before you order anything.
Pro Tip: Every depth on this chart assumes compacted aggregate, not what comes off the truck. We cover the exact math in the ordering section below.
How Do You Know If Your Site Needs a Deeper Base?
The chart above assumes decent soil, workable drainage, and normal foot or car traffic. Real yards rarely hand you all three at once, and that’s where judgment has to take over from the table.
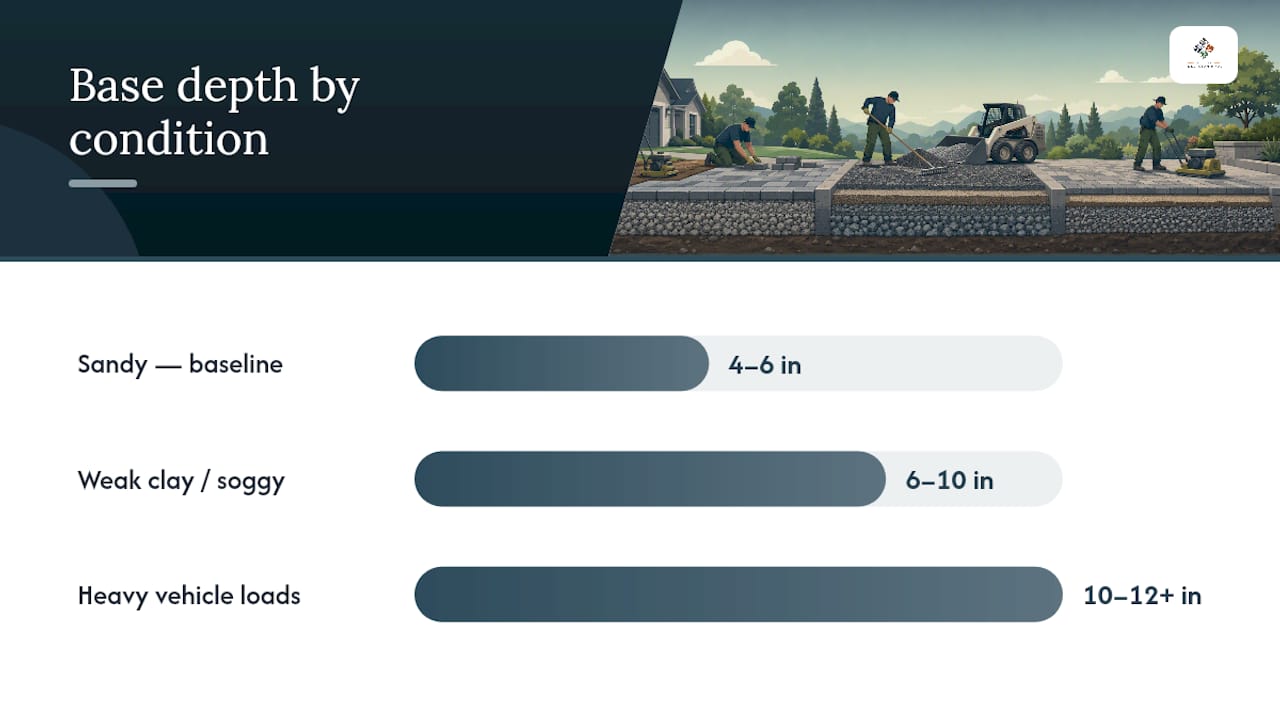
Soil strength is the first variable. Engineers measure this with a California Bearing Ratio (CBR) test, but you don’t need a lab report to spot a problem. If your subgrade is heavy clay, stays soggy after rain, or squishes underfoot when wet, add 2 to 4 inches beyond the baseline depth. Sandy, well-draining soil rarely needs the extra allowance.
Frost is the second variable, and it’s regional. In freeze-thaw climates, ground movement can heave a paver surface no matter how well you compacted the base. CMHA’s technical guidance points to three fixes: increase base depth substantially, add a separated subbase layer to interrupt frost movement, or design a permeable base system with underdrains that lets water escape before it freezes. Which one you need depends on local frost depth and how well your soil drains.
Load is the third variable, and it follows a simple hierarchy:
- Pedestrian traffic needs the least support and the thinnest base.
- Patios with furniture and foot traffic need a bit more.
- Driveways carrying daily car weight need meaningfully more. Delivery trucks, RVs, or heavy equipment access need the most, often 10 to 12 inches or more.
When two or more of these factors stack against you (poor soil plus a driveway, say, or frost plus heavy vehicle loads), that’s the point to call in a geotechnical engineer or an experienced local contractor rather than guessing.
What Materials Go Into Each Layer of a Paver Base?
Getting the depth right means nothing if you’re using the wrong aggregate. Three material choices come up constantly:
- Base aggregate: ASTM No. 57 crushed stone (sometimes labeled crusher run or dense-graded aggregate) is the workhorse for base lifts, prized because its mix of stone sizes locks together and compacts tightly.
- Subbase (when needed): Larger, more open-graded stone like No. 2 or No. 3 gets used under the primary base on soft soils or in permeable designs where drainage matters more than density.
- Bedding sand: Coarse concrete sand, often specified as ASTM C33 or a similar washed sand, goes down last in a thin, uniform layer.
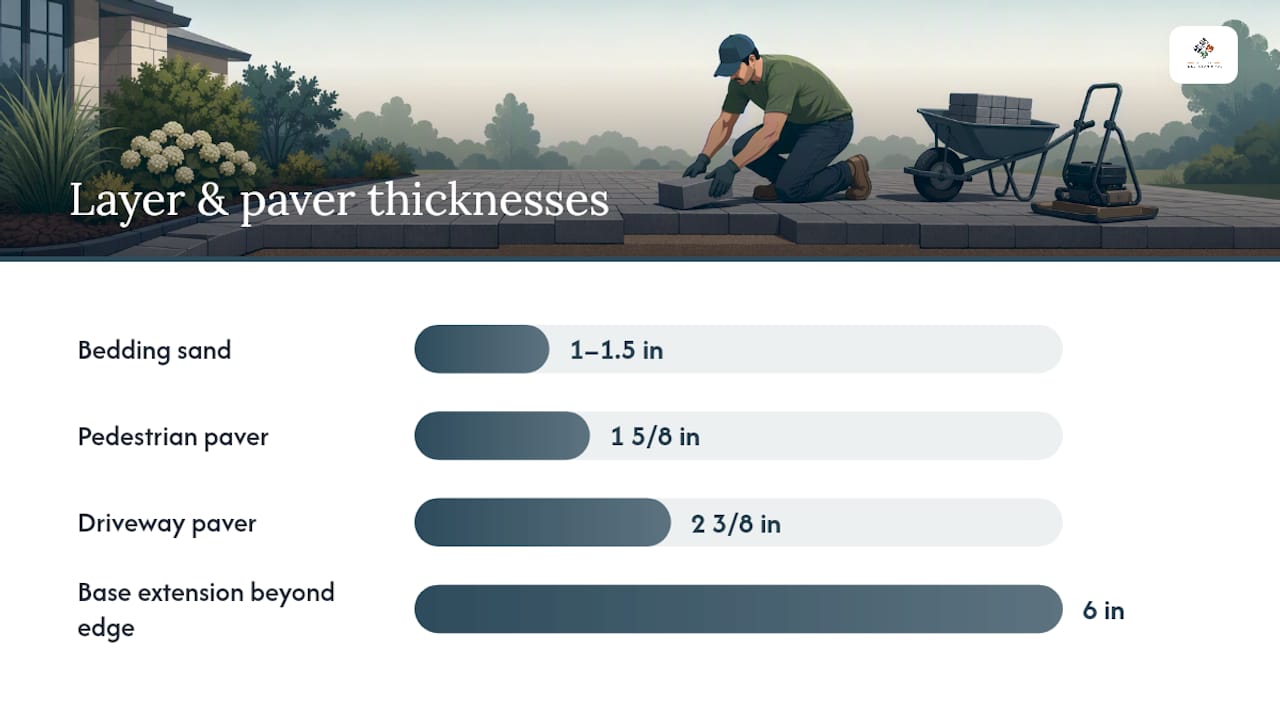
The bedding sand rule is worth repeating on its own: screed it to about 1 inch nominal depth and avoid exceeding roughly 1.5 inches. Bedding sand is a leveling layer, not a structural fix. Piling on extra sand to hide a low spot in your base is one of the fastest routes to a sunken paver repair job down the road, because sand shifts and compresses under load in ways compacted aggregate doesn’t.
Paver thickness matters too. Industry references from CMHA and the ICPI generally call for a minimum of 1⅝ inches (about 40mm) for pedestrian applications, stepping up to 2⅜ inches (60mm) or more for driveways carrying vehicle weight. Check your specific paver’s rating before buying.
Edge restraint closes out the system. Rigid plastic or aluminum edging should be spiked directly into the compacted base, not the native soil beneath it, and the base itself needs to extend at least 6 inches beyond the outer edge of your last paver row. Skip this and your entire installation depth calculation becomes irrelevant once the edges start creeping.
How Do You Install and Compact a Paver Base Correctly?
Depth and materials only pay off if the installation sequence is right. Here’s the order that actually works:
- Excavate for the full system depth. Add your compacted base depth, bedding sand depth, and paver thickness together. A patio needing a 4-inch base, 1-inch sand, and 2-inch pavers means digging 7 inches below your target finished surface.
- Lay geotextile fabric across the exposed subgrade before any stone goes down. This keeps base aggregate from migrating into the soil below, which is one of the quieter causes of long-term settling.
- Place and compact base aggregate in 2 to 4 inch lifts. Unilock’s installation guidance is direct on this point: if you’re building a 6-inch base, that means two separate passes with a plate compactor, not one. Dumping the full depth and compacting once leaves loose, uncompacted material at the bottom no matter how long you run the machine on top.
- Verify compaction and flatness before sand goes down. Professionals check density against 98% Proctor targets and confirm the surface sits within ±3/8 inch over a 10-foot straightedge, per CMHA’s guide specification. DIYers without access to a density gauge can still catch obvious low spots and soft areas with a straightedge and a firm footstep test.
- Screed bedding sand to a nominal 1 inch and lay pavers the same day, before rain or foot traffic disturbs the sand bed.
Pro Tip: Rent a reversible plate compactor, not a vibratory tamper, for base work. Make at least two overlapping passes per lift in a grid pattern, and check for standing water on the surface after compaction. If water pools instead of shedding, your subgrade needs correction before you add another lift.
How Much Base Material Do You Actually Need to Order?
Compacted depth and ordering volume are two different numbers, and mixing them up is how people end up short on delivery day.
- Compacted material settles once run over with a plate compactor, so the loose stone you order has to cover that shrinkage.
- The standard rule of thumb is to order about 1.25 times your compacted volume, a multiplier contractors use regularly to avoid a second trip to the supplier.
- The formula: area in square feet × depth in inches ÷ 324 = cubic yards of compacted material.
Here’s a worked example for a 12-by-12-foot patio at a standard 4-inch compacted base depth:
Convert cubic yards to tons using your specific supplier’s density figure, since crushed stone weight varies by material and moisture content. When you call a supplier, ask whether they deliver by the yard or by the ton, whether there’s a minimum order for small patios, and whether their No. 57 stone is locally sourced, since gradation can vary by region.
What Are the Most Common Paver Base Mistakes?
Most sunken paver repair calls trace back to one of these four errors, and every one of them is avoidable.
- Compacting the full depth in one pass. This leaves the bottom of the base loose no matter how long you run the compactor on the surface. Work in 2 to 4 inch lifts every time.
- Using bedding sand to fix a low spot in the base. Sand isn’t structural. Rework the base itself to ±3/8 inch tolerance instead of piling on extra sand.
- Skipping edge restraint, or spiking it into native soil instead of base. Pavers spread laterally under load without solid edging, and soil doesn’t hold a spike the way compacted aggregate does.
- Ignoring drainage during installation. Water trapped under a paver system saturates the subgrade and undermines compaction from below, often the real cause behind a patio that develops on visible dips within a year or two.
If you’re already seeing uneven settling, that’s usually a sign the base failed, not the pavers. Fixing it means pulling up the affected section, correcting the base to spec, and relaying rather than just adding more polymeric sand to the joints.
What Should a Contractor Check Before Signing Off on a Job?
Base preparation is where nearly every project either succeeds or fails long before the first paver goes down.
A qualified crew checks the same items every time: compaction verified in lifts rather than assumed, surface flatness confirmed against a straightedge, and edge restraint anchored into base material with proper spacing. These aren’t optional extras; they’re the acceptance criteria that separate a patio that lasts fifteen years from one that needs sunken paver repair within three.
Hiring a pro makes the most sense when your soil is clay heavy, drainage is already a known problem, or the project involves vehicle loads like a driveway or parking pad. Those are the situations where a misjudged depth costs real money to fix later.
What DIYers Get Wrong About Paver Base Depth
The conventional advice on this topic treats depth like the whole answer, and that’s backwards. Every chart, including the one at the top of this guide, gives you a starting number. The number that actually determines whether your patio lasts is compaction density, and that’s the part most DIY guides gloss over because it’s harder to reduce to a single figure.
Here’s what I’d prioritize differently: spend less mental energy debating whether your patio needs 4 or 5 inches of base, and more energy on renting the right compactor and running it in proper lifts. A homeowner who compacts a 4-inch base correctly in two lifts will outlast a neighbor who dumped 6 inches and ran a plate compactor over it once.
The other underrated factor is drainage. Depth charts assume water gets away from the base. If your yard holds water, no depth on any chart saves you, and that’s exactly the kind of site-specific problem worth a professional drainage assessment before you excavate anything.
— Ty
How a Professional Consultation Can Help With Base and Drainage Decisions
Villageprecisionpros gives you a straightforward alternative to guessing at depth charts and renting equipment for a one-time job: a site visit that catches soil and drainage problems before they turn into a sunken patio.

A consultation typically includes a walk of the site, an assessment of soil conditions and existing drainage, and a written estimate that accounts for the specific depth and material adjustments your yard actually needs, not just the textbook baseline. That matters most when clay soil, standing water, or heavier vehicle traffic complicate the simple version of this project. This consultation service is available to homeowners and is entirely optional. If your project looks straightforward, the guide above will carry you through it. If you’d rather have a second opinion before you excavate, schedule a landscaping consultation and get a clear read on what your specific site needs.
Sources
- Proper Concrete Paver Base and Depth: What to Know and Why It Matters – CMHA
- Do’s and Don’ts of Paver Installation: Step 2 of 3 – Base Preparation – Unilock
- Paver Base Depth Guide for Patios, Walkways and Driveways – BuildCalcHub
FAQ
How deep should a paver base be?
Compacted base generally runs about 4 inches for walkways and patios, approximately 6 inches for residential driveways, and deeper for vehicular or parking areas, with adjustments for poor soil, drainage, or frost exposure.
Is 2 inches of sand too much for pavers?
Yes. Bedding sand should be screeded to a nominal 1 inch and should never exceed 1.5 inches, since sand is a leveling layer, not a structural fix for an uneven base.
Can I use 3/4 inch gravel for paver base?
Straight 3/4 inch gravel isn’t ideal because it lacks the mix of particle sizes needed to compact tightly; a graded aggregate like ASTM No. 57 crushed stone locks together far better and is the industry standard for base lifts.
How much paver base do I need for a 12×12 patio?
A 12 by 12 foot patio at a 4 inch compacted depth needs about 1.78 cubic yards of compacted base material, which means ordering roughly 2.23 cubic yards of loose material after applying the standard 1.25× multiplier.