
A yard swale is a shallow, gently sloped channel that moves rainwater away from problem areas while filtering it as it travels. Done right, it solves standing water and soggy lawns without looking like a ditch. The three things that make it work are correct sizing, safe slope, and the right plants. What follows covers the types, dimensions, materials, build steps, and upkeep that separate a swale that performs for decades from one that erodes after the first hard rain.
TL;DR:
- Swale size must cover 1% to 10% of the contributing drainage area, with side slopes no steeper than 3:1 to prevent erosion.
- The longitudinal slope should be between 1% and 4%, with steeper grades requiring check dams or step pools to control flow.
- Native deep-rooted plants improve infiltration and stability, especially when densely planted at channel bottoms, and curving the channel enhances landscape integration.
- Proper permitting depends on local regulations, drainage area size, and proximity to property lines, with larger or complex projects needing licensed professional involvement.
- Construction costs vary from simple grass swales using DIY methods to engineered bioswales with soil media and structural elements, requiring careful planning and possible professional assistance.
Table of Contents
- What Is a Yard Swale, and When Do You Actually Need One?
- Which Type of Swale Fits Your Yard?
- How Big Should a Swale Be? Sizing and Key Dimensions
- What Materials and Plants Work Best in a Swale?
- How Do You Build a Swale Step by Step?
- How Often Does a Swale Need Maintenance?
- How Does a Swale Affect Your Neighbors’ Property?
- Do You Need a Permit to Build a Swale?
- What Does a Swale Cost to Build?
- How Do You Blend a Swale Into Your Existing Landscape?
- How We Approach Swale Design on Real Properties
- Let professionals handle the grading you don’t want to guess at
- Where to Learn More
- Sources
- FAQ
What Is a Yard Swale, and When Do You Actually Need One?
A swale conveys and treats runoff at the same time. That’s the key difference from a rain garden, which is built to hold water and let it soak in, and from a plain drainage ditch, which just moves water without filtering anything. A swale splits the difference: water flows through it toward an outlet while vegetation and soil strip out sediment along the way.
You probably need one if you notice:
- Water pooling in the same low spot after every storm
- Runoff carving bare, muddy channels across the lawn
- A neighbor’s yard, driveway, or downspout dumping water onto your property
- Erosion along a slope or near a foundation wall
Swales aren’t the answer everywhere. Very steep terrain, a high water table, or a drainage area larger than a typical residential lot usually calls for engineered piping, a detention basin, or a rain garden instead. If your problem is a single downspout puddle rather than a whole yard grading issue, start with simpler yard drainage fixes before you dig a swale.
Which Type of Swale Fits Your Yard?
Swales come in a handful of variations, and matching the type to your soil and slope determines whether the project succeeds.
- Dry (grass) swales: Turf or low grass lines a shallow channel that drains within a day or two of a storm. Best for moderate slopes and moderate clay soils where you want a mowable, low-fuss look.
- Vegetated swales (bioswales): Dense native plantings and engineered soil media replace turf, boosting filtration and pollutant removal compared to grass alone, according to EPA bioretention guidance. These work well where water quality matters, like runoff heading toward a pond or creek.
- Wet swales: Built where the water table sits close to the surface, so standing water is expected and marsh-tolerant plants do the work.
- Rock-lined (dry creek) swales: Rounded river rock or cobble replaces vegetation in the channel bottom, ideal for steeper grades or a strong visual feature.
Grass swales are the easiest to maintain. Bioswales filter the most pollutants. Rock-lined channels handle higher velocity and double as a landscape focal point.
How Big Should a Swale Be? Sizing and Key Dimensions
Getting the dimensions wrong is the single most common reason a swale fails, either by overflowing in a storm or by turning into a muddy trench that never drains. A few rules of thumb keep most residential projects on solid ground.
By the numbers: Swale footprint should generally cover 1% to 10% of the total contributing drainage area, and side slopes should stay at 3:1 (horizontal:vertical) or flatter to resist erosion and support plant roots.
Longitudinal slope, meaning the drop along the channel’s length, matters just as much as width. A minimum of 1% keeps water moving instead of stagnating, but once the grade climbs past 4%, erosion risk rises fast, and above roughly 6% you’ll need check dams or step pools to slow the flow. Bottom width typically runs 2 to 8 feet, with wider channels improving treatment but requiring more yard space, per Oregon State Extension guidance.
If your site has high groundwater, karst geology, or a contributing area larger than a half acre or so, that’s your signal to bring in a civil engineer before you break ground. Local permitting offices may require the same review, which is worth checking before you finalize any grading plan.
What Materials and Plants Work Best in a Swale?
Material choice depends on how much water moves through the channel and how often. Rock or pea gravel bottoms handle higher velocity and stay attractive with minimal upkeep, which makes them a strong pick for steeper sections or areas near a downspout outlet. Vegetated bottoms and engineered soil media, by contrast, do more filtering work and fit gentler, slower-moving stretches.
Plant selection is where a swale earns its keep visually and functionally. Deep-rooted native plants outperform ordinary turf grass for both infiltration and bank stability, since their root systems reach further into the soil and hold it in place during heavy flow. Good choices include:
- Native sedges and rushes for the wettest zone at the channel bottom
- Tall native grasses like switchgrass or little bluestem on the side slopes
- Perennials tolerant of both flooding and drought for the upper edges, since a swale swings between soaked and bone dry
- Riprap or erosion-control matting at inlets and outlets where water enters fastest
Pro Tip: Plant the channel bottom more densely than the side slopes. That’s where erosion pressure is highest right after installation, before root systems have had a season to establish.
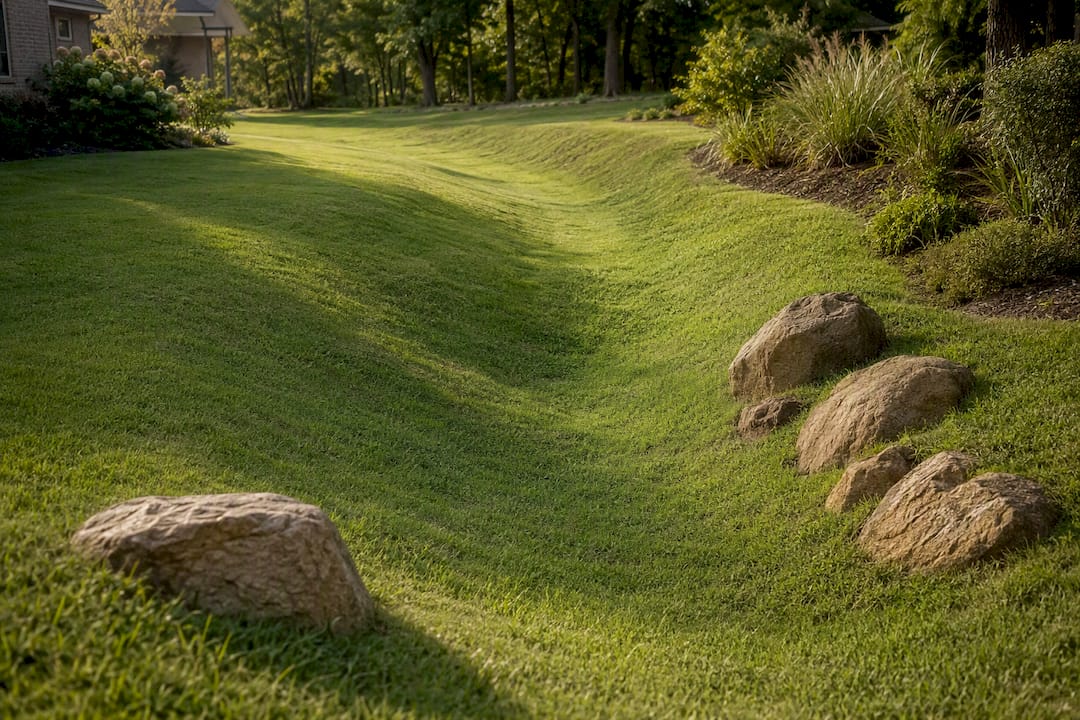
Curving the channel instead of running it straight, and tucking a few boulders along the bank, turns a purely functional feature into something that reads as an intentional part of the landscape rather than a drainage afterthought.
How Do You Build a Swale Step by Step?
Follow this sequence whether you’re planning the work yourself or handing it to a contractor:
- Call before you dig. Locate buried utilities, septic lines, and irrigation before any excavation starts.
- Measure the contributing drainage area. Estimate the square footage of roof, driveway, and lawn that will feed the swale, since that number drives your sizing.
- Check infiltration. A simple perc test tells you whether the native soil drains fast enough, or whether you’ll need an underdrain and engineered media instead.
- Set grades and sketch the plan. Mark the inlet, the outlet, and where overflow goes in an extreme storm, plus a few inches of freeboard above the design water level.
- Excavate and build the cross-section. Shape a trapezoidal or parabolic channel, install underdrains or check dams if the plan calls for them, and stabilize the outlet with rock so discharging water doesn’t erode the next spot downstream.
- Plant and mulch. Install the plant palette matched to each wet zone, then mulch the upper banks to hold soil while roots establish.
- Verify drawdown. After the next real storm, confirm the channel drains within the design window, generally 24 to 48 hours, rather than holding water longer.
- Bring in a pro when the site gets complicated. High groundwater, tight utility corridors, or a drainage area feeding multiple properties all justify a licensed contractor or engineer rather than a weekend project.
How Often Does a Swale Need Maintenance?
A swale isn’t a set-it-and-forget-it feature. Plan to inspect it after every major storm and at least twice a year otherwise, checking for sediment buildup, eroded edges, and any spot where water pools longer than the design drawdown time, a routine Virginia Tech Extension recommends for grass swales specifically.
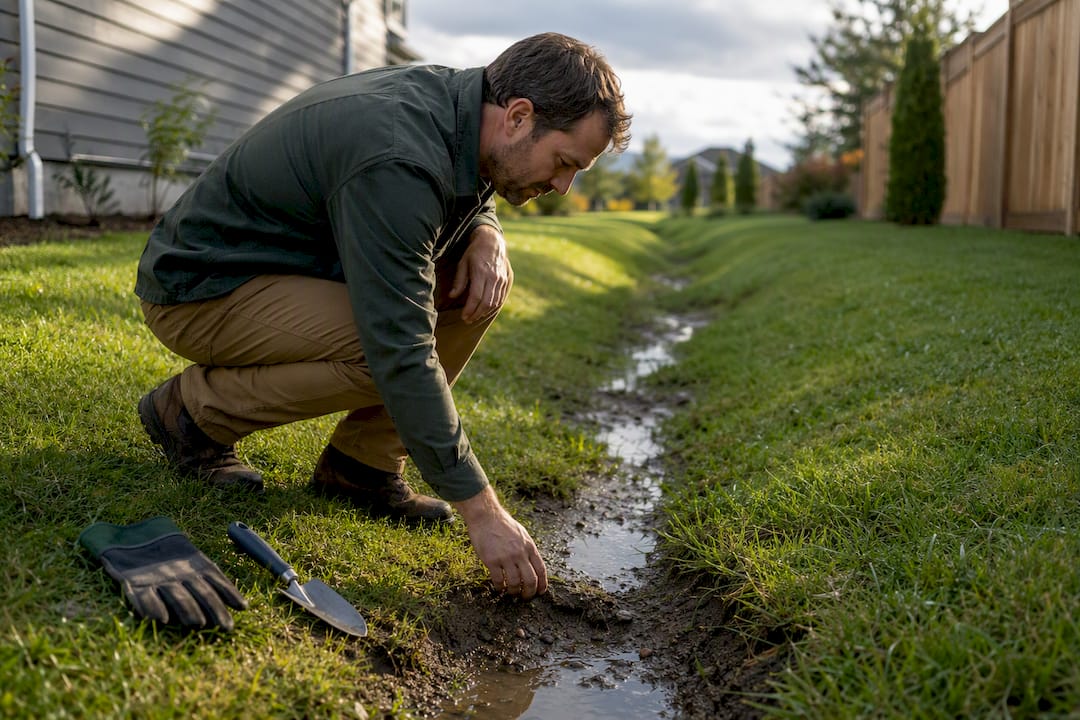
Routine tasks are simple: clear leaves and debris from the channel, remove accumulated sediment before it chokes flow, mow grass swales to the height that keeps vegetation dense without smothering it, and reseed bare patches before they turn into erosion channels.
The mistakes that cause the most callbacks are predictable:
- Undersizing the channel for the actual drainage area
- Building side slopes steeper than 3:1, which erodes almost every time
- Planting turf grass where deep-rooted natives were needed for stability
- Locating the swale too close to a foundation, well, or septic field
Pro Tip: Standing water more than two days after a storm, visible sinkholes along the banks, or a foundation that’s suddenly damp nearby all mean it’s time to call a professional rather than keep patching the problem yourself.
How Does a Swale Affect Your Neighbors’ Property?
Water that used to pool in your yard has to go somewhere once a swale sends it moving, and that “somewhere” is often a neighboring lot or a shared drainage easement. Redirecting runoff onto adjacent property without a legal outlet or agreement is one of the most common disputes between neighbors, and it’s avoidable with a little upfront planning.
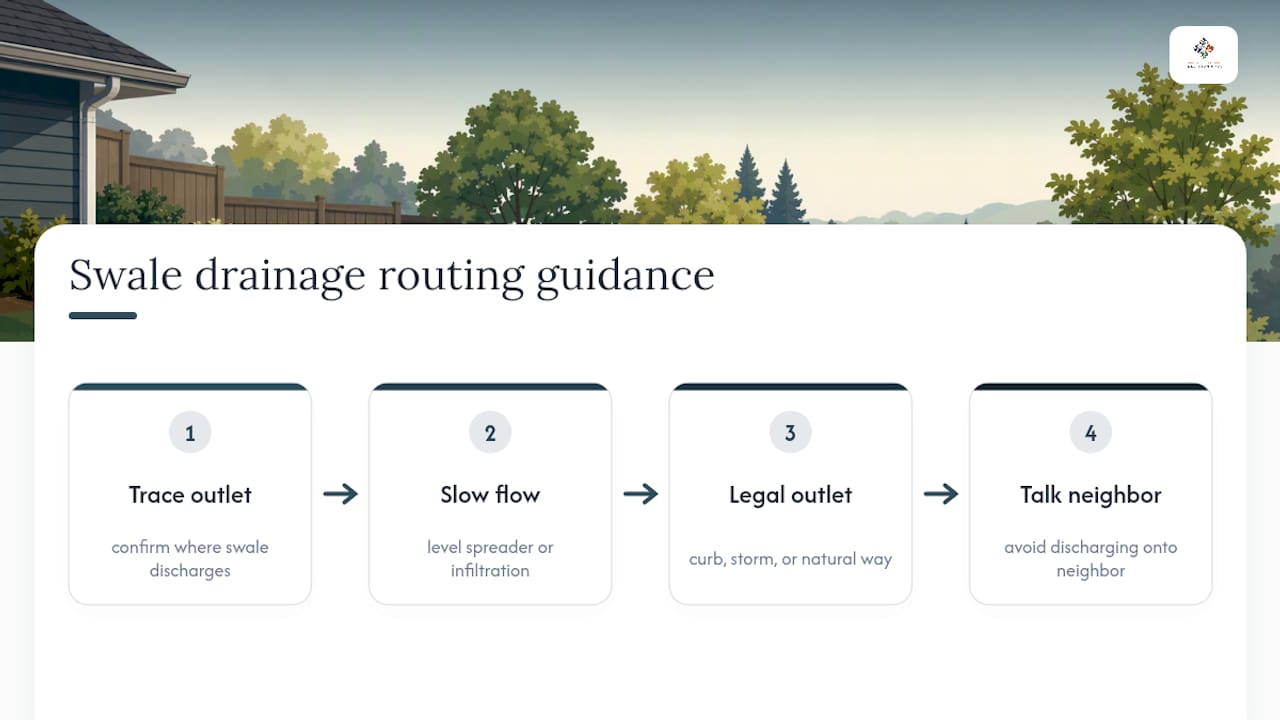
Start by tracing where your swale’s outlet actually discharges. If it empties onto a neighbor’s yard, into a shared ditch, or toward a street storm drain, confirm that the destination can legally and physically handle the added flow. A swale that concentrates water into a single fast-moving outlet can cause more erosion downstream than the diffuse runoff it replaced, even if your own yard looks better.
A few practical strategies keep the peace:
Route swales toward existing, legal drainage infrastructure such as a street curb inlet, a municipal storm system, or a natural drainage way rather than directly onto a fence line. Where a swale must cross or approach a property line, a quick conversation with the neighbor before construction heads off disputes that are much harder to resolve after the concrete or plants are in. Consider a level spreader or additional infiltration area near the outlet to slow water down before it leaves your property, rather than letting it exit as a concentrated stream.
If your property sits in a subdivision with a shared stormwater system, check whether swales on individual lots are expected to tie into a common drainage easement. Many developments are graded as an interconnected system, and altering one lot’s flow path can shift water problems onto lots that were never designed to handle it. When in doubt, a licensed surveyor or civil engineer can confirm your property’s drainage easements and legal discharge points before you finalize a design.
Do You Need a Permit to Build a Swale?
Requirements vary significantly by municipality, so treat any general rule here as a starting point, not a final answer for your address. Many jurisdictions allow minor grading and drainage work without a permit, but that threshold usually depends on the volume of earth moved, the size of the drainage area involved, and whether the swale discharges toward a neighboring property or a public right-of-way.
Grading permits become more likely once a project moves significant soil, alters the flow path shown on a subdivision’s approved drainage plan, or affects a floodplain or wetland buffer. Some cities also require a review any time work occurs within a certain distance of a property line or public easement, regardless of the volume of dirt involved.
POA rules add a second layer that’s easy to overlook. Many property owners associations restrict grading changes, require design approval for visible landscape features, or have specific rules about how stormwater must be managed to protect shared common areas. A swale that’s perfectly legal under city code can still violate a POA’s architectural guidelines if it wasn’t submitted for approval first.
Before you start digging, check with your local building or planning department about grading and stormwater permit thresholds, and pull your POA’s covenants if one applies to your property. It’s a short phone call that can prevent a costly redo, and in many areas it’s also the fastest way to learn whether your planned outlet point is considered a legal discharge location.
What Does a Swale Cost to Build?
Cost swings widely based on length, depth, material choice, and whether the project needs engineered media or underdrains. A short, shallow grass swale that a homeowner shapes with a rented skid steer and reseeds with turf sits at the low end of the spectrum. A longer bioswale with engineered soil media, native plant plugs, check dams, and stabilized rock outlets costs considerably more, since materials, labor, and plant establishment all scale up together.
The biggest cost drivers, in order of impact, are usually excavation volume, the type of bottom material (grass versus engineered media versus rock), the plant palette, and any structural elements like check dams or underdrains required by poor infiltration soil. A rock-lined dry creek bed often costs more upfront than a grass swale of the same length because of stone and delivery costs, but it also demands far less ongoing labor once it’s in.
Budgeting realistically means accounting for a few line items beyond the hole in the ground: soil testing or a perc test if infiltration is questionable, plant material and the first season of establishment watering, erosion-control matting at inlets and outlets, and any permit fees your jurisdiction requires. Homeowners tackling a straightforward grass swale on gentle terrain can often manage costs by doing grading and seeding themselves and hiring out only the outlet stabilization. Anything involving engineered media, underdrains, or a drainage area feeding multiple downspouts is worth pricing out with a professional, since a miscalculated swale that fails within a year costs more to fix than it would have to build correctly the first time.
How Do You Blend a Swale Into Your Existing Landscape?
A swale doesn’t have to look like infrastructure. The channel’s curve, its plant palette, and how it connects to the rest of your yard all determine whether it reads as a designed feature or a scar across the lawn.
Curving the path instead of running it in a straight engineered line is the single easiest way to make a swale feel intentional, since a gentle bend mimics how water moves naturally across terrain. Tucking a few boulders along the outer bank of each curve reinforces that look while also slowing water at exactly the points where velocity tends to build.
Plant choice ties the swale to the rest of the landscape. Extending a native grass palette from the swale into adjacent low-maintenance garden beds creates visual continuity instead of an obvious drainage feature bolted onto an otherwise manicured yard. A swale that runs near a patio or seating area benefits from taller ornamental grasses along its far bank, screening the channel while still allowing water to flow freely.
Lighting is an underused trick here. Low path lights or uplighting on a boulder accent along the swale’s edge extends its usefulness into the evening and reinforces that the feature was planned, not tolerated. Where a swale crosses a walking path, a simple stepping-stone or small culvert crossing keeps the yard functional without breaking the channel’s flow.
How We Approach Swale Design on Real Properties
We start every swale project with a site walk, checking soil type, existing grade, and where water actually collects during a storm, not just where a property line diagram suggests it should. Function comes first, but we design the planting plan and channel curve to fit the rest of the yard from day one rather than treating it as an afterthought. We’ve seen how often an undersized or poorly graded swale gets called in as a repair job. For straightforward grass swales on gentle, well-draining lots, a capable homeowner can handle the work. Once groundwater, engineered media, or neighboring drainage gets involved, that’s when a licensed crew earns its keep.
Ty
Let professionals handle the grading you don’t want to guess at
Village Precision Pros solves the part of swale design most homeowners get wrong on the first try: reading your yard’s actual grade and water flow before a single shovel goes in the ground. Our landscape and irrigation team handles site assessment, grading, drainage planning, and planting as one connected process instead of separate guesswork.

Here’s what that looks like in practice. We walk the property to map where water actually pools and where it needs to go, sketch a plan that fits your yard’s layout and any permit requirements your city or POA may apply, then handle excavation, check dams, and outlet stabilization before planting the palette that will hold the banks long term. If your project touches a patio, retaining wall, or other hardscape features, we coordinate that work in the same visit so the drainage and the hardscape are built to match, not patched together after the fact. Once the swale is established, our annual maintenance plans keep sediment cleared and vegetation healthy without you having to track a mowing height or inspection calendar yourself.
If standing water or a soggy corner of your yard has been on your list for a while, reach out for a site visit and we’ll tell you straight whether a swale, a rain garden, or a simpler fix is the right call for your property.
Where to Learn More
The sizing and slope guidance in this article draws on extension and government stormwater resources, including Auburn’s stormwater management guide, BASC’s swale and grading resource, Minnesota Stormwater’s dry swale criteria, EPA bioretention guidance, and Oregon State Extension’s water-quality swale bulletin. Always check local codes and consider a licensed engineer for complex sites.
Sources
- Chapter 4: Stormwater management (Auburn/ACESAG)
- Swales, drains and site grading: BASC/PNNL
- Design criteria for dry swale / grass swale: Minnesota Stormwater
- Bioretention (Rain gardens): EPA BMP
- Water-quality swales (OSU Extension)
FAQ
How Can I Create a Swale in My Yard?
Start by measuring the drainage area feeding the low spot, then grade a shallow trapezoidal channel with side slopes no steeper than 3:1 and a longitudinal slope of at least 1%. Plant deep-rooted natives on the banks and stabilize the inlet and outlet with rock before the first storm tests the design.
How Deep Do Swales Need to Be?
Depth depends on your contributing drainage area, but most residential swales run shallow, often a foot or less at the channel bottom, with a wider footprint doing more of the work than depth alone. Bottom widths typically fall between 2 and 8 feet, and the whole channel should be sized so its footprint covers 1% to 10% of the drainage area it serves.
Is a Swale Better Than a French Drain?
Neither option is universally better; they solve different problems. A swale handles surface runoff visibly and can double as a landscape feature, while a French drain moves water underground and fits tight spaces where a surface channel isn’t practical, such as close to a foundation.
What Does a Swale Look Like in a Yard?
A well-built swale looks like a shallow, gently curving depression lined with grass, native plants, or rock, blending into the surrounding lawn rather than reading as a ditch. The best examples curve naturally, carry varied plant heights along the banks, and show no bare or eroded soil once vegetation establishes.