A pop up emitter drain is a reliable, low profile discharge point for an underground drain pipe, but only when that pipe maintains a continuous positive slope of at least 1%. That slope builds the head pressure that lifts the spring loaded cap. Common units run 3 inch, 4 inch, and 6 inch, and the sections below cover how to pick, install, and troubleshoot one with confidence.
TL;DR:
- A continuous slope of at least 1% is essential for a pop up emitter drain to function correctly and prevent backflow issues.
- Proper installation requires careful slope verification, dry fitting, and correct orientation of the elbow’s weep hole to ensure reliable flow.
- Emitter size should match the pipe diameter, with 3 and 4 inch units suitable for most residential drainage, and flow capacity is around 43 gallons per minute at one inch of head.
- Most emitter failures are caused by slope loss, clogs from debris, or damage to the pipe or cap, not product defect, and regular flushing can prevent clogs.
- For yard drainage exceeding normal capacity, such as in clay soil, high water tables, or multiple roof sections, a dry well or larger containment option is recommended instead of a single emitter.
Table of Contents
- What a pop up emitter drain is and how it works
- Installing a pop up emitter drain: steps and placement
- Choosing the right size and features
- Keeping a pop up emitter drain working
- When you need more than a pop up emitter
- Field notes from drainage projects we have handled
- When to DIY and when to call a professional
- How we help with drainage and grading projects
- FAQ
- Sources
What a pop up emitter drain is and how it works
A pop up emitter is the outlet end of an underground drainage run. It sits flush with the lawn, capped by a spring loaded lid that pops open under water pressure and closes again once flow stops, keeping grass clippings, dirt, and small animals out of the pipe between storms.
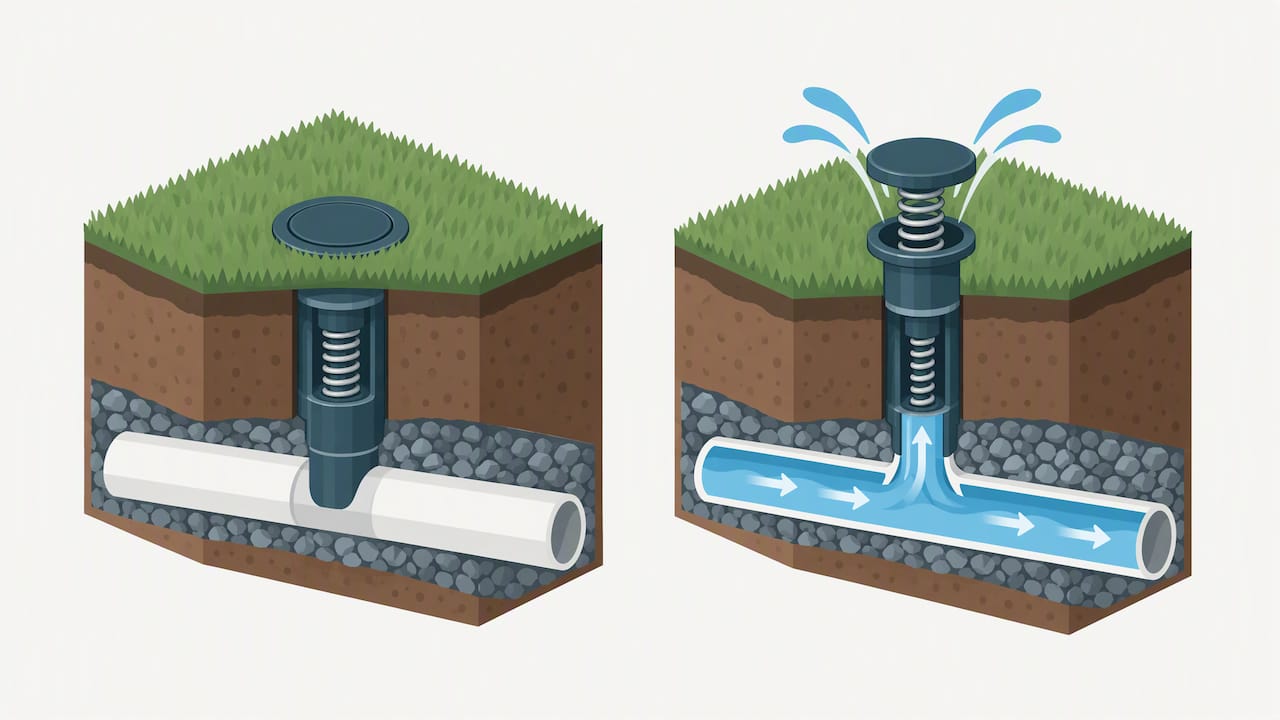
These fittings terminate the same systems homeowners already rely on: French drains, downspout extensions, and catch basin outflows. Water traveling through the buried pipe builds hydrostatic pressure as it reaches the emitter, and that pressure pushes the spring loaded cap upward, typically about 1 inch of travel, to release the flow onto the surface.
A few traits separate a dependable unit from one that fails early:
- Housing material: high density polyethylene resists cracking under freeze thaw cycles and lawn equipment contact.
- Spring grade: a stiffer spring resists wind flutter but still opens at low pressure.
- Flange size: a wider flange seats better in soil and resists shifting over seasons.
- Color options: green or black caps blend into turf better than gray plastic.
The device does one job well: it lets water out and keeps debris from working its way back in.
Installing a pop up emitter drain: steps and placement
Before any digging starts, call 811 to have utility lines marked. This step is free and prevents the single most expensive mistake on a drainage project: cutting a buried line.
Pick a discharge location downhill from the inlet, at least several feet from the foundation, and angled away from a neighbor’s property line. Dumping water onto someone else’s lot or back toward your own house foundation creates problems bigger than the drainage issue you started with.
- Trench the run from inlet to outlet, maintaining a continuous slope of at least 1% the entire distance, confirmed with a level or string line rather than eyeballed.
- Dry fit every component before gluing anything, including the pipe, couplings, the elbow, and the emitter body, and confirm the emitter top sits lower than the inlet invert.
- Install the elbow with its weep hole oriented downward or toward permeable soil, since NDS technical guidance notes the emitter must sit below the inlet elevation with continuous slope for proper flow, and the weep hole drains residual water from the pipe between storms.
- Mount the emitter on the elbow’s hub end, keeping the cap flush with or very slightly below finished grade rather than buried under mulch or soil.
- Backfill in layers, tamping lightly to avoid leaving air pockets that cause settling later.
- Test with a hose before final grading, running water through the inlet and watching the cap lift and the elbow drain afterward.
- Finish grading around the flange so water sheets away from the cap rather than pooling against it.
Pro Tip: Set a small flag or marker at the emitter location for the first mowing season so the blade deck clears the cap instead of cracking it.
Skipping the dry fit is the step most homeowners regret. Once pipe is glued, a missed slope error or a backward elbow means digging the whole run back up.
Choosing the right size and features
Pipe diameter drives emitter selection more than any other factor. Most residential French drains and downspout extensions run 3 inch or 4 inch corrugated or Schedule 40 pipe, and retail product listings show emitters sized to match those diameters directly, along with 6 inch adapters for catch basin outflows carrying heavier volume.
Beyond diameter, manufacturer spec sheets are worth reading before you buy. NDS technical specifications for the Part 430 and Part 420 emitters list an open pressure around 0.04 PSI, roughly 1 inch of head, with flow capacity near 43 gallons per minute at that head and closer to 31 gallons per minute at half an inch of head. Those numbers matter most when a pipe run serves a large roof area or a long French drain, since an undersized emitter restricts flow and backs water up the line.
Features worth comparing when you shop:
- Integrated weep elbow: saves a separate fitting and keeps orientation correct from the start.
- Flanged cover: spreads load across more soil contact for a more stable seat.
- Catch basin adapters: let a 6 inch basin outlet step down to a 3 inch or 4 inch emitter.
- UV inhibitors: extend cap life in yards with full sun exposure.
Keeping a pop up emitter drain working
Most emitter failures trace back to something upstream of the device itself, not a defective cap. A short diagnostic routine finds the real cause faster than replacing parts at random.
Work through this checklist when an emitter stops draining properly:
- Confirm slope: run a level along the visible pipe run or check grade stakes from installation to rule out a low spot that traps water.
- Check cap movement: lift the cap by hand to see if the spring still travels freely or has corroded in place.
- Inspect the elbow weep hole: a clogged weep hole lets water sit in the pipe between storms, inviting freeze damage and mosquito breeding.
- Look for pipe blockage: silt, roots, and leaf debris collect at low points or joints and choke flow long before the emitter shows symptoms.
Clearing a clog usually means flushing the line with a garden hose from the inlet end, and a plumber’s snake handles root intrusion that a hose alone cannot push through. Mower damage is the other common culprit: a cracked flange lets soil and grass clippings into the pipe, so marking the emitter location each spring protects both the cap and the mower blade.
Pro Tip: If water sits in the pipe through a cold snap and the weep hole seems clear, check that the elbow is oriented correctly. A weep hole facing upward collects water instead of releasing it, and that is a common cause of freeze related cracks.
When the slope is confirmed, the line is clear, and the cap still will not seat or lift properly, that is the point to call in a professional for a closer inspection rather than keep swapping parts.
When you need more than a pop up emitter
A pop up emitter handles typical downspout and French drain volumes well in soil that drains at a reasonable rate. Heavy clay soil, high water tables, or a roof area feeding more water than the pipe diameter can move are signs the yard needs more than a single emitter outlet.
Signs that point toward a dry well or larger catch basin instead:
- Standing water persists near the discharge point long after rain stops, suggesting the surrounding soil cannot absorb the output fast enough.
- Repeated erosion at the discharge point despite grading adjustments, a sign the energy of the flow needs to be dissipated before it reaches turf.
- Multiple roof sections or a sump pump feeding one line, which often exceeds a single 3 inch or 4 inch emitter’s practical capacity.
Dry wells work well as a complementary step rather than a replacement. EPA and municipal guidance on downspout disconnection describes routing roof runoff into a lawn or dry well as a way to encourage infiltration before water ever reaches a pipe and emitter system, reducing the volume the emitter has to handle. In loose or sandy soils, a layer of river rock or a small splash pad under the discharge point absorbs the impact and keeps the lawn from washing out.
Field notes from drainage projects we have handled
We have corrected more than one yard where the emitter itself was fine but the pipe run lost its slope halfway through, usually from settling around an old tree root or a poorly compacted trench. Re-grading that section solved what looked at first like a product defect.
A few habits we rely on in the field:
- Splash pads in sandy soil prevent the small crater that forms under a bare discharge point within a season or two.
- Siting the emitter before trenching avoids regrading work later, since moving an outlet after the pipe is set means redoing the whole run.
- Marking weep hole orientation on the elbow before backfill, since it is impossible to check once soil covers the fitting.
Readers planning a broader yard drainage project often pair emitter work with grading adjustments elsewhere on the property, and that sequencing matters more than most homeowners expect.
Ty
When to DIY and when to call a professional
A single emitter replacement or a short, visible pipe run is a reasonable weekend project for a homeowner comfortable with a shovel and a level. Long runs, buried utilities, steep grade changes, or a yard draining more than one roof section usually justify bringing in a professional who can assess slope, soil, and volume together before digging starts.
How we help with drainage and grading projects
Drainage work rarely stays isolated to one pipe. Grading, soil type, and nearby hardscape all affect whether an emitter drains cleanly or backs up again next season, and that is where our Landscape & Irrigation team gets involved, handling the trenching, slope verification, and pipe sizing so the outlet performs the first time.

When discharge runs near a patio, retaining wall, or stone feature, our Hardscape & Stone Masonry crews coordinate the grading and splash pad work so water moves away from structures instead of pooling against them. For yards with recurring drainage needs, our annual maintenance plans include periodic checks on drainage components so small issues get caught before a storm finds them. When a discharge point sits near a pond or lake edge, Lakefront and Pond Management Services can advise on shoreline considerations specific to that setting.
A professional assessment typically covers:
- Slope verification along the full pipe run, not just at the inlet and outlet.
- Soil evaluation to confirm the site can absorb the expected flow.
- Sizing recommendations matched to roof area or catch basin volume.
Reach out through our services page to schedule a site visit and get a plan specific to your yard.
FAQ
Do pop up emitter drains actually work?
Most failures trace back to lost slope, a clogged line, or a buried cap rather than a defect in the emitter itself.
Do pop up emitters get clogged?
They can, usually from grass clippings, silt, or root intrusion collecting in the pipe rather than in the emitter cap itself. Flushing the line from the inlet end with a garden hose clears most routine clogs, and a plumber’s snake handles root blockages.
How deep should a pop up emitter drain be set?
The cap should sit flush with or very slightly below finished grade, never buried under soil or mulch. NDS installation guidance notes that setting it too deep prevents the spring from seating properly and lets turf overgrow the flange.
What size pop up emitter do I need?
Match the emitter to your pipe diameter, with 3 inch and 4 inch units covering most French drain and downspout runs and 6 inch adapters handling catch basin outflows. Manufacturer flow specs show common units moving around 43 gallons per minute at 1 inch of head pressure, so a larger roof area or longer run may call for the bigger size.
Sources
- NDS Drainage spring cap for emitter pop-up, 3 in/4 in: SiteOne product listing
- NDS technical specifications, pop-up emitter with elbow adapter (Part 430)
- Rooftop downspout disconnection and dry wells, Lakewise / Vermont DEC