For an accessible walking surface, keep the running slope at or below 1:20 (5%) and the cross slope at or below 1:48 (about 2%). Cross those numbers and the code no longer treats your path as a walkway. It becomes a ramp, which means landings, handrail triggers, and a maximum slope of 1:12 (8.33%) instead.
TL;DR:
- Slopes exceeding 1:20 (5%) on a walkway are considered ramps, triggering requirements like landings and handrails, especially beyond 1:12 (8.33%) slope.
- Cross slopes above 1:48 (about 2%) can affect drainage and safety, and they must be measured at multiple points to ensure compliance.
- Accurate slope measurement requires a level and a simple calculation, with professional verification recommended if readings are near limits.
- Older or space-constrained sites may qualify for slope exceptions, but proper documentation of site constraints and measurements is essential.
- Regular re-measurement after weather events and soil settling helps maintain long-term ADA compliance for walkways.
Table of Contents
- ADA Walkway Slope Requirements: Reading the 1:20 and 1:48 Rule
- When a Sloped Path Becomes a Ramp Under ADA Rules
- How to Measure Running and Cross Slope Accurately
- Curb Ramp Slope, Flares, and Landing Depth Rules
- Alterations, Exceptions, and Keeping Documentation Defensible
- Slope Tolerances, Inspection Habits, and Long-Term Compliance
- Why Slope Limits Matter Differently for Different Disabilities
- Handling the Transition Between Slopes and Level Ground
- Surface Materials That Support ADA-Compliant Walkways
- How Walkway Slope Compliance Gets Verified and Documented
- Where to Find the Exact ADA Standards Language
- A Practitioner’s View on Code, Craft, and Longevity
- Get a Slope Compliance Check From a Local Crew That Builds to Last
- Primary Standards Worth Bookmarking
- Sources
- FAQ
ADA Walkway Slope Requirements: Reading the 1:20 and 1:48 Rule
The 2010 ADA Standards spell out two separate slope limits for every accessible route, and homeowners often confuse them. Running slope measures the grade in your direction of travel, the slope you’d feel underfoot walking from one end of a path to the other. Cross slope measures the tilt perpendicular to that direction, the side-to-side pitch built into most walkways for drainage.
The U.S. Access Board’s Chapter 4 on Accessible Routes sets the running slope ceiling at 1:20, or 5%, and the cross slope ceiling at 1:48, roughly 2%. Ratios like these confuse people until you see the math: 1:20 means one inch of rise for every 20 inches of run. Divide 1 by 20 and you get 0.05, or 5%. The 1:48 cross slope limit works the same way: one inch of rise across 48 inches of width equals about 2.08%, which the standard rounds to 2%.
These thresholds apply specifically to walking surfaces on accessible routes, not to ramps, which carry their own steeper allowance. A few things worth remembering:
- Running slope caps out at 1:20 (5%) on any stretch of walkway classified as part of an accessible route.
- Cross slope caps out at 1:48 (approximately 2%), regardless of running slope, because excess side tilt can pull a wheelchair off line.
- Both limits are maximums, not targets. Building at the exact ceiling leaves zero room for construction tolerance or settling.
- Changes in level greater than a half inch generally must be treated as a ramp or otherwise remedied, with smaller changes allowed only when beveled.
When a Sloped Path Becomes a Ramp Under ADA Rules
Cross the 5% line on running slope, even briefly, and that segment stops being a walkway in the eyes of the code. It’s a ramp, and ramps carry a different rulebook entirely.
The Access Board’s ramp guidance caps ramp running slope at 1:12 (8.33%), less than half the pitch tolerated on a standard walkway. That’s before landings, handrails, and edge protection enter the picture. Once a slope crosses the ramp threshold, a few requirements kick in automatically:
- A landing is required at the top and bottom of every ramp run, and wherever the ramp changes direction.
- Handrails become mandatory once the rise of a ramp run exceeds a certain height, adding cost and design complexity that a simple walkway never needs.
- Maximum horizontal run between landings is limited, so a long grade change can’t just keep climbing at 8.33% indefinitely.
- Ramp surfaces need firmer drainage planning, since water sitting on an 8.33% grade behaves very differently than water on a 2% cross slope.
We see this trigger point catch people off guard constantly.
How to Measure Running and Cross Slope Accurately
Guessing at slope by eye is how noncompliant walkways get built in the first place. Verifying the actual number takes about five minutes with the right tool.
- Set a 24-inch level flat on the walking surface, aligned in the direction you want to measure (lengthwise for running slope, sideways for cross slope).
- Raise or hold the level until the bubble reads level, then measure the gap between the level’s low end and the walkway surface in inches.
- Divide that gap by 24, then multiply by 100 to get a percentage. A half-inch gap over 24 inches works out to about 2.1%, right at the cross slope ceiling.
- Repeat at several points along the path, since slope often drifts near drains, transitions, and joints rather than staying constant.
A digital level set to percent mode speeds this up and removes the arithmetic, but always confirm it’s reading percent, not degrees. The two numbers look similar and get mixed up constantly. Measure running slope along the actual direction of travel, not diagonally across the path, since diagonal readings understate the real grade.
Pro Tip: Take at least three cross slope readings per landing or path segment, not just one at the center.
If your readings sit close to either limit, or if you’re preparing documentation for a permit or an accessibility complaint, bring in a professional to confirm the survey before you pour concrete.
Curb Ramp Slope, Flares, and Landing Depth Rules
Curb ramps carry their own layer of detail on top of the general walkway limits, largely because they connect a sidewalk to a street or parking surface at a point where water, wheels, and foot traffic all collide.
New construction curb ramps generally follow the standard 1:12 maximum running slope shared with other ramps, though some alterations to existing sites allow steeper transitions under tightly limited conditions. Flared sides, the angled wings on either side of a curb ramp, have their own separate slope allowance, and they’re only required when pedestrians might walk across the ramp’s sides rather than straight up the run.
- Top landings need a minimum depth of 36 inches, giving a wheelchair user room to maneuver before entering the ramp run.
- Cross slope at that top landing is still governed by the 1:48 rule, since it connects directly to the rest of the accessible route.
- Gutter slope at the base of a curb ramp factors into the overall grade calculation, and a steep gutter can push the effective ramp slope over the limit even if the ramp surface itself measures fine.
- Edge protection, often a raised curb or detectable warning strip, helps keep wheelchairs from rolling off the ramp’s flared sides.
Pro Tip: Measure curb ramp slope with the gutter in place, not just the ramp panel. Contractors sometimes check the concrete pour before the gutter grade is finished, which hides a compliance problem until the whole job is done.
Alterations, Exceptions, and Keeping Documentation Defensible
Older sites and tight lots don’t always have room for a textbook-perfect 1:20 walkway, and the Standards account for that with narrow exceptions for alterations where space or existing structure genuinely can’t accommodate the standard limits.
These allowances are limited by rise height, not open-ended. A path that qualifies for a steeper alteration slope typically comes with a shorter maximum run before a landing is required, and often triggers handrail or edge protection requirements that wouldn’t apply to a compliant new walkway.
- Document the site constraint driving the exception (existing grade, lot line, structural limit) in your permit file, not just in memory.
- Keep dated photos and slope measurements from before construction, since inspectors and future buyers may ask for evidence the steeper slope was unavoidable.
- Note any added safety features, handrails, edge curbs, contrasting surface texture, tied to the exception in your project records.
- Treat exceptions as a last resort. A regrade or a different path layout often costs less over time than maintaining a nonstandard slope and its required extras.
Slope Tolerances, Inspection Habits, and Long-Term Compliance
Concrete and pavers move. Soil compacts unevenly, freeze-thaw cycles heave sections a fraction of an inch, and tree roots push up joints years after installation.
That margin absorbs the small settling and construction variance every hardscape experiences, and it means a walkway stays compliant years after the concrete cures.
- Re-measure running and cross slope annually, and after any freeze-thaw winter or period of heavy rain.
- Focus inspection points on transitions: where a path meets a driveway, crosses a drainage channel, or approaches a curb ramp.
- Watch for heave near tree roots and utility lines, both common causes of slope drift on residential properties.
- Check joint lines on paver walkways specifically, since individual pavers can settle independently even when the base was compacted correctly.
Pro Tip: Keep a simple slope log for your property, date, location, and reading, the same way you’d log HVAC filter changes. It turns “I think it’s fine” into a documented answer if an inspector or a real estate buyer ever asks.
A regrade caught early is a far smaller job than a full walkway replacement, and our property maintenance services build that kind of periodic check into ongoing agreements rather than waiting for a complaint.
Why Slope Limits Matter Differently for Different Disabilities
The 1:20 and 1:48 numbers aren’t arbitrary. They reflect two very different failure modes, and each affects a different group of pedestrians.
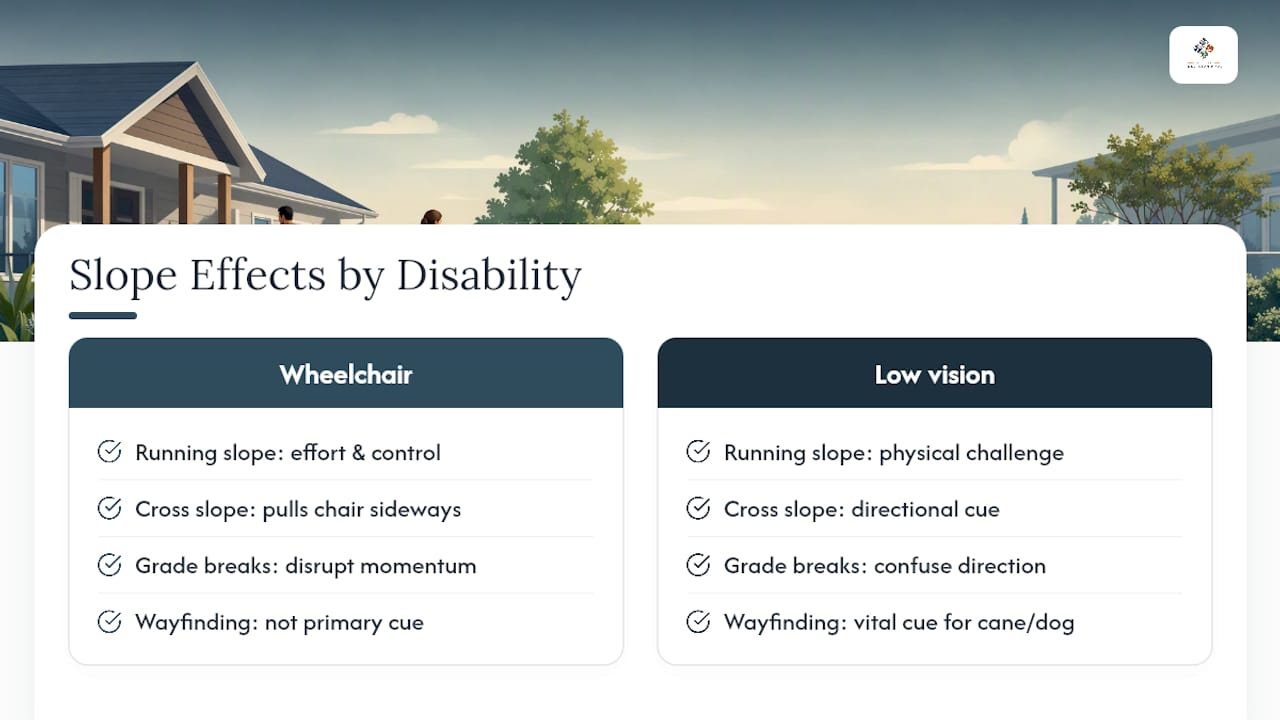
For wheelchair users, running slope determines how much upper-body effort it takes to move forward, and how much control they have moving backward or stopping. It can make a manual chair roll backward unexpectedly on a stop, which is a real safety risk, not just an inconvenience. Cross slope is arguably more dangerous for wheelchair users than running slope, because it constantly pulls the chair sideways, forcing the user to fight the wheel angle with every push. Practitioners in the field note that even small grade breaks, spots where slope changes abruptly rather than transitioning smoothly, can disrupt a wheelchair’s momentum even when each segment technically meets the numerical limit.
For pedestrians with low vision or blindness, slope serves as a wayfinding cue as much as a physical challenge. A consistent, predictable cross slope helps a person using a cane or guide dog sense which direction leads toward a curb or a street. An erratic or excessive cross slope, on the other hand, can be mistaken for a curb ramp approach when it isn’t one, creating disorientation at exactly the kind of intersection where clear cues matter most.
Both groups benefit from the same design discipline: keep slopes consistent, predictable, and within the numerical limits along the entire length of a route, not just at spot checks.
Handling the Transition Between Slopes and Level Ground
Where a sloped section meets a flat landing, a driveway, or a curb ramp, the transition itself becomes a hazard if it’s handled carelessly. A grade break, the point where one slope angle changes into another, needs to happen gradually enough that a wheelchair’s front casters don’t bottom out or a cane user doesn’t catch an unexpected lip.
Vertical changes in level are the most common tripping and rolling hazard at these joints. Anything up to a quarter inch generally needs no special treatment. Between a quarter inch and a half inch, the edge typically needs to be beveled at a slope no steeper than 1:2 to ease the transition. Anything beyond a half inch has to be treated as a ramp in its own right, even if it’s only a short run connecting two walkway sections.
Good transition design also means matching cross slope direction across a joint. If one panel drains one way and the adjoining panel drains the opposite way, water pools right at the seam, which speeds up erosion and ice formation in colder months. Matching drainage direction across transitions keeps water moving instead of collecting exactly where pedestrians are most likely to lose their footing. When we design stone pathways and garden walkways, we treat every transition point as its own mini design problem, not just a seam between two slabs.
Surface Materials That Support ADA-Compliant Walkways
Slope compliance means nothing if the surface itself is unsafe to walk or roll across. The Standards call for a “stable, firm, and slip-resistant” surface, and that phrase does a lot of work in material selection.
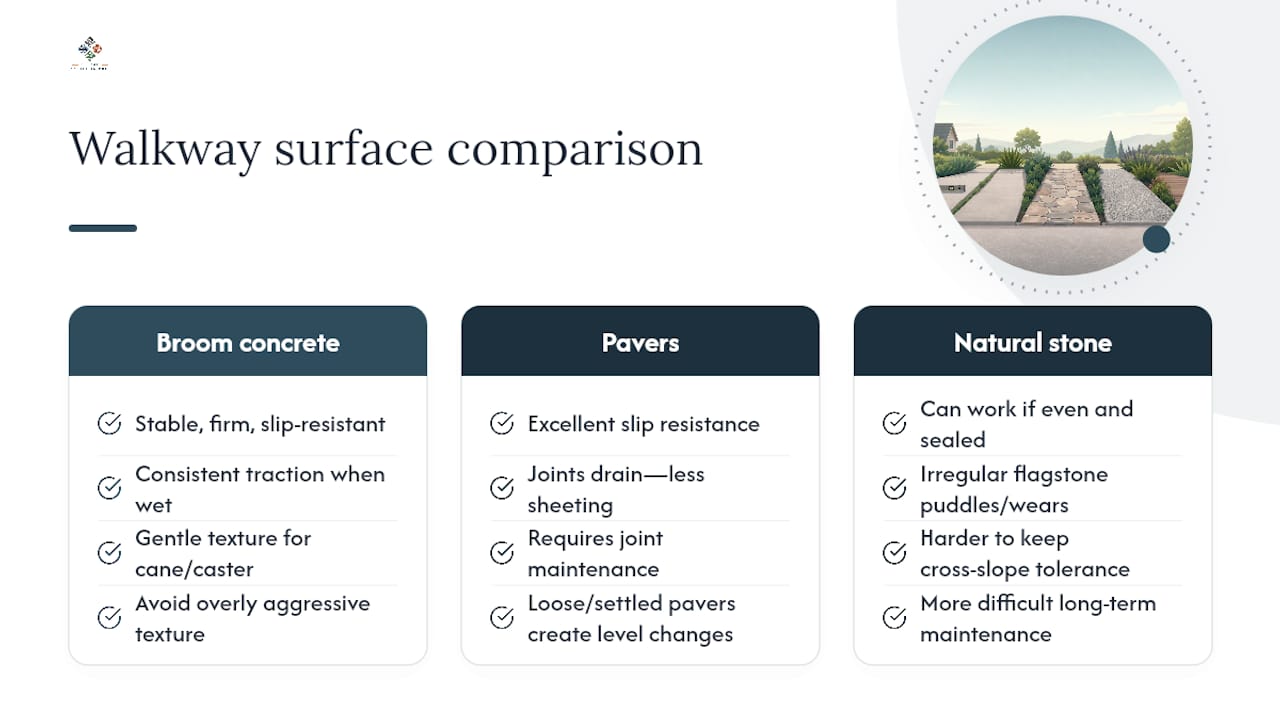
Broom-finished concrete remains one of the most reliable choices for accessible walkways because the texture provides consistent traction in wet conditions without becoming rough enough to catch a cane tip or a wheelchair caster. Stamped or heavily textured concrete can look sharper, but overly aggressive texture patterns sometimes create the exact kind of uneven surface the Standards try to prevent, so texture depth matters as much as texture presence.
Pavers offer excellent slip resistance and let water drain through joints rather than sheeting across the surface, which helps maintain cross slope consistency over time. The tradeoff is joint maintenance. Loose or settled pavers create the small vertical changes in level that turn into compliance and safety problems, so a well-compacted base and properly filled joints matter more for accessible paths than for a purely decorative walkway.
Natural stone can work, but flagstone with an irregular, unsealed surface tends to develop puddling and uneven wear that’s harder to keep within cross slope tolerance. Whatever the surface, avoiding gloss sealers on any material used in a walkway matters, since a slip-resistant surface finish beats an attractive but slick one every time rain or dew is involved.
How Walkway Slope Compliance Gets Verified and Documented
There’s no single national certification stamp for an ADA-compliant walkway the way there might be for a fire-rated door. Compliance gets verified through documented measurement against the Standards, either by a design professional during construction, a building inspector at final approval, or a third-party accessibility consultant during a complaint investigation or a Title II/Title III audit.
Most jurisdictions fold ADA slope checks into the standard building permit and inspection process for new sidewalks, curb ramps, and commercial walkways. That inspection typically involves the same 24-inch level or digital level techniques covered earlier, applied at multiple points along the route rather than a single spot check. For public rights-of-way and government facility projects, ADA Checklist for Existing Facilities resources give inspectors a structured way to document findings.
For homeowners and private property managers, there’s rarely a formal certification requirement unless the property serves the public in some capacity, a business, a rental office, a community amenity. But documenting your own slope measurements at installation still matters. If a fall, a complaint, or a resale inspection ever raises the question, having dated measurements showing the walkway was built within 1:20 running and 1:48 cross slope limits is far stronger evidence than a verbal assurance from years ago.
Where to Find the Exact ADA Standards Language
Reading the primary standards directly clears up more confusion than any summary can, especially when a specific site condition doesn’t fit neatly into general guidance.
Chapter 4 of the Access Board’s guide to the 2010 ADA Standards covers accessible routes broadly, including the running and cross slope limits for walkways discussed throughout this guide. Section 405 within the full Standards addresses ramps specifically, including the 1:12 maximum slope and landing requirements. Section 406 covers curb ramps in detail, including flare slopes and landing depth.
For the ramp-specific breakdown with diagrams and worked examples, the Access Board’s dedicated ramps and curb ramps guide is the most practical single document to keep bookmarked. It translates the Standards’ legal language into the kind of measurements a contractor or property manager actually needs on site. Anyone drafting permit documentation or preparing for an inspection should reference these chapters directly rather than relying on secondhand summaries, since ratio and percentage conversions get misquoted often enough to cause real design errors.
A Practitioner’s View on Code, Craft, and Longevity
The Standards aren’t bureaucratic overreach. They’re a translation of decades of real injuries and real access failures into numbers a contractor can actually build to. Every time we set a walkway grade, we’re not just avoiding a failed inspection. We’re deciding whether the person using a wheelchair or a guide dog can move through that space safely for the next twenty years, not just the day the concrete cures.
The gap most guides skip is durability. A slope that’s technically compliant on installation day but built at the absolute maximum has no room left for the freeze-thaw cycles and soil settlement every Arkansas property experiences. That’s why we design toward a buffer, not the ceiling. If you’re unsure where your existing walkway stands, measure it. If the numbers surprise you, document them and get a second opinion before you assume the fix is simple.
— Ty
Get a Slope Compliance Check From a Local Crew That Builds to Last
Reading the Standards is one thing. Knowing whether your actual driveway path, patio walkway, or curb transition measures within limits is another, and that’s where a site visit beats a tape measure and a guess. Professional crews bring 24-inch levels and digital slope tools like those covered in this guide to consultations, so you get an actual number instead of an assumption.

During a landscaping consultation, we measure existing running and cross slope at key points along your walkway, flag anything approaching the 5% or 2% thresholds, and lay out what a regrade or resurfacing would involve before any concrete gets touched. For projects that need more than a spot fix, our hardscape and stone masonry crews build paths designed with a slope buffer from the start, so the walkway still measures compliant years after installation, not just on inspection day. If your Central Arkansas property has a path that feels a little steeper than it should, schedule a consultation and get the actual numbers before you decide what to do next.
Primary Standards Worth Bookmarking
For direct code consultation, these are the sources this guide draws from and the ones worth keeping on hand for any permit or design question:
- Chapter 4: Accessible Routes — U.S. Access Board, covering running and cross slope limits for walkways.
- Ramps and curb ramps guidance — U.S. Access Board, covering the 1:12 ramp slope, landings, and handrail triggers.
- Curb ramps guidance — ADA archived toolkit, U.S. Department of Justice, covering landing depth, flares, and gutter slope.
- ADA Standards Guide, Chapters 1 through 5 — U.S. Access Board, covering changes in level and general accessible design rules.
Sources
- Chapter 4: Accessible Routes — U.S. Access Board
- Ramps and curb ramps — U.S. Access Board
- How to Use this Checklist — ADA Checklist for Existing Facilities
- Curb ramps guidance — ADA archived toolkit (U.S. Department of Justice)
FAQ
What is the maximum slope for an ADA walkway?
The maximum running slope for an ADA-compliant walkway is 1:20, or 5%.
What’s the maximum slope for a 5-foot-wide sidewalk?
Sidewalk width doesn’t change the slope limits. A 5-foot-wide sidewalk still follows the same 1:20 running slope and 1:48 cross slope maximums as any other accessible walkway.
Is a 5% slope considered a ramp?
A running slope of exactly 5% is still within the walkway limit, but anything steeper than 5% must be treated as a ramp, with a maximum slope of 1:12 and required landings.