
Pick your pergola by what you will put under it: start with the furniture layout, then add 3 feet of clearance and at least 8 feet of headroom. A footprint suitably larger than typical dining table sizes comfortably holds a six-person dining set, while a larger size can handle a sectional, lounge area, or combined dining and lounge zone. Before finalizing a size, check your local permit threshold.
TL;DR:
- The pergola size should be based on furniture layout, with at least 3 feet of clearance on all sides and 8 to 10 feet of headroom for comfort.
- Mock up the furniture arrangement on-site before building to ensure circulation space and avoid cramped conditions with actual furniture and planned activity.
- Standard footprints range from 8×8 to 10×10 feet for small setups, 10×12 to 12×16 feet for most residential dining and lounge areas, and 14×20 feet or larger for multi-zone or larger entertainment spaces.
- Height should provide at least 7 to 8 feet clearance to prevent oppressive feeling, with taller posts advantageous for long spans or attached structures to match overall proportions.
- Proper foundation depth, lumber size, and compliance with local permits are crucial, and a site visit can help confirm accurate sizing and necessary structural details.
Table of Contents
- Step-by-step method to determine the right pergola footprint
- Standard pergola footprints and what fits in each
- Height and proportion: headroom, accessory clearance, and visual balance
- Structural sizing: posts, beam spans, rafter spacing, and foundation notes
- Permitting and a practical application checklist
- Measure and validate on site, with low-effort mockups
- How material and design choices affect sizing and foundation needs
- On-site tips and installation best practices
- Considerations for residential vs. commercial pergola sizing
- Impact of intended pergola use on size requirements
- Seasonal climate factors affecting pergola size and design
- Accessibility standards and clearance requirements
- Author perspective: practical trade-offs and common homeowner regrets
- How Village Precision Pros can help design, permit, and build your pergola
- FAQ
- Sources
Step-by-step method to determine the right pergola footprint
Most homeowners start a pergola project by searching for popular sizes, then try to force their furniture to fit afterward. That backwards approach is exactly why so many end up disappointed with a structure that feels cramped the moment they add a grill, a sectional, or a few extra chairs for guests. We’ve found the better method works in the opposite direction: let the furniture define the footprint, not the other way around.
Here’s the process that holds up on real job sites:
- List everything that goes underneath. Write down every piece of furniture or equipment: dining table and chairs, a sectional, a grill cart, a fire pit on a paver patio, string lighting posts. Measure each piece.
- Mark the footprint on the ground. Use stakes, string, or painter’s tape to lay out the actual boundary where posts would go. A $20 roll of marking tape saves far more in regret than it costs.
- Add movement zones around every seating area. Plan on at least 36 inches of clearance on all sides of a dining table so chairs can slide out and people can walk past. Where someone needs to walk behind a seated diner, that clearance should grow to 42 to 44 inches, according to sizing guidance from Polywood.
- Account for post thickness. Posts eat into usable space from the inside edge, not just the outer footprint. A structure with 6-inch posts loses more interior room than one with 4×4 posts, so measure your furniture zone, then add post width on top of it rather than inside it.
- Test the mockup before committing. Walk the staked area with a chair in hand. Pull it out from the table. Walk around the grill cart. If anything feels tight, widen the footprint now, while it only costs you more tape.
- For multiuse spaces, size for the largest combined zone. A pergola meant for both dining and lounging should be sized to the sum of both furniture groups plus clearance, then visually divided with a rug, a planter line, or a change in paver pattern rather than shrinking either zone.
That last point trips up a lot of homeowners. They try to squeeze a six-person table and a lounge sectional into a footprint sized for one or the other, and the result is a space where nobody can relax because they’re constantly bumping chairs.
Pro Tip: Lay out your furniture mockup at the time of day you’ll actually use the space most, so you can also check where shade and sun fall before you commit to posts.
Standard pergola footprints and what fits in each
Thinking in terms of small, medium, and large footprints helps translate furniture lists into buildable dimensions. These ranges reflect what we see hold up well across real backyard layouts in Central Arkansas, where patios range from cozy courtyards to full outdoor living rooms.
- Small (8×8 to 10×10): Fits a bistro set, a two-seat loveseat with a side table, or a small reading nook. This range also works well over a play area or a compact hot tub if that’s the primary use.
- Medium (10×12 to 12×16): This is the workhorse range for most backyards. A 10×12 holds a four to six person dining set with proper clearance, matching the baseline Polywood recommends for a standard six-person table. A 12×16 stretches to fit dining plus a small sectional, or a larger lounge group on its own.
- Large (14×20 and up): This range suits outdoor kitchens, multiple distinct zones such as dining plus lounge plus a bar cart, or a built-in hot tub with surrounding deck space. Larger footprints also mean larger loads, so expect your foundation and beam sizing to scale up accordingly, a point we cover in the structural section below.
Beyond raw dimensions, proportion matters for how the finished structure actually looks against your house and patio. A pergola that covers close to the entire patio can feel heavy and boxy, while one that’s too small reads as an afterthought. A rough rule many designers lean on is the golden ratio, keeping length to width at roughly 1.6 to 1, which tends to produce a shape that looks intentional rather than arbitrary. A 10×16 pergola, for instance, sits close to that ratio and often reads as more balanced than a perfect square of the same square footage.
As a starting point for coverage, aim for the pergola footprint to occupy a clear majority of your intended seating area without swallowing the whole patio. If your patio is 20 by 20 feet, a 12×16 pergola leaves breathing room around the edges for plantings, a side path, or an uncovered sun spot, while still shading the bulk of your seating.
Height and proportion: headroom, accessory clearance, and visual balance
Height gets overlooked far more often than footprint, and it’s just as easy to get wrong. A pergola that’s too short feels oppressive even if the floor space is generous. Underside clearance, the distance from the ground to the lowest beam, should be at least 7 to 8 feet as an absolute minimum, with 9 to 10 feet considered ideal, particularly when you’re planning to add a ceiling fan, pendant lighting, or retractable shade, according to guidance on pergola height.
Taller posts become more important in two common situations. First, long spans, anything approaching the outer edge of what a given beam size can safely carry, tend to look better and perform more predictably with slightly taller posts, since the added height gives the structure visual weight to match its length. Second, pergolas attached to a raised deck need enough height above the deck surface to clear the minimum 8-foot threshold measured from where people actually stand, not from grade.
Proportion rules apply vertically as well as horizontally. A pergola that’s wide and long but short can look squat, almost like a carport. Using a ratio closer to 1:1 between height and width, adjusted up for larger footprints, keeps the structure from feeling pressed down. For a typical 12×16 deck pergola, a post height in the 9 to 10 foot range usually reads as proportional, while the same footprint at 7 feet can look stunted against a two-story house.
Structural sizing: posts, beam spans, rafter spacing, and foundation notes
Once the footprint and height are set, the structure has to actually carry itself. Post size depends directly on height: for posts up to roughly 8 feet, a 4×4 is typically the minimum size, while posts between 8 and 10 feet generally need to step up to 6×6 for adequate strength, a distinction confirmed in the City of San Diego’s patio cover guidance. That same guidance notes that rafters on an attached structure cannot rely solely on the house’s existing fascia board for support, a detail that catches a lot of DIY builders off guard.
Beam and header spans depend on lumber size and whether the structure is open-air or roofed. Open-air pergolas can span farther than fully roofed structures carrying more weight, and larger members span farther than smaller ones: a 6×12 beam, for example, covers considerably more distance than a 4×8, based on municipal construction plan guidance. Rafter spacing commonly lands at 24 inches on center for pergolas, a spacing that affects how far the rafters can project past the beam before they need extra support.
Foundation requirements shift based on whether the pergola is freestanding or attached to the house. Freestanding structures need their own footings at every post, typically concrete piers sized to local frost depth, while attached pergolas share some of the load path with the house’s existing foundation but still need footings at the outer posts. Larger footprints and roofed designs increase the load on every footing, which is exactly why a 14×20 outdoor kitchen pergola needs deeper, wider piers than an 8×8 bistro cover.
Permitting and a practical application checklist
Permit rules vary significantly by jurisdiction, and the gap between what’s required for an attached pergola versus a freestanding one catches many homeowners off guard. Attached structures are often subject to setback rules similar to the house itself, while freestanding pergolas get treated as accessory structures with their own, sometimes more flexible, setback allowances, according to permit guidance from the City of Irvine. Some jurisdictions exempt small patio covers from a building permit below a certain square footage threshold, but that exemption rarely waives zoning or setback requirements, a distinction spelled out in Lafayette’s patio and pergola application checklist.
Before you finalize a design, gather the documents most planning departments expect to see:
- A site plan showing distances from the structure to property lines and existing buildings
- A dimensional construction plan noting width, length, and post spacing
- A framing plan with beam, rafter, and post sizes
- Manufacturer specifications if you’re using a prefabricated kit
- Electrical plans if the pergola will carry lighting, fans, or outlets
- Any POA approval documents your community requires
Calling your local planning department before you commit to a final design saves real time. A five-minute conversation can confirm your setback distance and whether your intended size falls under an exemption threshold, long before you’ve poured a single footing.
Measure and validate on site, with low-effort mockups
Before buying materials or signing a contract, confirm the footprint works in real life. You don’t need expensive tools to do this well.
- Gather basic tools. A tape measure, a laser measure if you have one, stakes, string, and a roll of painter’s tape handle most layouts.
- Mark the footprint and place furniture mockups. Use actual chairs or boxes cut to size to represent the dining set, sectional, or grill.
- Test circulation and sightlines. Walk every path you’d normally take: from the back door to the table, from the grill to the seating.
- Check for overhead and ground obstructions. Look for low tree branches, roof eaves, slope, and drainage paths that could pool water under the structure.
If your site has a slope, an existing drainage issue, or ties into a raised deck, that’s the point to call a contractor for a measured site plan rather than guessing.
How material and design choices affect sizing and foundation needs
Material and roof style change more than appearance. Louvered or fully roofed pergola systems carry significantly more weight than open lattice designs, which usually means larger beams and deeper, more substantial footings to keep the structure stable in wind and snow load. Post thickness also matters more than it seems: many prefabricated kits use 6-inch posts, and that extra girth eats into usable interior space compared with a custom-built structure using slimmer posts sized to the actual span.
Material choice drives long-term upkeep too. A louvered aluminum system shrugs off moisture and never needs refinishing, while a wood structure needs periodic sealing to resist weather, a trade-off worth weighing against your climate before locking in a size and style. If you’re planning to add a ceiling fan or integrated lighting, factor that extra load into your beam sizing from the start rather than retrofitting it later.
On-site tips and installation best practices
A few details separate a pergola that lasts decades from one that starts showing rot within a few years. We always recommend keeping cedar posts off direct soil contact, setting them on post bases or piers instead, since ground contact is one of the fastest ways to shorten a wood post’s life. Grade and drainage matter just as much: a properly sloped base keeps water moving away from footings rather than pooling at the post base, and our crews typically build paver bases with enough compacted depth to stay stable through freeze thaw cycles. For larger or custom footprints, a built-to-size pergola often delivers better long-term value than an off-the-shelf kit, since it’s sized to your actual furniture and site conditions rather than a standard catalog dimension.
Considerations for residential vs. commercial pergola sizing
Residential and commercial pergolas get sized around very different priorities, even when the square footage looks similar on paper. A residential pergola is usually sized around one household’s furniture and daily routines: a dining set, a lounge area, maybe a hot tub. Commercial applications, think restaurant patios, hotel courtyards, or retail outdoor seating, need to account for higher turnover, wider aisles for staff and trays, and often stricter accessibility and fire code requirements than a backyard structure ever faces.
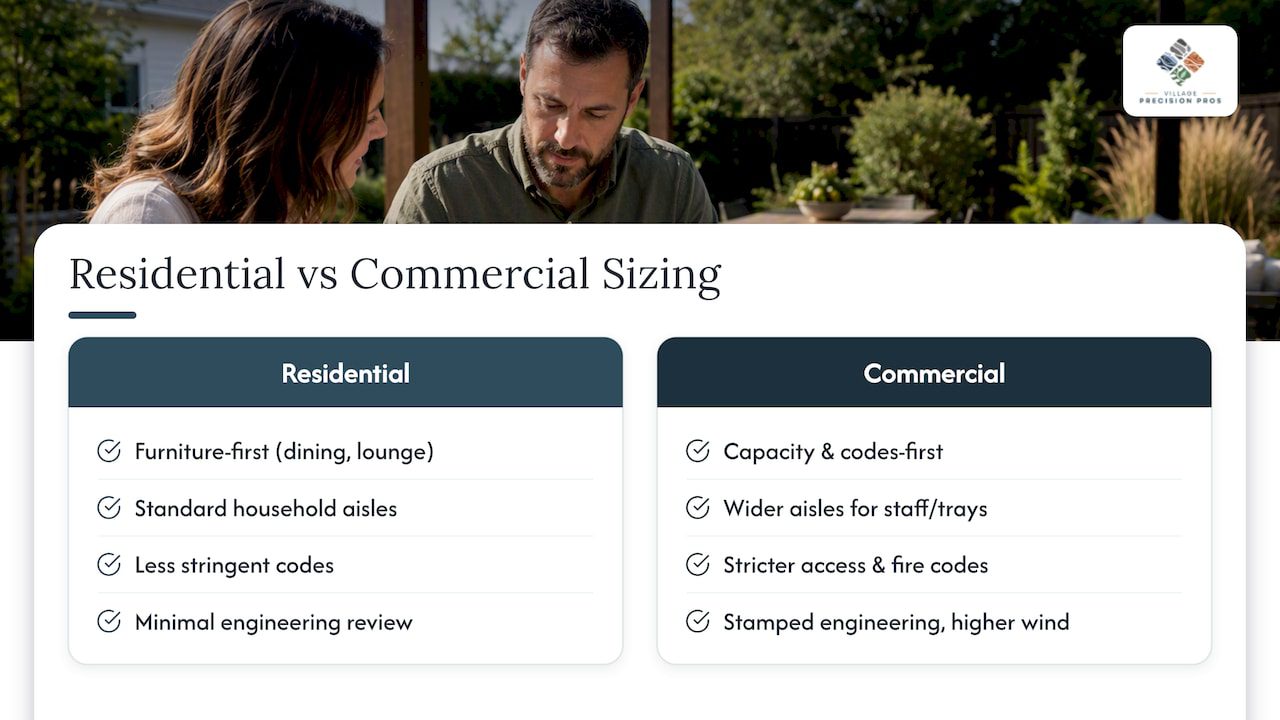
Commercial projects also tend to require more rigorous structural review, since occupancy load and public use trigger a different tier of building code scrutiny than a private residence. A commercial pergola covering a restaurant patio might need engineered stamped drawings and a higher wind load rating than a comparable residential structure, even at the same footprint.
For residential projects, the main driver stays furniture and family use: how many people regularly gather, whether kids need play space, whether the structure needs to handle a grill or fire feature. Commercial sizing starts from capacity and code compliance first, then works backward to furniture layout, essentially the reverse order of the furniture-first approach that works best at home.
Impact of intended pergola use on size requirements
What you plan to do under the pergola shapes its size more than almost any other factor, which is exactly why furniture-first sizing works better than picking a size off a catalog page. A dining-focused pergola needs enough room for the table itself plus the full clearance zone on every side, pushing even a modest four-person table toward a 10×10 or 10×12 minimum once you account for chair movement.
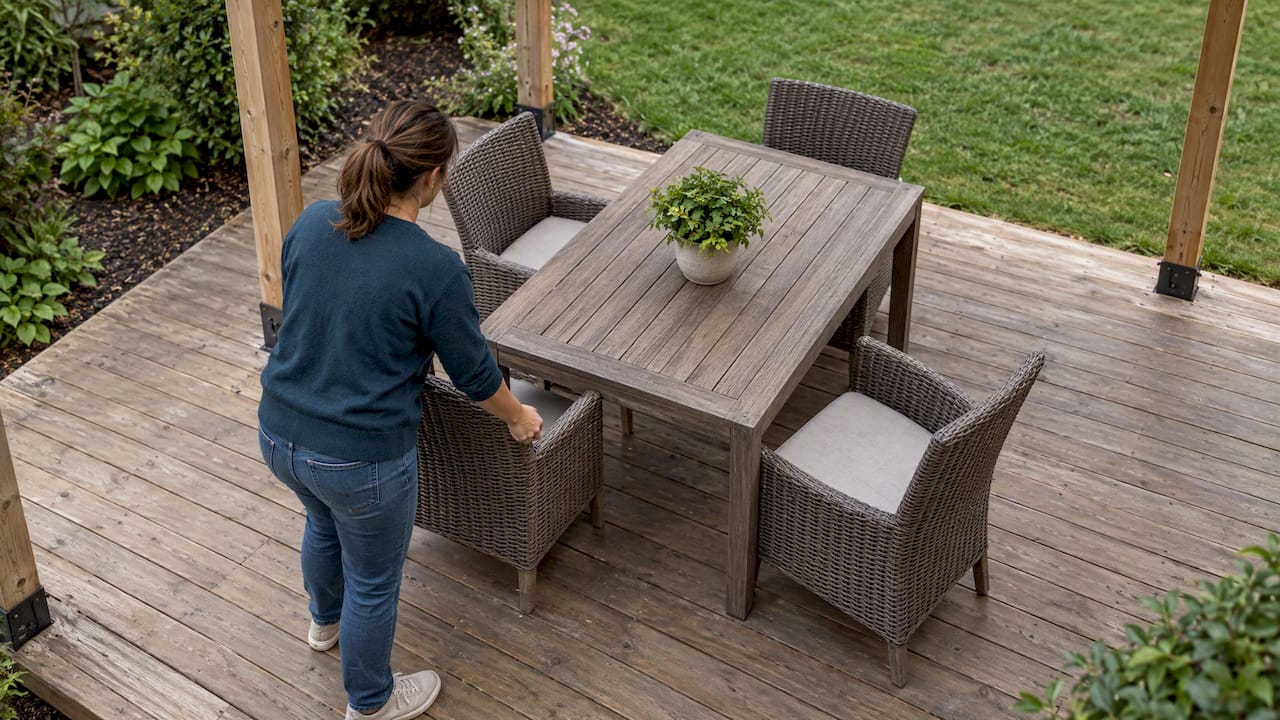
A lounge-focused pergola built around a sectional or a cluster of deep seating often needs more total square footage than a dining setup of similar seating capacity, since deep furniture and coffee tables take up more floor space than a dining set with the same number of seats. A garden-feature pergola, built mainly as a focal point with a bench or a small accent planting, can work at the smaller end of the range, since it’s not organizing circulation around multiple people and furniture pieces.
Mixed-use spaces, where dining and lounging share one structure, need the most careful planning. Size for the combined footprint of both furniture groups plus clearance for each, then use a visual break, a change in paver pattern, a low planter, or a rug, to separate the zones without physically shrinking either one.
Seasonal climate factors affecting pergola size and design
Climate shapes pergola sizing decisions in ways that go beyond simple comfort. In regions with strong summer sun, a larger footprint or added louvers and shade cloth may matter more than extra floor space, since the goal is maximizing shaded seating rather than just covering more ground. Open lattice pergolas let more light through, which can mean sizing the structure larger than you’d otherwise need just to create enough fully shaded seating for your furniture.
Wind load is the other major climate factor, and it directly affects structural sizing rather than footprint. Taller, larger, or fully roofed pergolas catch more wind than a short, open lattice design, which is part of why roofed and louvered systems typically need stronger posts and deeper footings, a point covered in the structural section above. In regions that see heavy snow, roof-style pergolas also need beam and rafter sizing that accounts for snow load, not just the weight of the structure itself.
Freeze thaw cycles matter for the foundation more than the frame. Footings that don’t reach below the local frost line can heave over winter, which is why foundation depth should follow local frost depth guidance rather than a generic nationwide rule, something a local contractor can confirm quickly during a site visit.
Accessibility standards and clearance requirements
Accessibility matters most when a pergola serves a shared or commercial space, though it’s worth considering even for a residential backyard if family members or regular guests use a wheelchair or walker. A clear path width of at least 36 inches is a widely used baseline for comfortable passage, and that number lines up closely with the general furniture clearance guidance covered earlier in this guide, meaning a pergola sized correctly for comfortable circulation often already supports easier mobility access.
For structures intended for public or commercial use, local accessibility codes may require specific clear floor space at seating areas, wider turning radii near entry points, and ramped rather than stepped transitions onto the patio surface. These requirements vary by jurisdiction and by whether the space counts as public accommodation, so a commercial pergola project should confirm applicable accessibility code requirements with the local building department alongside the standard permit checklist covered earlier.
Even for a private residence, building in a little extra clearance near any planned ramp, wide doorway, or frequently used path costs little at the design stage and avoids a costly retrofit later if mobility needs change.
Author perspective: practical trade-offs and common homeowner regrets
Furniture-first sizing beats catalog picking because catalogs don’t know what you own. The most common regret we hear is simple: the pergola feels smaller the moment real furniture and real people fill it. Test with a mockup before you build, and when in doubt, prioritize circulation over a few extra inches of roof.
Ty
How Village Precision Pros can help design, permit, and build your pergola
Sizing a pergola on paper is one thing. Getting the post spacing, beam spans, and permit paperwork right on an actual Central Arkansas property is another, and that’s where our crews take the guesswork off your plate.

- We walk your site, measure the space, and help map furniture layouts before a single post goes in the ground.
- We handle construction plans, framing details, and the paperwork your local planning department expects to see.
- We pour footings sized to your soil and climate, whether the project is a freestanding pergola or one attached to a new patio.
A typical first step is a site visit where we measure your space and talk through how you plan to use it. If you’re ready to see what a custom-built pergola looks like on your own property, explore our custom pergola design and build services and we’ll schedule a visit.
FAQ
What is the ideal size for a pergola?
The ideal size depends entirely on what furniture or activity it needs to shade, not a single universal dimension. A 10×12 footprint comfortably fits a six-person dining set with proper clearance, according to Polywood’s sizing guidance, while lounge or multiuse spaces often need 12×16 or larger.
What is the golden ratio for a pergola?
The golden ratio, roughly 1.6 to 1 for length to width, is a proportion guideline some designers use to keep a pergola looking balanced rather than boxy or oddly stretched. A 10×16 footprint sits close to this ratio and tends to read as more intentional than a perfect square of similar square footage.
How far can a 2×8 span for a pergola?
Span distance depends on lumber size, spacing, and whether the structure is open-air or roofed, with larger beams like a 6×12 covering considerably more distance than a smaller member such as a 4×8, per municipal construction plan guidance. A local contractor or your building department can confirm the exact allowable span for a 2×8 based on your rafter spacing and local code.
Is a 10×10 pergola too small?
A 10×10 pergola works well for a bistro set, a small two-seat lounge area, or a modest play space, but it’s tight for a full dining set once you add the recommended 36 inches of clearance on each side. For a six-person dining table, sizing guidance points toward a 10×12 minimum instead.
Sources
- How to Choose the Right Size Pergola for Your Backyard
- Adding or Replacing a Residential Patio Cover or Gazebo | City of Irvine
- Pergola/arbor/patio cover construction plan guidance
- Pergola/Gazebo/Covered Deck or Patio/Carport: Application Checklist
- Patio Covers | City of San Diego Official Website