An accessible backyard delivers continuous, firm, slip-resistant routes connecting the entry, the patio, and every feature a family actually uses, built to widths and slopes that a wheelchair or walker can handle without a struggle. That’s the outcome, full stop. Everything else, the standards, the materials, the site fixes, is how a contractor gets there, and we’ll walk through the whole checklist below.
TL;DR:
- The minimum clear width for accessible routes is 36 inches, with narrowings down to 32 inches allowed for short distances up to 24 inches long.
- Slopes exceeding 5% automatically classify the path as a ramp, which then must meet a maximum 1:12 slope with handrails and landings.
- Surfaces must be firm and stable, such as broom-finished concrete or properly drained pavers, and require warranties and regular maintenance to remain accessible.
- Regrading, terracing, lifts, or no-step entries are necessary options for steep or confined yards, with proper drainage critical for retaining walls and terraces.
- Accurate, detailed drawings showing slopes, widths, and surface specifications are essential when interviewing contractors, along with user involvement and prior accessible project references.
Table of Contents
- What Does an Accessible Backyard Design Actually Require?
- Which Width, Slope, and Landing Standards Should You Require?
- What Surfaces Actually Hold Up Under Wheels and Weather?
- How Do You Design Around a Steep or Tight Backyard?
- How Do You Interview a Contractor for an Accessible Build?
- What Ongoing Maintenance Keeps a Route Accessible?
- How Should Lighting Support Safe Nighttime Access?
- How Can Raised Beds Make Gardening Accessible?
- Where Should Accessible Seating and Rest Areas Go?
- How Do You Design for Sight, Sound, and Touch?
- A Note From the Field
- How Village Precision Pros Builds Accessible Backyards
- Standards Worth Handing Your Contractor
- Sources
- FAQ
What Does an Accessible Backyard Design Actually Require?
Before you sign a contract, you need a way to grade the bid against something other than a nice rendering. We build our contracts around acceptance criteria, the specific, checkable items that separate a backyard that looks accessible from one that functions that way every single day. Use this list during bid review and again at the final walk-through.
- A continuous accessible route with documented minimum widths, passing spaces, and turning areas shown right on the plans.
- Slope callouts on the drawings, marking exactly where the route stays at 5% or less and where a formal ramp (1:12 maximum) takes over.
- Written surface specs, firm, stable, slip-resistant, with the specific product and installation method named for every route segment and patio.
- Threshold details and no-step-entry decisions, plus handrail placement, guard offsets, and landing sizes marked on the drawings, not left to the crew’s judgment on install day.
- A maintenance clause or annual service commitment that keeps the route clear and functional long after the crew leaves.
If a bid is missing any of these, ask why before you sign.
Which Width, Slope, and Landing Standards Should You Require?
Numbers make accessibility real. Vague promises about a “wide, easy path” don’t hold up against an actual wheelchair, so we translate every requirement into the figures we put on our own drawings, drawn from the Access Board’s accessible route standards.
Pro Tip: Ask your contractor to mark the exact clear width in inches at every pinch point on the plan set, not just an average width for the route.
The core figures to require:
- Continuous clear width: 36 inches minimum, with reductions to 32 inches allowed only at short points, capped at 24 inches of length.
- Running slope: 5% (1:20) or less qualifies as an accessible route. Anything steeper gets reclassified as a ramp and must meet 1:12 maximum slope rules, plus handrails and landings.
- Cross-slope: kept as gentle as the terrain allows, generally around 1:48, because a route that slopes side to side while also running downhill creates a compound slope that pulls a wheelchair off course. The Access Board’s grade break guidance specifically calls for grade breaks to run perpendicular to the direction of travel to prevent that hazard.
- Passing spaces and turning clearances: 60 inches by 60 inches, or a T-shaped equivalent, placed often enough to let two people, or one wheelchair user making a 180 degree turn, pass comfortably.
- Landings: required at the top and bottom of every ramp run, and at intervals along longer runs, sized to match the platform requirements in the standards.
Put these figures on the plan set, not just in the proposal narrative.
What Surfaces Actually Hold Up Under Wheels and Weather?
The surface is where good intentions meet Arkansas weather, and it’s usually where budget-driven substitutions cause the most trouble. The Forest Service Trail Accessibility Guidelines define “firm” as a surface that doesn’t noticeably distort under a simulated wheelchair load, and “stable” as one that holds up to weather and wear without permanent change. That’s the bar every material choice has to clear.
- Broom-finished concrete gives you the most predictable firmness and slip resistance, and it shrugs off freeze-thaw cycles when the base is properly compacted.
- Correctly drained pavers with tight, interlocking joints work well, but the joints have to stay filled and the base has to be compacted aggregate, not sand alone, or you’ll see settling within a season.
- Stabilized or bonded crushed stone meets the firm-and-stable standard when it’s properly bonded, per the Forest Service’s surface guidance, and it reads as a more natural surface than concrete for garden paths.
- Artificial turf can work over a firm base with proper edge restraints and drainage detailing, but plush, high-pile turf can bog down casters and small wheels. Low-pile, tightly backed products with a compacted subbase perform far better for wheelchair users.
- Decking needs board spacing no wider than a quarter inch, a slip-resistant finish, and metal grates or textured surfaces in any spot that collects ice.
Ask for a written warranty on surface firmness, not just material defects, and a maintenance schedule that keeps joints, grout lines, and turf infill in spec year over year. Our own stone walkway installation work on Arkansas clay starts with a soil report before a single paver goes down, because a walkway is only as firm as the ground underneath it.
How Do You Design Around a Steep or Tight Backyard?
Not every lot gives you a flat run from the back door to the patio. When the grade won’t cooperate, you have four real options, and picking the wrong one wastes money fast.
- Regrading makes sense on smaller elevation changes where you can bring the whole yard down to a workable slope without disturbing drainage patterns or neighboring grades.
- Terracing is usually the better call on steeper lots. Terraces break a steep slope into a series of manageable levels connected by short, compliant ramp runs or gentle switchbacks, and they double as retaining structure.
- Vertical platform lifts solve the problem when there simply isn’t room for a ramp long enough to meet the 1:12 slope requirement. Lifts need a dedicated power source and, per VA accessible housing guidance, a backup plan for power outages, since a lift that fails becomes a barrier instead of a solution.
- No-step entries are acceptable where the rise is under 4 inches, but your contractor should document the transition detail and confirm it on the plans, not just build it by feel.
Terraces and retaining walls need drainage built in from day one; a wall that traps water behind it will heave and crack, turning a smooth transition into a trip hazard within a year or two. If your lot has real grade problems, our breakdown of sloped backyard patio solutions and terraced backyard ideas covers the trade-offs in more depth.
How Do You Interview a Contractor for an Accessible Build?
Hiring the right crew comes down to what you ask before the contract, not what you hope for after. Here’s the sequence we’d want a client to run through with any landscaper bidding this kind of work:
- Ask for slope callouts and cross sections on every drawing, not just a finished-grade elevation number buried in the specs.
- Require a materials schedule listing the exact surface product, thickness, and installation method for every route segment and patio.
- Confirm the drawing shows continuous clear widths, passing spaces, and landing dimensions, measured in inches, not described as “generous.”
- Insist on a design walkthrough with the actual user, whoever will navigate the space with a wheelchair, walker, or cane, and have that feedback written into the construction documents. Research on participatory design backs this up directly: user involvement early in the process prevents accessibility from becoming an afterthought bolted on after the concrete cures.
- Ask for references and portfolio examples that specifically show accessible routes, not just attractive patios, and follow up on how those routes have held up over time.
A tool like Veete’s 3D garden planner can help you and your contractor test clear widths and turning radii before anything gets poured, which is a lot cheaper than fixing it after.
What Ongoing Maintenance Keeps a Route Accessible?
A perfectly built route stops being accessible the moment a planter or a stack of firewood blocks it. DOJ Title III guidance is explicit that accessible features have to stay unobstructed, which makes maintenance part of the design, not an afterthought.
- Walk the route seasonally and clear furniture, pots, hoses, and leaf buildup that narrow the usable width.
- Check for frost heave, settled pavers, and drainage issues each spring and fall, since any of these can quietly shrink your clear width or reintroduce a slope you thought you’d solved.
- Inspect surface firmness, handrail integrity, and threshold height once or twice a year, and fix small issues before they become tripping hazards.
We’d recommend building an annual maintenance plan into your contract from the start, rather than treating upkeep as a future decision.
How Should Lighting Support Safe Nighttime Access?
Slope and surface work only matter if the route stays visible after sunset, and lighting is where a lot of otherwise solid designs fall apart. A path that reads perfectly clear at noon can hide a grade break, a joint line, or a threshold edge once the sun drops, and that’s exactly where a cane or wheelchair user needs the most visual information.
Low, even path lighting spaced along both edges of the route works better than a handful of bright fixtures, since consistent illumination avoids the dark gaps between pools of light where a wheel or foot can catch. Fixtures set at a lower height, generally 12 to 18 inches, throw light down onto the surface rather than into a user’s eyes, which matters for anyone with low vision navigating by contrast rather than detail.
Grade breaks, ramp landings, and any change in surface material deserve dedicated fixtures, not ambient spillover from a nearby patio light. That’s where trips happen. Motion-activated lighting near seating areas and entries adds a layer of safety without running fixtures all night, and it flags an approaching visitor or caregiver before they’re right on top of a step or narrow point.
Switches and controls belong at a height reachable from a seated position, generally between 15 and 48 inches off the ground, and within reach of the route itself rather than tucked behind a planting bed. If your property already has a lighting plan in place, it’s worth having a contractor walk the route after dark before finalizing fixture placement. Our woodworking and lighting work often turns up dark spots that don’t show up on a daytime site visit.
How Can Raised Beds Make Gardening Accessible?
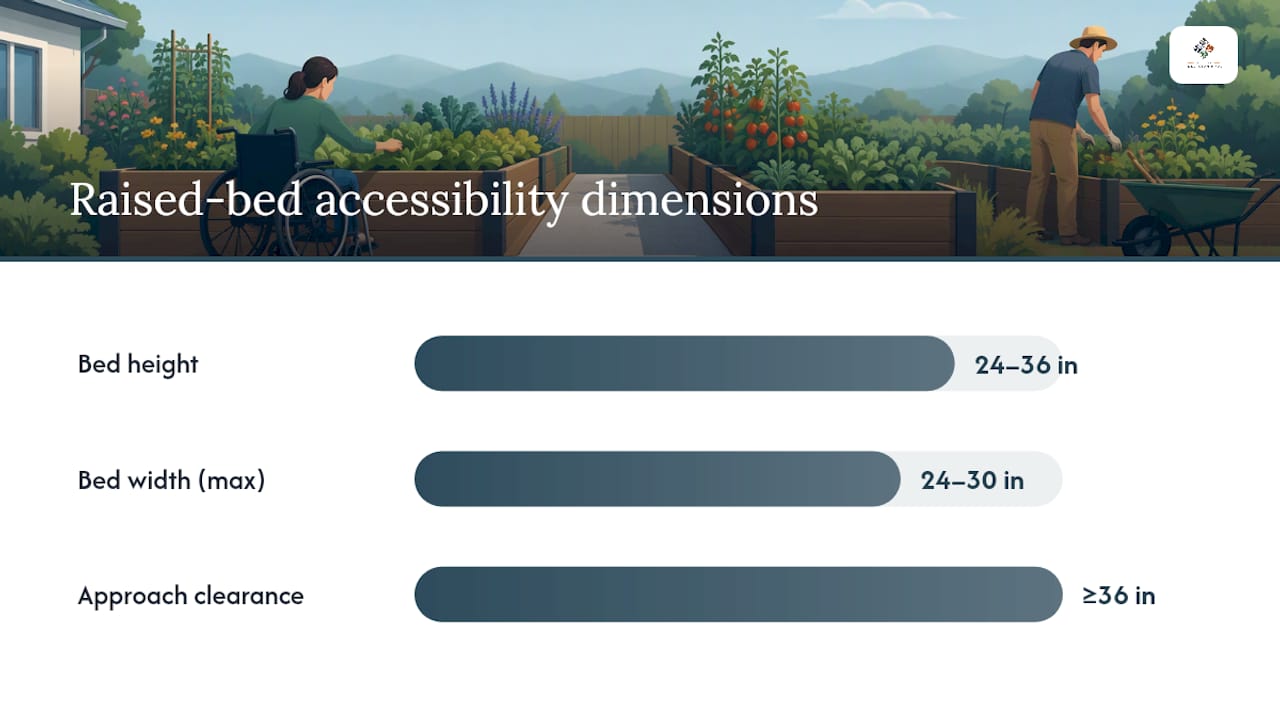
Gardening is one of the outdoor activities people with mobility limitations most want to keep doing, and it’s also one of the easiest to solve for with the right bed height and layout. Raised beds built between 24 and 36 inches high let a seated gardener reach soil without bending or transferring out of a wheelchair, and a width of no more than 24 to 30 inches keeps the center of the bed within arm’s reach from either side.
Leave at least 36 inches of clear, firm surface on all sides of a raised bed so a wheelchair can approach and turn without backing across grass or gravel. That clearance matters more than the bed itself; a beautiful raised planter surrounded by loose mulch defeats the purpose.
Container gardens fill in the gaps a fixed bed can’t, especially on a patio or along a hardscaped edge where digging a permanent structure isn’t practical. Grouping containers at a consistent height, rather than scattering pots of different sizes, makes the whole area easier to scan and navigate for someone with limited vision or reach.
Vertical growing structures, trellises, wall-mounted planters, tiered stands, add planting space without expanding the footprint a wheelchair needs to travel around. For property managers overseeing a shared garden space, standardizing bed height and container placement across the property also simplifies maintenance, since crews aren’t adjusting technique from one planting area to the next.
Where Should Accessible Seating and Rest Areas Go?
Rest areas aren’t a luxury add-on to an accessible backyard. They’re what makes a longer route usable for someone whose stamina or balance limits how far they can go without a break. Place seating at intervals along any route longer than roughly 50 feet, and always at the endpoints, near an entry, at a patio, next to a garden feature people are likely to linger at.
Seating needs a firm, level, and clear approach, the same width and slope standards that apply to the travel route itself, so a bench surrounded by soft mulch or set on a sloped patch of lawn doesn’t actually serve anyone using a wheelchair or walker. Leave a clear space beside or in front of seating, at least 30 by 48 inches, so a wheelchair user can park alongside a companion rather than being stuck at the end of a row.
Seat height between 17 and 19 inches, with sturdy armrests, helps people with limited leg strength sit and stand without assistance. Backless benches look clean in a rendering but offer little support for anyone who needs to push up from a seated position.
Shade matters as much as the seat itself, since heat sensitivity is common among older adults and people managing chronic conditions. A pergola, a mature tree canopy, or even a simple shade sail over a rest area extends how long someone can comfortably stay outside, which is often the whole point of building the space in the first place.
How Do You Design for Sight, Sound, and Touch?
Accessibility isn’t only about wheels and steps. Sensory design broadens who actually enjoys a backyard, particularly people with low vision, hearing loss, or cognitive differences who navigate space through senses other than sight alone.
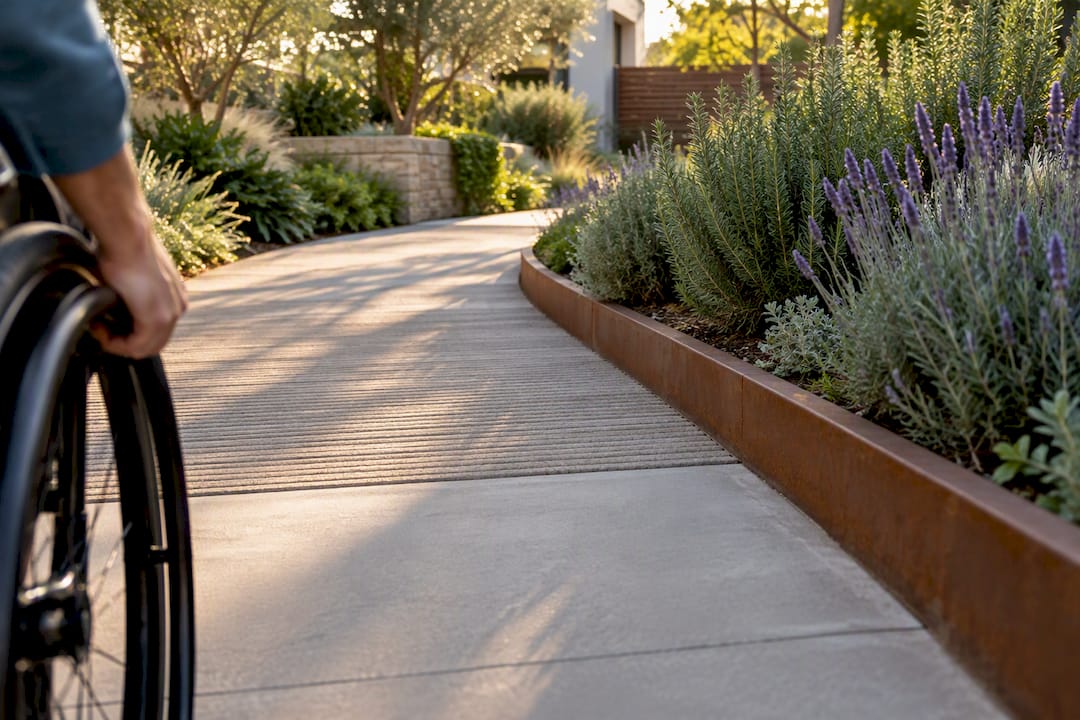
Tactile cues help orient someone who can’t rely on vision to track a route. A change in paving texture, smooth concrete transitioning to a slightly ribbed surface, can signal an approaching turn, a step down, or the edge of a patio, functioning almost like a handrail underfoot. Raised planting beds and low walls along a path give a hand or a cane something consistent to follow.
Scent plants add another layer entirely. Rosemary, lavender, and citrus varieties planted along the edges of a route give someone with limited vision a way to track their location in the garden by smell, and they reward anyone brushing past at wheelchair height rather than at eye level. Place fragrant plantings where hands or wheels naturally pass close by, not just where they look good from a distance.
Sound does similar work. A small water feature near a seating area adds a gentle auditory landmark that helps with orientation and also masks street noise, which matters more than most designs account for. Wind chimes or ornamental grasses that rustle in a breeze add subtle cues without requiring any maintenance beyond normal upkeep.
None of this needs to dominate the design. A few well-placed tactile transitions, a couple of scent plantings along the main route, and one modest water feature usually do more for sensory accessibility than an elaborate sensory garden that tries to do everything at once.
A Note From the Field
We’ve built more than 2,000 outdoor projects, and the ones that hold up as truly accessible are the ones where function got the same attention as the aesthetic from day one, not tacked on after. On our Coronado Backyard Oasis project, solving the slope meant terracing the rear third of the lot and routing a firm, stabilized path around it instead of forcing a straight run down the grade. Before you call anyone, grab a tape measure and a level, and jot down your steepest slope and narrowest gate. That alone saves a contractor a wasted first visit.
Ty
How Village Precision Pros Builds Accessible Backyards
This article is for readers who want the technical standards actually built into concrete, stone, and drainage, not just discussed in a proposal meeting. We specialize in exactly the trades this kind of build requires: hardscape and stone masonry for firm, slip-resistant routes, decks and patios built to accessible spacing and finish standards, landscape and irrigation work that keeps drainage from undermining a route’s firmness over time, and artificial turf installation where a low-pile, firm-base product fits the design.

The right first step is a site visit, not a sales pitch. Ask us to walk the property, measure the actual slopes, and put together a written plan with slope callouts and surface specifications you can compare against the checklist in this article. If your accessible route needs to survive Arkansas winters and summers alike, pair that plan with an annual maintenance plan so the route we build stays the route you can use. Reach out through Villageprecisionpros to schedule that visit.
Standards Worth Handing Your Contractor
- Access Board ABA/ADA Chapter 4: widths, slopes, and clearances.
- Forest Service Trail Accessibility Guidelines: surface firmness and stability.
- DOJ ADA Title III guidance: keeping routes unobstructed.
Compare every drawing your contractor submits against these three documents before signing.
Sources
- Guide to the ADA Accessibility Standards: Chapter 4: Accessible routes
- Forest Service Trail Accessibility Guidelines (FSTAG)
- DOJ resources on ADA Title III accessibility obligations
- Inclusive design and universal-design principles for outdoor activity access (systematic perspectives)
FAQ
What Is the Minimum Width for an Accessible Backyard Path?
A continuous accessible route needs a minimum clear width of 36 inches, with reductions to 32 inches allowed only at short points up to 24 inches long. Wider paths make it easier for two wheelchairs or a wheelchair and a walking companion to pass.
What Slope Turns a Path Into a Ramp?
Any running slope over 5% (1:20) is classified as a ramp rather than an accessible route, and ramps must meet a maximum slope of 1:12 along with handrails and landings. Cross-slope should stay close to 1:48 to avoid a hazardous compound slope.
How Much Does an Accessible Backyard Renovation Cost?
Cost depends heavily on lot slope, surface material, and how much regrading or terracing the site needs, so there’s no single figure that fits every yard. Village Precision Pros provides a written estimate after a site visit and slope assessment rather than a flat rate, since accessibility work is priced by scope, not by square footage alone.
Can Artificial Turf Work in a Wheelchair-Accessible Backyard?
Yes, if it’s installed over a firm, compacted base with proper edge restraints and drainage, low-pile turf performs well for wheelchair and walker users. Thick, plush turf without a firm subbase should be avoided, since it lets casters and narrow wheels sink and drag.