
You can absolutely screen an outdoor AC unit for a cleaner-looking yard, but the screen only works long-term when it respects the manufacturer’s clearance zones and leaves room for service. Build without those constraints in mind, and you risk reduced efficiency, a shortened equipment lifespan, or a technician who can’t reach the unit at all. We design and install these screens for homeowners, and we treat the condenser as equipment first, landscape feature second.
TL;DR:
- Check the installation manual for exact side and top clearances, keep upward discharge unobstructed, and preserve a technician’s tool access lane.
- Use hinged or removable panels instead of a fixed enclosure, mount the screen on a raised base, and grade the ground away from the unit.
- Composite resists moisture and needs no painting but costs more upfront; wood needs periodic sealing, while lattice supports airflow through its gaps.
- Clean the condenser coil seasonally, check filters monthly, and replace them as needed based on system use and manufacturer guidance to maintain airflow.
- Simple freestanding panels on level ground suit do it yourself projects, but drainage repairs and hardscape integration are better left to professionals; blocked clearances can void warranties.
Table of Contents
- Design and material options for hiding a condenser
- Clearances, airflow basics, and maintenance that protects performance
- Where to place your screen and plan for drainage and access
- Construction details that keep screens durable and service friendly
- Should you build it yourself or bring in a professional?
- How we evaluate and build an AC screening project
- Why we put equipment health ahead of curb appeal
- Let us design and build your AC screen the right way
- FAQ
- Sources
Design and material options for hiding a condenser
The right screen depends on your yard, your budget, and how much upkeep you want to take on. Most homeowners choose from a handful of proven approaches, each with its own tradeoffs in durability and airflow management.
- Cedar or redwood slats: naturally resist rot and insects, age to a soft gray patina, and need occasional sealing to stay looking sharp.
- Pressure-treated wood: the most budget-friendly option, but it requires more frequent staining and can warp in humid climates.
- Composite slats: shrug off moisture and never need painting, though the upfront material cost runs higher than wood.
- Powder-coated metal panels: offer a clean, modern look and hold up well outdoors, provided the coating resists chipping near fasteners.
- Lattice panels: lightweight and affordable, with gaps that naturally support airflow if spaced correctly.
- Living hedges: blend into the landscape but demand regular trimming to avoid crowding the unit over time.
For configuration, three-sided screens leave the top and one side open for service and discharge, which works well against a fence line. Slatted panels set on posts give you airflow through the gaps while fully blocking the sightline. A short wall topped with planters dresses up the perimeter without enclosing the unit, and hinged access panels let a technician swing a section open rather than lift a solid frame off its footings. Whatever you choose, the goal stays the same: hide the equipment without trapping heat or blocking the technician’s path to it.
Clearances, airflow basics, and maintenance that protects performance
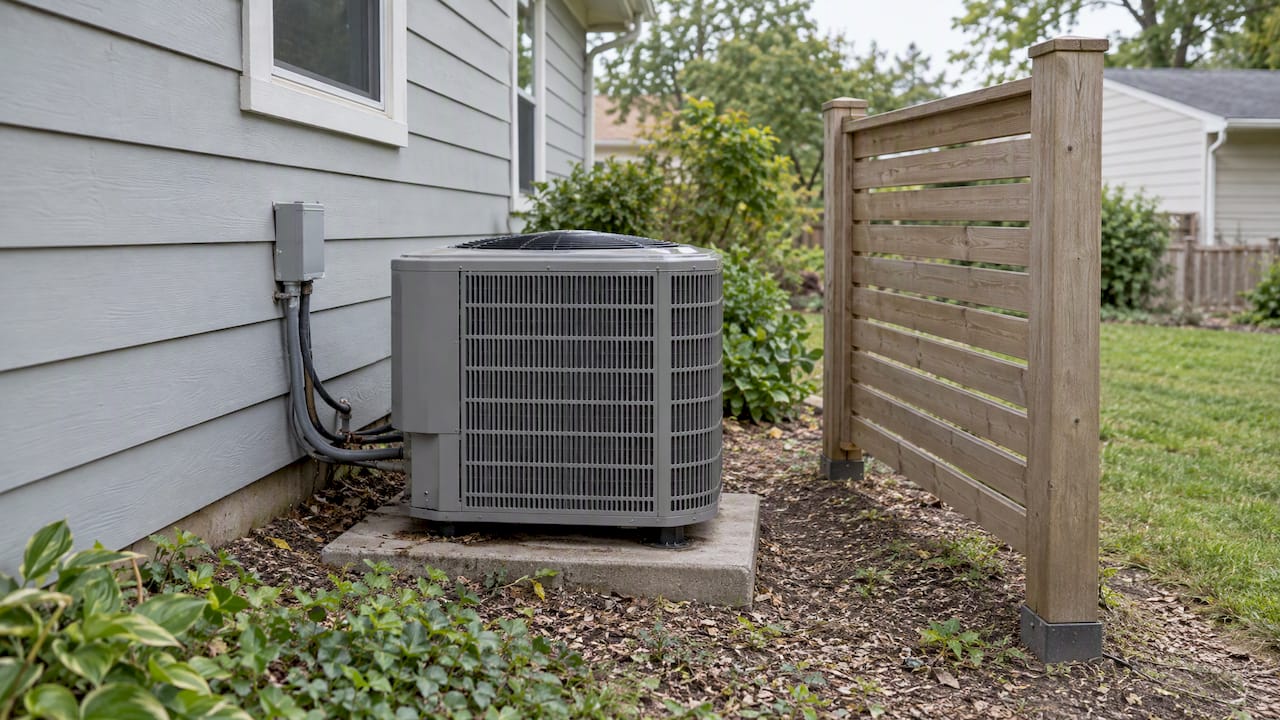
Airflow is what makes a condenser work. A split system pulls air across the coil and discharges it, usually upward or outward, and anything that restricts that path forces the compressor to work harder, which can reduce efficiency and shorten the unit’s life. Manufacturer installation specifications set minimum side and top clearances for exactly this reason, and ASHRAE’s installation guidance confirms that blocking those clearances can meaningfully reduce both airflow and cooling capacity.
Before you build anything, follow these steps:
- Pull your unit’s installation manual and note the exact clearance distances the manufacturer requires on each side and above the unit.
- Keep the top discharge path completely open, since most systems vent upward and depend on that space to exhaust heat.
- Leave a clear access lane wide enough for a technician to carry tools and a condenser fan motor if needed.
- Check the condenser coil for debris and clean it seasonally, since dirt buildup fights against any airflow your screen design preserves.
- Replace or check your filter on the schedule your system calls for, since a clogged filter undercuts efficiency regardless of how well the outdoor unit is screened.
Filters should be checked monthly and replaced as needed according to your system’s usage and manufacturer recommendations, according to ENERGY STAR’s maintenance checklist, and skipping that step raises energy costs and wears down equipment faster than most homeowners expect.
Where to place your screen and plan for drainage and access
Siting the screen correctly prevents problems before they start. Avoid tucking the unit into a tight corner where heat collects, and keep it away from downspouts or splash zones that can pool water against the housing.
- Position the screen so one side stays fully open for a technician to approach with tools.
- Use hinged or removable panels rather than a fixed, four-sided box, so servicing never requires disassembly.
- Grade the area slightly away from the unit to prevent standing water from collecting around the base.
- In colder climates, use a breathable cover for the top only during off-season storage, never a tight wrap that blocks vents.
- If you choose a living screen, keep shrubs trimmed back at least as far as the manufacturer’s clearance requires, since unchecked growth is the most common airflow problem we see.
Pro Tip: Site the screen’s access panel away from prevailing winds, so debris doesn’t collect against the opening you’ll need every service visit.
Construction details that keep screens durable and service friendly
A well-built screen stays low-maintenance and never interferes with the unit it protects. Stainless steel or coated hardware resists corrosion near the condenser’s own condensation and outdoor moisture, where standard fasteners rust and stain the wood around them.
- Mount panels on a raised platform or vented base so soil, mulch, and moisture never touch the unit directly.
- Design at least one panel to lift out or swing open completely, giving technicians full access without tools beyond a screwdriver.
- Finish wood with an exterior-grade stain or sealant rated for ultraviolet and moisture exposure, reapplied every couple of years.
- Keep mulch and planting beds several inches back from the unit’s base, since organic material against the housing traps moisture and invites corrosion.
Framing screens into existing hardscape work, like a paver landing or short retaining wall, also makes the access panel feel like part of the design rather than an afterthought.
Should you build it yourself or bring in a professional?
A simple slatted panel screen on level ground is a reasonable DIY weekend project if you’re comfortable with basic carpentry and you have your manual’s clearance numbers in hand. Projects that involve grading, drainage correction, integration with a patio or retaining wall, or living screens near property lines are where professional help earns its keep.
- DIY-friendly: a freestanding lattice panel or simple three-sided wood screen on flat, well-drained ground.
- Better left to a pro: screens tied into hardscape, sites with drainage issues, or any installation near an HVAC warranty you want to keep intact.
Improper placement or a screen that blocks required clearance can void a manufacturer’s warranty and shorten the unit’s service life, so when a project touches your HVAC equipment directly, it’s worth getting it right the first time. For homeowners who want design and installation handled from start to finish, we offer full-service screening as part of our broader hardscape and outdoor design work.
How we evaluate and build an AC screening project
On every site visit, our crews walk through the same checklist before the first board goes up:
- Measure and document the manufacturer’s required clearances on all sides and above the unit.
- Plan a removable or hinged access panel sized for standard service tools.
- Confirm the surrounding grade drains away from the unit rather than toward it.
- Select materials matched to the client’s climate exposure and maintenance preference.
- Set a maintenance reminder for coil cleaning and filter checks that lines up with the new screen’s access points.
We’ve applied this same approach to pool equipment screening across Central Arkansas, where airflow and service access matter just as much as they do for an AC condenser. If you want a plan built around your specific unit and yard, request a site evaluation and we’ll walk the clearances with you before we design anything.
Why we put equipment health ahead of curb appeal
Here’s where we land after building these screens for years: aesthetics matter, but they’re the second decision, never the first. A beautiful screen that chokes airflow costs you more in reduced efficiency and early equipment failure than an unscreened unit ever would. When a clearance number in your manual conflicts with the design you had in mind, the manual wins, and when you’re not sure how a modification affects your warranty, a quick call to your HVAC manufacturer or a landscaping professional saves you from an expensive guess.
— Ty
Let us design and build your AC screen the right way
We handle AC unit screening as part of our broader hardscape and woodworking services, which means your screen gets built with the same attention to drainage, materials, and long-term durability as a patio or retaining wall. Our work spans custom woodworking panels, hardscape integration for screens tied into a paver landing or short wall, drainage corrections for sites where water pools near the unit, and annual maintenance plans that keep coil cleaning and panel upkeep on schedule.

- Custom-built screens using cedar, composite, or metal panels matched to your home’s style.
- Hardscape integration that frames the access panel into a patio, wall, or walkway.
- Drainage and grading adjustments through our landscape and irrigation services.
- Ongoing maintenance plans covering coil access and panel upkeep.
If vegetation or old growth needs clearing before we start, we also work alongside land clearing partners like Cornelius Wrecking for larger site prep needs. Ready to get your unit screened properly? Request a consultation on our hardscape and stone masonry page and we’ll start with a clearance check and a design built around your yard.
FAQ
How to test if an AC unit is working?
Check that cool air is coming from your vents, that the outdoor unit’s fan is spinning, and that you hear the compressor running without unusual noise. If airflow feels weak or the unit cycles on and off rapidly, a blocked filter or restricted clearance around the condenser is a common cause worth checking first.
How to hide a window AC unit?
Window units are typically screened with a decorative exterior cover or a planter box positioned to the side rather than directly in front of the airflow path. Keep any screen a few inches from the unit’s housing, since window air conditioners can leak air around their edges and sealing those gaps matters more than concealing the unit itself, according to a Building Technologies Office case study.
Will AC not cool if the filter is dirty?
A dirty filter restricts airflow across the coil, which reduces cooling capacity and forces the system to run longer to reach the same temperature. Central systems only filter and condition air while running, so a clogged filter compounds the problem the longer it goes unreplaced, per EPA guidance on air cleaners.
What is the $5000 rule for AC?
This isn’t a standard industry term we can confirm with a specific definition, and it doesn’t appear in manufacturer or ASHRAE installation guidance. If you’ve heard the phrase from a contractor, ask them directly what calculation or policy they’re referencing before you rely on it.