

Voltage drop is the loss of voltage as current travels down the wire away from the transformer. It is why the last fixture on a run looks dim, yellow or flickers while the first one looks fine. The fix is almost always design, not new bulbs: heavier wire, shorter or split runs, a transformer with the right taps, and a load that fits the transformer. This guide shows you the numbers and the order we work through them.
TL;DR
- Keep every fixture at the end of a run between 10.8V and 12V on a 12V LED system, and keep total circuit drop at or under 5 percent.
- Wire gauge, run length and total wattage decide the drop. Doubling the wire length roughly doubles the loss.
- Fix a weak run by stepping up to 12-gauge or 10-gauge wire, splitting the run, looping it, or moving to a higher transformer tap.
- Size the transformer so the connected load stays near 80 percent of its rating, and never over-volt a whole run to rescue one fixture.
- Long, branching or hardscape-heavy layouts are worth designing before anything is buried. We do that across Central Arkansas.
Table of Contents
- What voltage drop actually is
- How much voltage drop is acceptable
- The math, with a worked example
- 12V or 24V: what changes
- Fixes, in the order we try them
- Transformer sizing: how big, and why it affects drop
- What we do on Arkansas properties
- How to check your own system
- Mistakes that create voltage drop
- When wireless is a reasonable alternative
- Where we can help
- FAQ
- Sources
What voltage drop actually is
Copper wire resists the flow of electricity. Every foot of cable takes a little voltage away, and the loss adds up along the run. Voltage drop is cumulative, which is why it shows up as dimmer light at the far end of a run rather than at the first fixture.
Three things drive it:
- Distance. Current travels out and back, so the loss counts the wire twice.
- Load. More watts on the run means more amps, and more amps means more loss.
- Wire gauge. A thicker conductor has less resistance. Lower AWG numbers are thicker wire.
A low-voltage system is more sensitive to this than a household circuit. Low-voltage landscape lighting uses a transformer to step line power down to about 12 volts, so losing even one or two volts is a big share of what the fixture receives.
How much voltage drop is acceptable
Two targets work together.
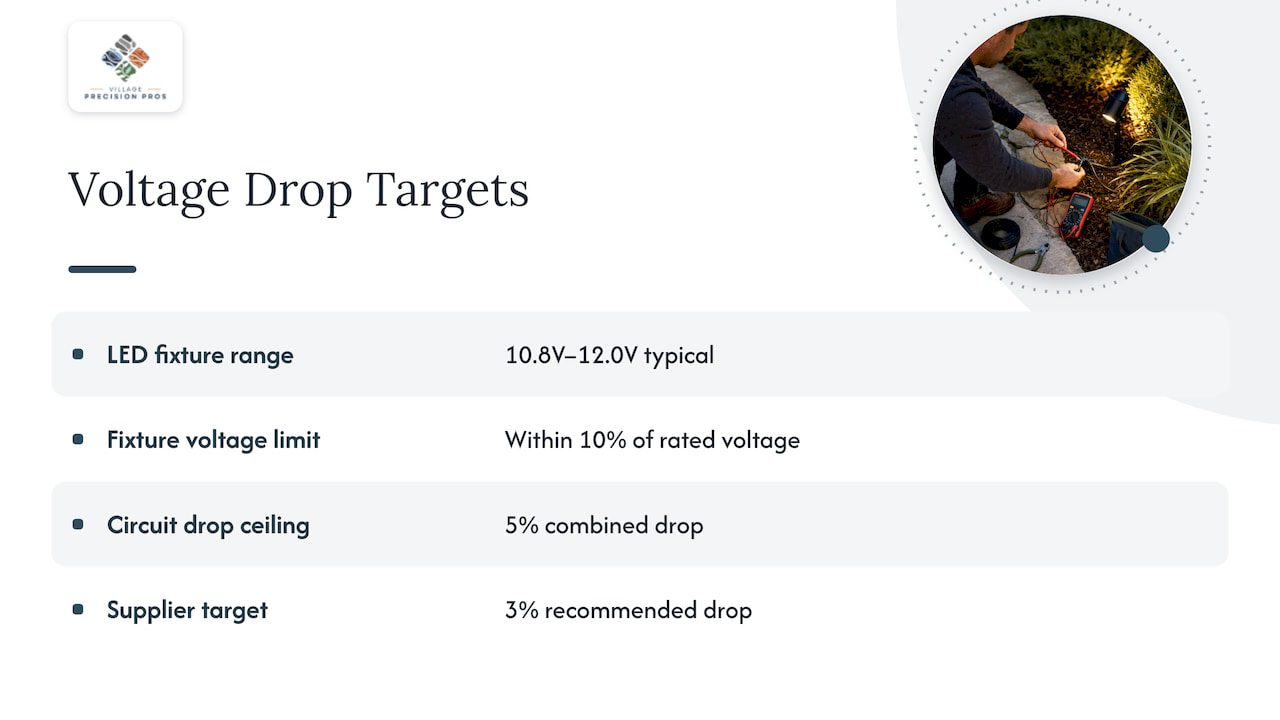
First, the fixture itself. For modern LED fixtures, the ideal operating range at the fixture is typically 10.8V to 12.0V. Below that you tend to see dimming, color shift or flicker. Another low-voltage design guide frames the same idea as keeping every fixture within 10 percent of rated voltage, so no fixture drops below 10.8V on a 12V system.
Second, the circuit. Engineering standards commonly cap combined voltage drop at 5 percent from the source to the farthest load. That figure comes from building energy codes for larger electrical systems, so treat it as a ceiling rather than a landscape lighting rule. Lighting suppliers are tighter. One contractor calculator says to stay at 5 percent or less and recommends 3 percent.
Our working rule: aim for the last fixture to land comfortably inside 10.8V to 12V, and treat anything near the edge as a redesign, not a pass.
The math, with a worked example
The basic formula used by most calculators is: voltage drop equals 2 times the length in feet, times the amps, times the wire resistance in ohms per foot. CalcForDIY shows the same formula per 1,000 feet of cable. Amps come from watts divided by volts.
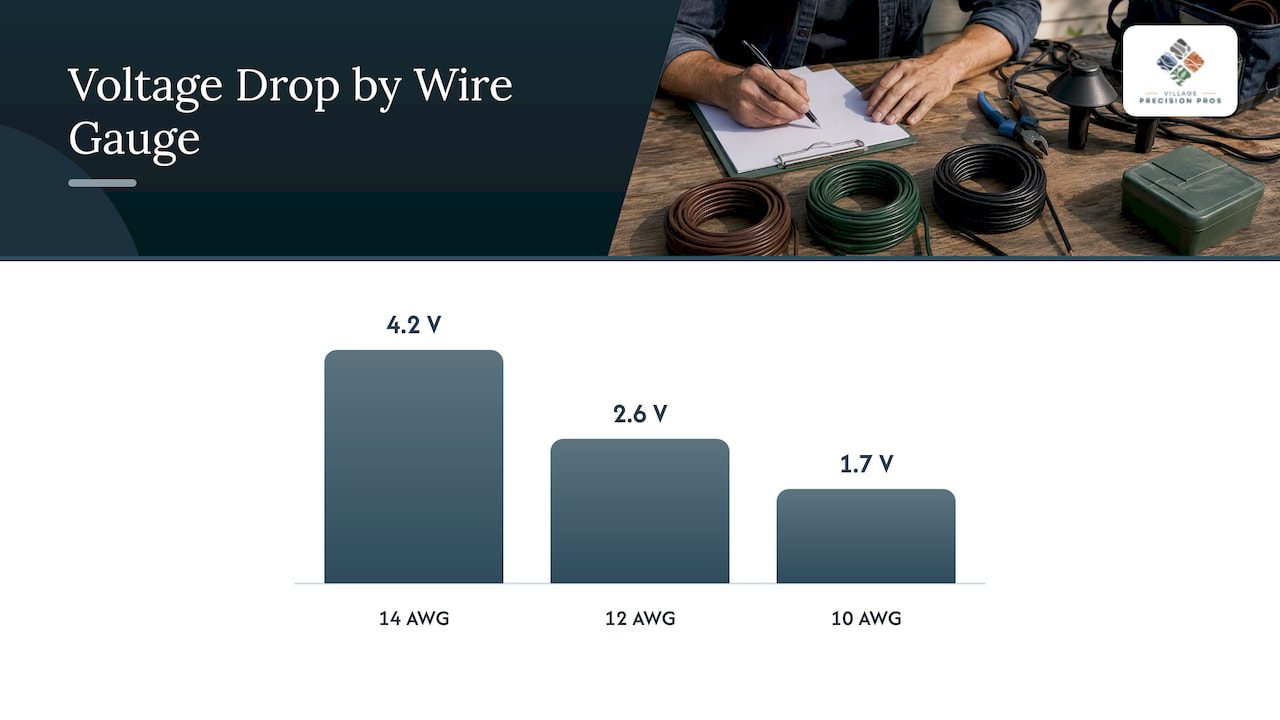
Here is our own arithmetic for a single concentrated load, the worst case. Take 100 watts of LED fixtures at the very end of a 100-foot run on a 12V system. That is about 8.3 amps. Using typical copper resistance values:
| Wire gauge | Approx. resistance (ohms per 1,000 ft) | Drop over 100 ft at 8.3 A | Voltage at the end of a 12V tap |
|---|---|---|---|
| 14 AWG | 2.53 | about 4.2V | about 7.8V |
| 12 AWG | 1.59 | about 2.6V | about 9.4V |
| 10 AWG | 1.00 | about 1.7V | about 10.3V |
Even 10-gauge fails the 10.8V target in that worst case. That tells you something useful: the answer is rarely one change. You combine a heavier wire with a higher tap, a split run, or a lighter load.
Real layouts are kinder than the worst case, because fixtures are spread along the wire. When fixtures are daisy-chained, the load is spread out and practitioners use an N+1 over 2N factor so the effective drop is roughly half of what the same wattage would cause at the end. The same page gives a sample case: a 60-watt load over 75 feet on 12/2 wire drops about 0.6 volts, or 4.9 percent of source voltage. That is why a run of evenly spaced path lights behaves very differently from the same wattage in one cluster at the far end.
Temperature matters too. Copper resistance rises with heat, and handbook values assume 20 degrees Celsius. Professional design tools use a 40 degree design temperature, which adds roughly 8 percent to the calculated resistance. In an Arkansas summer, with sun-baked soil and mulch beds, that margin is worth building in.
12V or 24V: what changes
We get asked whether a higher-voltage system avoids the problem. The physics is on its side: for the same wattage, a 24V system pulls half the amps, and drop scales with amps, so the same wire carries the load much farther. The tradeoff is fixture compatibility. Your fixtures and drivers have to be rated for 24V, or for a wide input range such as 12 to 24V, and you cannot simply feed 24V to a 12V-only fixture. Check the spec sheet of each fixture before deciding.
For most residential yards, a well-designed 12V system with the right wire and taps performs perfectly. A 24V or wide-range approach earns its place on long frontage, large lots, or lakefront properties where runs stretch past what even heavy wire handles comfortably.
Fixes, in the order we try them
1. Use heavier wire
Switching to 12-gauge wire for runs beyond about 50 feet is one of the most effective proactive choices, and for longer or heavier runs 10-gauge is the next step. One manufacturer guide suggests 12-gauge for runs up to roughly 100 feet at 100 watts or less, with 10-gauge past about 150 feet. Treat those as starting points, then check them against your actual load.
2. Split long runs into more than one circuit
Rather than stretching one cable around the whole property, give the back yard, the front walk and the driveway their own home runs from the transformer. Very long runs, around 200 feet and beyond, are good candidates for splitting into multiple circuits. Each leg stays short, each leg can be tapped separately, and a fault in one leg does not take down the rest.
3. Loop the run
Feeding both ends of a run from the transformer, instead of one direction only, effectively cuts the drop in half. It lets you reach farther without stepping up to much thicker cable. It works best on a perimeter or a long path that returns toward the equipment.
4. Use the transformer taps
Multi-tap transformers let you pick an output voltage for each run, commonly from 12V up to about 22V. A short run gets a low tap. A long run gets a higher tap to compensate for the drop. The Tucson calculator page describes a tap range of 12 to 22V for exactly this reason.
The warning is as important as the technique. The common mistake is to over-volt an entire run to brighten one distant fixture, which can cause premature failure or overheating in the fixtures nearest the transformer. Balancing a tap is a precision task. Measure, adjust, and measure again.
5. Rebalance the load
Move a heavy fixture, such as a high-output flood, nearer the transformer end, or put it on its own run. Swapping older halogen lamps for LED reduces wattage so dramatically that many struggling legacy systems stop dropping voltage with no wiring change at all.
Transformer sizing: how big, and why it affects drop
Transformer sizing and voltage drop are connected. An overloaded transformer sags, and you cannot tap your way out of a transformer that is simply too small.
Here is the sizing method we use:
- Add up the fixture load. Use the VA rating from the manufacturer where given. For LED, VA and watts are often nearly identical.
- Divide by 0.8. A common field practice is to keep a continuous load under about 80 percent of the transformer’s VA rating. That page also notes that code provisions for continuous loads size conductors and overcurrent protection at 125 percent of the load.
- Round up to the next standard size. Leave headroom for the fixtures you will add in two years.
- Check the run split. Make sure each run’s load stays inside what the wire gauge handles at its length.
A quick example: 160 watts of LED fixtures divided by 0.8 is 200. A 200-watt transformer fits, and a 150-watt unit does not. Similar calculators such as CalcForDIY build in a 20 percent margin for the same reason.
What we do on Arkansas properties
Our experience is that most dim-light calls are not bad fixtures. They are layouts that were never calculated. Someone bought a kit, buried 16-gauge wire in a long loop around the lot, and hung every fixture on a single run. We design the runs first: where each home run leaves the transformer, which wire gauge each leg gets, and which tap it needs. We then verify the voltage at the farthest fixture before anyone puts the mulch back. On properties with patios, pavers or stone walls, we plan conduit and sleeves before the hardscape goes in, because cutting a finished patio to pull one wire is the costliest way to fix a lighting problem. We treat lighting as a permanent part of the landscape, with weather-proof connections, correct wire sizing and manufacturer specifications followed, not as a weekend add-on.
Ty
If you want to see how we think about layout, our piece on landscape lighting layout around finished hardscape goes deeper, and our landscape lighting design rules cover fixture placement.
How to check your own system
You do not need to be an electrician to find out whether voltage drop is your problem. You do need a multimeter and some care.
- Turn the system on after dark, or cover the photocell, so everything is running at full load.
- Measure voltage at the transformer’s output terminals for the run you are testing.
- Measure at the socket or lead of the first fixture and then the last fixture on that run.
- Compare. If the last fixture reads below 10.8V on a 12V LED system, you have a drop problem. If the first fixture reads well above 12V, you may be over-volted already.
If the lights flicker rather than just dim, the cause can be a bad connection instead of drop. Our walkthrough on how to test flickering landscape lights under load separates the two. If you are weighing a do-it-yourself install, read our low voltage outdoor lighting installation guide first.
Two cautions where you act. Turn off power at the transformer’s input before touching any connection, and have a licensed electrician handle anything on the 120-volt side of the transformer, including adding or moving a receptacle. Low voltage is gentler than line voltage, but the primary side still carries line current.
Mistakes that create voltage drop
- Daisy-chaining a whole property on one cable. It is the most common cause of a dim far end.
- Using 16-gauge or 14-gauge wire for a long run because it came in the kit.
- Ignoring the load added later. One extra spotlight on an old run can push it over the edge.
- Poor splices. Crimp or twist connections that are not sealed corrode in damp soil and add resistance of their own. Quality systems depend on weather-proof connections.
- Setting the tap by guess. Without a meter, you are guessing.
- Skipping the transformer margin. A transformer running at its limit all night runs hot and sags.
When wireless is a reasonable alternative
Some spots are simply too far or too awkward for a wired run: a remote corner of a lot, a single accent on a far fence. Solar fixtures avoid the cable entirely, and a guide to cable-free garden lighting options walks through what works and what does not. Solar lights are lower in output and depend on sun exposure, so they suit accents rather than primary path or security lighting. For the main system, a properly designed low-voltage circuit remains the dependable choice.
Where we can help
Village Precision Pros has served Central Arkansas since 2020, and lighting often goes hand in hand with the rest of the outdoor work we do: patios, pathways, stone masonry and woodworking features. Planning wire and conduit alongside that work means no cutting finished surfaces later. See our Hardscape and Stone Masonry service and our woodworking and lighting services, or read about outdoor lighting for Arkansas landscapes. When a system is installed, our annual maintenance plans keep the property in shape over the years. Contact us through our website to talk through your property.
FAQ
How much voltage drop is there in 100 feet?
It depends on wire gauge and load, so there is no single number. As our worked example shows, 100 watts concentrated at the end of 100 feet of 12-gauge wire loses about 2.6 volts, while the same load spread along the run loses far less. Run the numbers for your fixtures instead of guessing.
What is the acceptable voltage drop for landscape lighting?
For 12V LED systems, keep each fixture between 10.8V and 12V. Keeping total circuit drop under 5 percent is a common engineering ceiling, and many lighting suppliers recommend 3 percent. If the last fixture falls below 10.8V, redesign the run.
How do I fix voltage drop in LED landscape lights?
Start with heavier wire, then split or loop long runs and raise the transformer tap for the affected run. Reduce the load on that run if needed. Avoid over-volting the whole run, because the first fixtures can overheat.
What size transformer do I need for landscape lights?
Add the fixture VA, divide by 0.8, and round up to the next standard size. For 160 watts of fixtures that points to a 200-watt unit. Leave room for future additions.
Is 24V better than 12V?
For the same wattage, 24V draws half the current, so the drop is lower over distance. It only works if your fixtures are rated for 24V or a wide input range. For short and medium runs, 12V with the right wire does the job.
Sources
- CalcForDIY: Low-Voltage Landscape Lighting Transformer & Wire Calculator
- Dauer Manufacturing: Voltage Drop & Wire Gauge Guide
- California Energy Commission: Electrical Power Distribution
- SiteOne: Voltage Drop Calculator
- Tucson Electrical Solutions: Landscape Lighting Calculator
- Low Voltage Landscape Lighting installation guide
- ExpertCE: Calculating Transformer Size for Low Voltage Landscape Lighting
- Central Seminary: low-voltage lighting guidance